Most documents are printed on a desktop printer. Desktop printers can be used to proof drafts of a document before printing on an imagesetter, or to create camera-ready copy. Printing on a desktop printer is the same regardless of whether the printer is a PostScript or non-PostScript printer, and whether you're using a custom or Preferences driver. See the preceeding sections on configuring your printer.
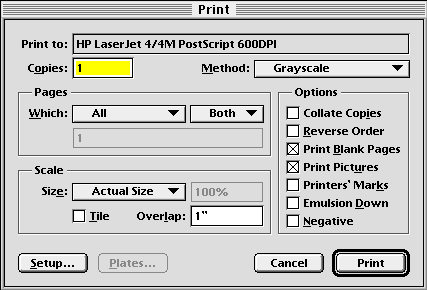
1. Choose Print from the File menu.
The Print dialog box will open to allow you to choose a variety of printing options. If you did not configure your printer before choosing Print, Click Setup now to access the Print Setup dialog box.
2. Set the number of copies.
Enter the number of copies to print into the Copies text box.
3. Set which pages to print.
The Which pop-up menu controls which pages will be printed. Choose All to print all the pages in the document, Chapter to print all the pages in the current chapter, Page to print just the current page, or Range to print a range of pages. When you print a range, enter the starting page number, a dash, then the ending page number. You can print discontinuous page ranges by separating them with a comma.
4. Choose how to print the page.
Choose Grayscale from the Method pop-up menu for black and white printers and Color for color printers.
5. Click Print.
Crop marks, registration marks, slur gauges, density control bars, gray balance patches, trapping patches and page information are referred together as printers' marks. You can toggle on printers' marks in the Print dialog box, but only crop and registration marks will print to non-PostScript.
| Mark | Description | Purpose |
| Crop marks | Lines at the page corners | To aid in trimming the page to its final size. |
| Registration marks | Bulls-eyes at the top and bottom | These are used by commercial printers to align color separations correctly. |
| Density control bar | Swatches in 10% increments | These are used to verify that the inks are printing at the correct at the bottom right density. Separate control bars will be printed for each plate. |
| Gray balance patch | Two swatches above the density | This is used to ensure proper midtone color balance. The dot control bars percentages are 50% cyan, 41% magenta and 41% yellow. Compare the gray balance patch to the 50% gray patch to its right. (color and process separations only) |
| Trapping patches | Swatches above the gray patch | These are used to evaluate the ink acceptance in wet-on-wet printing when multiple inks are printed simultaneously. (color and process separations only) |
| Slur gauges | Targets in upper right and bottom left | These are used to ensure that the press pressure is set correctly. Slur gauges fill in if the pressure is too great. They can also be used as a second set of registration marks. (PostScript only) |
| Page slug | Text at the bottom left | The first line lists the project filename, page number and date. The second line contains the separation (ink) name, screen frequency, angle and scale. (PostScript only) |
Printers' marks require an extra 0.5" (12.7mm) on each side of the page. A letter size (8.5 x 11") page requires 9.5 x 12" to print. If the printers' marks cause the page to be too big for printing drafts on the paper in your printer, print at a reduced scale or in tiles.
If you are making changes to your document, you may want to print only a quick draft. You may not even want to read the text; instead, you may want to see the pages at a small size in relationship to other pages. PageStream allows you to print your page without pictures to create a quick draft copy, and can print multiple pages at thumbnail size on one piece of paper.
To print a proof of a document: Deselect Print Pictures in the Print dialog box. PageStream will print pictures as boxes with a cross on them. This will speed up printing but will still demonstrate the page layout.
To print thumbnails for a document: Choose Thumbnails from the Scale pop-up menu in the Print dialog box. Enter the size of the thumbnails in the text box to its right. The size of the thumbnails determines how many will print on a page and must be less than 45%.
PageStream allows you to create documents much larger than any printer. If you need to print an oversized document such as a poster or banner on a desktop printer, you can use PageStream's automatic tiling feature to print pieces of a page which you can paste together.
Tiling can only be used in conjunction with a scale of Actual Size or Custom. If you select Reduce to Fit or Thumbnails, the Tile option will be toggled off.
To tile a page: Select Tile in the Print dialog box. You can change the default tile overlap if you wish.
PostScript printers can fail to print a page for a variety of reasons, including insufficient memory and EPS objects containing illegal instructions. Printers do not automatically report the error type, but PageStream allows you to include an error handler with your documents that will print a page listing an error message.
To include the error handler when printing, toggle on the Error Handler checkbox in the Print Setup dialog box. Do not include the error handler for all documents, because it must be sent to the printer with each document, slowing down printing. Only use it when you have an unidentified PostScript problem.