Hexen II Demo
Table of Contents
The Chronicle of Deeds
Technical Help
The Chronicle of Deeds
It was precisely one year ago that
Eidolon came to our world of Thyrion. On the evening before his
arrival, a rain of fire streamed down from the sky, scorching
citizens and buildings alike on the four continents of our fair
planet. By dawn the populace was fearful and demoralized, and
they fell quickly before the march of Eidolon’s vile Golems.
The attack was bold and carefully executed. All four continents
had fallen by midday: a sad tribute to the withered resistance of
our four mighty nations. Even now I am shamed to think of it.
Now, a full year after the conquest,
Thyrion still huddles in a state of constant fear and dread. The
conquest has ended, and many humans yet survive–but in these
times of trouble, life itself is a meager blessing.
Eidolon’s minions overrun the land and kill its populace for
sport. The cleverest humans make themselves unobtrusive, avoiding
Eidolon’s creatures and attempting little more than to
survive. It is under these dreary conditions that I write the
manuscript you now hold in your hands.
The Servants of Eidolon
In the year since Eidolon’s first
conquest, many strange and deadly creatures have stalked
Thyrion’s shores. So that the reader might comprehend the
might of Eidolon’s army, I shall spare a few brief pages
documenting the nature of these creatures.
 Scorpion Scorpion
Eidolon has bent a race of giant Scorpions to his will.
These creatures are truly horrific: their deadly sting,
combined with their variable size, force the citizens of
Thyrion to continually watch their step. There are two known varieties of
Scorpion: the pale Sand Scorpion, which fights viciously
but lacks the strength of its darker cousin, and the
glossy black Bog Scorpion, whose attacks are notoriously
deadly. Both are best avoided.
|
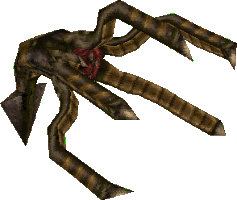
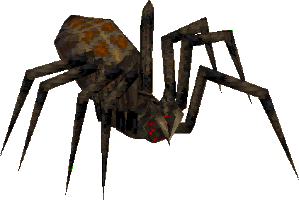 Spider Spider
Just as Eidolon has turned Scorpions into his
footsoldiers, his race of giant Spiders is a plague upon
the land. Like Golems, they come in many different sizes.
There are two distinct varieties of spider, each with its
own color scheme. One sports a black and yellow
coloration, while the other is a muddy brown or red. The
black spider is reputed to be the deadlier of the two,
but the red variety is still a dangerous foe. |
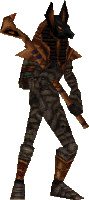
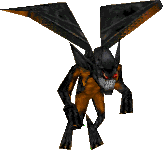 Imp Imp
Among the weakest of Eidolon’s minions, Imps are
nevertheless vicious adversaries. Imps have been sighted
in both the coldest and hottest of Thyrion’s climes.
There seem to be two distinct varieties, each best suited
for a particular extreme of temperature: the Fire Imp and
Ice Imp. They are quite similar in physiognomy, though
the Ice Imps’ bodies are a frosty blue, and the Fire
Imps exhibit a ruddy coloration. Imps fly upon leathery bat wings and
attack their hapless victims with magical projectiles of
ice or fire–or with vicious, swooping dives. They
are fragile but extremely quick, and thus quite difficult
to kill.
All four continents of Thyrion
are currently plagued with Imps.
|
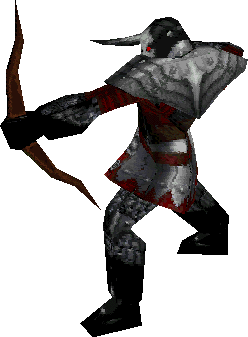 Knight
Archer Knight
Archer
Eidolon’s minions include a number of human and
semi-human followers. In particular, Eidolon seems to
favor the cadres of deadly archers who heed his beck and
call. The continents of Thyrion veritably swarm with
roving Knight Archers, each seeking to prove his worth by
slaying a foe of Eidolon’s empire. Knight Archers occupy the middle range of
Eidolon’s minions, both in terms of commonality and
power. Their swift arrows can be deadly, while at close
range these archers are forced to punch at their
opponents.
Knight Archers fire enchanted
arrows of two varieties. The standard Archer arrow emits
a greenish glow and deals considerable damage to its
target. The alternate type of arrow glows luminous red,
and knocks the archer’s foes backward with great
force while causing an equal amount of damage as the
green arrows. These red arrows are deadly tools, as they
allow the Archer to buffet nearby foes back to long
range–thus maintaining the optimum distance for
successful archery.
Occasionally the traveler may
encounter commanders of Knight Archer regiments. These
men, known as Archer Lords, are considerably more skilled
(and therefore deadlier) than their common minions.
|
 Hydra Hydra
Even as the lands of Thyrion were being subverted by
Eidolon’s minions, the waters were likewise
undergoing a horrific change. Sinewy, tentacled Hydra now
prowl the dank waters surrounding Eidolon’s
strongholds, promising violent death for the unwary
swimmer. Hydra can rip a
victim to shreds with their wickedly barbed tentacles.
When their prey is too far to grapple with, they spit a
corrosive bile that sears the skin and even tarnishes
metal.
It’s a common misconception
that Hydra can harm people on land. While all agree it is
true that Hydra cannot leave the water, some claim they
can rear above the water line and spit their bile at
humans near the water’s edge. The truth of this
frightening story remains to be seen.
|
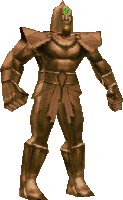 Golem Golem
Golems were the mainstay of Eidolon’s first assault
on Thyrion. These colossal automatons are both durable
and formidable, winning many battles through sheer
intimidation. The typical Golem stands twice the height
of a man, and moves with measured, ponderous steps.
Golems come in many sizes, however. There are reports of several distinct
types of Golem. Though different varieties may appear on
several continents, there are definite concentrations of
particular types on each continent. The mid-sized Iron
Golem, a ponderous creature of iron and lead, plagues the
castles of Blackmarsh and jungles of Mazaera. Deadly and
massive Bronze Golems tread the paved streets of
Septimus, while the relatively diminutive Stone Golems
prowl amongst the pyramids of Thysis.
All Golems love hand-to-hand
combat, where they can crush opponents under their
massive, nerveless feet. Additionally, the larger Iron
and Bronze Golems fire a deadly blast from magical gems
set in their foreheads.
The main challenge in fighting
Golems is to deal enough damage to destroy them. There
are tales of agile warriors who evaded Golems’
attacks with ease, but eventually grew tired of hacking
at their durable opponents, and were forced to give up
and run.
|
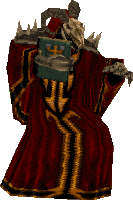 Skull
Wizard Skull
Wizard
No one knows the origin of the Skull Wizards. What is
known, however, is that they posses immense magical
power. Skull Wizards serve as generals and councilors to
Eidolon, advising him in arcane matters and overseeing
the gradual destruction of Thyrion. Skull Wizards are masters of summoning.
Instead of directly attacking their foes, they like to
summon lesser creatures to do battle in their stead.
Spiders are reputedly their favorite subjects.
When pressed, however, a Skull
Wizard is not incapable of defending itself. It can
summon a magical skull to fire at enemies, and it
teleports short distances whenever it feels genuinely
threatened.
Even in death, the Skull Wizard
is deadly. It is said that a dying Skull Wizard does not
truly die, but instead is transmuted into a host of giant
spiders.
Finally, it is said that the
Skull Wizard is merely a lesser form of an even mightier
creature, the Shadow Wizard. None have seen a Shadow
Wizard and lived to tell of it, but the rumors are so
persistent that its existence seems likely.
|
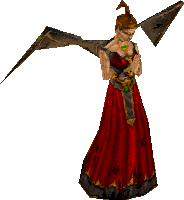 Fallen
Angel Fallen
Angel
Fallen Angels haunt the decaying castles of Blackmarsh.
Ghostly and ethereal, they possess a surreal, deceptive
beauty. But beware! Fallen Angels rank among
Eidolon’s most deadly minions, and harbor no love
for humans despite their charming appearance. Fallen Angels use magic to harm their
foes. Common attacks include magical bursts that seem to
originate from the Angel’s translucent wingtips, and
a crimson, spiraling bolt of magic that rends everything
in its path.
When attacked, the Fallen Angel
is more than capable of protecting itself. Naturally hard
to see due to their ghostlike transparency, Fallen Angels
further confound their opponents by flying to and fro.
When seriously threatened, the Angel can enfold itself in
its own wings to ward off damage.
|
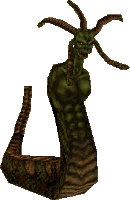 Medusa Medusa
Medusa roam the great cities of Septimus, inspiring fear
in all who tread those flagstoned streets. A
startling combination of woman and snake, the Medusa
is capable of turning her prey to stone with a mere
glance. Her head is crested with snakes instead of hair,
and these snakes spit venom that sears the unwary target.
Little else is known of
Medusa, for very few humans have seen one and lived to
tell of it.
|
 Mummy Mummy
Travelers in the deserts of Thysis must constantly be
wary of Mummies. These desiccated tomb dwellers are slow
of foot but remarkably hardy. In the narrow confines of
their decaying tombs, speed is less important than power.
Wielding long scepters to good advantage, Mummies tend to
have the upper hand when fighting in their natural
environs. When their foes retreat to greater distances,
however, the Mummy is by no means helpless. By stamping
their scepters upon the ground, Mummies are capable of
summoning flames from the earth itself, scorching hapless
foes who try to run away. One
cannot make the mistake of assuming that a Mummy is dead
when its limbs have been severed. So powerful is its
spirit that the Mummy will continue to attack after vital
pieces of its body have been hacked off. Destroying a
Mummy, therefore, is often a slow and painful process
that requires the utmost diligence. Only when the Mummy
has been thoroughly dismembered can an adventurer rest
easy.
|
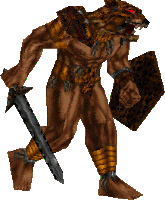 Were-Jaguar Were-Jaguar
The steamy jungles of Mazaera are home to a particularly
deadly foe: the Were Jaguar. Brandishing serrated swords,
Were Jaguars look like a combination of great cat and
conventional footsoldier, but they are considerably more
deadly than either. Were Jaguars are extremely adept with
both sword and shield, hacking and slashing at medium
range, and bashing with their shields when an opponent
draws too close. Were
Jaguars are also incredibly fast and agile. They are
known to leap and dive at their foes, and roll nimbly
from side to side in order to dodge attacks. Occasionally
they use their great shields to reflect incoming
projectiles, sometimes even turning these projectiles
back upon their originator.
An even tougher race of Were
Jaguar has recently been sighted in Mazaera. Dubbed the
Were Panther, these beasts are supposedly even stronger
and faster than their common Jaguar cousins.
|
Riders of the
Apocalypse
Four grim generals carry out Eidolon’s decrees upon
the four continents of Thyrion. The origin of these dread
beings is unknown, but none questions their power:
Eidolon himself, it is rumored, cannot fully control
them. These four
abominations are known as the Riders of the Apocalypse.
Mounted on dire steeds, these riders are known by the
names War, Famine, Pestilence and Death. Who can say what
dire magic they command, or what deadly powers they
possess? The only certainty is this: should a wandering
hero encounter one of these four beings, his life is in
great peril.
|
Eidolon
Any man or woman who tries to free Thyrion must do battle
with Eidolon himself. Reports of Eidolon’s
appearance and powers are wildly conflicting, though all
agree that he is potent beyond all human reckoning, and
that he bears great resemblance to a creature from a
nightmare. Nothing
else is known of Eidolon’s powers or physiognomy.
When the time comes for a hero to challenge
Eidolon’s dominion, we can only hope that he does
not despair at the sight of this horrific fiend.
|
Artifacts and Armor
The world of Thyrion has always been
magical. Aside from the mundane trappings of everyday society, it
is relatively common to encounter relics of great power. Here is
a brief catalogue of such items, from the mundane (such as
torches and armor) to the fantastical. Any hero who attempts to
defeat Eidolon will be forced to make good use of these
resources.
Armor
Several types of armor are widely available in Thyrion. Armor
slowly wears away as it sustains blows, becoming less and less
effective until disintegrating entirely.
Each piece of armor is designed for a
particular body shape and style of fighting. Hence, some armor is
of extra value to certain heroes.
 |
Amulet
Amulets are a magical sort of armor that greatly benefit
spellcasters such as the Necromancer, but are of
considerably less use to brawny warriors such as the
Paladin. |
 |
Breastplate
The Paladin prefers to wear sturdy breastplates, and
gains great benefits when doing so. However, breastplates
do not fit well upon the Necromancer’s slight frame,
and confer fewer benefits upon him than any other hero. |
 |
Bracers
Bracers fit over the forearm and are used to deflect
enemy attacks. The deadly Assassin is highly trained in
the use of bracers. Other heroes gain some benefit from
bracers, though the Crusader, who knows little of their
use, is least affected. |
 |
Helmet
The Crusader is accustomed to wearing helmets, and
therefore gains most value from their use. The Assassin
rarely uses this armor type, though, and as such gains
the least benefit from wearing a helmet. |
Artifacts
A sharp-eyed adventurer is wont to acquire items that aid in the
deliverance of our people. A quick wit and strong arm can only be
aided by valuable found objects.
 |
Torch
The least of any adventurer’s supplies, torches are
nonetheless valuable when exploring the shadowy places
favored by Eidolon’s minions. They produce light for
a brief span, then slowly fade. It is wise to save them
for truly black areas, rather than expending them in
locales where the gloom is merely a nuisance. |
 |
Healing Vial
Healing Vials are used by Eidolon’s minions to
repair minor wounds. The availability of these potions
helps make up for the grievous lack of medics in
Eidolon’s ragged armies. An adventurous hero could
steal any number of these vials, and thereby keep himself
in good health over the course of his travels.
Unfortunately, however, these glass beakers are typically
too fragile to carry: they must be quaffed on the spot. |
 |
Quartz Flask
Quartz Flasks are a more substantial variety of Healing
Vials. Unlike Vials, which are fragile and impossible to
transport, Quartz Flasks are sturdy containers that can
be ported from place to place. This portable quality,
plus the fact that they’re substantially more potent
than Vials, makes them a handy resource in battle. |
 |
Mystic Urn
The Mystic Urn is a treasured but unfortunately rare
artifact in Thyrion. Mystic Urns are portable, and are
capable of restoring a grievously wounded hero to
complete health or beyond. Their value, therefore, is
self-evident. |
Mana Crystals
Magic of all kinds is powered by an intangible essence called
mana. Mana suffuses the earth and flows in the wind, but humans
are incapable of tapping into this mana directly. To harness this
mystical energy, magi capture it in specially designed crystals.
Anyone who wishes to cast magical spells or utilize magical
weapons must collect a number of these crystals. Mana crystals
shatter as soon as they are touched, infusing the recipient with
raw magical power.
As with Healing Vials, Mana Crystals are
extremely fragile and cannot be transported, for they would
shatter the instant an adventurer placed them in his pack.
 |
Blue Mana
There are two distinct varieties of mana in Thyrion: blue
and green. Magi trap mana in different-shaped crystals,
the better to easily distinguish what type of mana is
stored therein. The blue mana crystal is a rare jewel
indeed. |
 |
Green Mana
Green mana crystals are no less rare than blue mana
crystals. They are used to power any spells or weapons
that the blue variety cannot affect. |
 |
Combined Mana
On some occasions, mages capture mana of both sorts in a
single crystal. These crystals are invariably red, and
somewhat larger than the vessels containing blue or green
mana individually. |
 |
Krater of Might
The ultimate container of mana is called a Krater of
Might. Unlike mana crystals, these vessels may be carried
from place to place and used when necessary. They contain
sufficient power to fully infuse a single human to
maximum mana capacity. |
 |
Chaos
Device
Allegedly the fruit of a mad wizard’s
experimentation, the Chaos Device teleports its user to
another part of the world. This effect is not always
predictable, but it’s useful when the user finds
himself trapped in a room with deadly foes. Clever uses of the Chaos Device have been
reported. For example, adventurers have been known to
trigger these devices as they fell to certain death, or
as they struggled for air underwater. The value of a
Chaos Device, therefore, cannot be underestimated.
|
 |
Boots of Speed
Boots of Speed are created by secretive, unknown
craftsmen. While their original purpose is not apparent
to the average human, one thing is clear: by donning a
pair of these boots, it is possible to attain speeds not
otherwise possible. This extra speed is extremely handy
in combat. |
 |
Disc of Repulsion
The Disc of Repulsion is a defensive artifact. When used,
it blasts aside projectiles aimed at its user, and hurls
nearby opponents back to a manageable range. These discs
are extremely valuable for deflecting damaging spell
effects. |
 |
Icon
of the Defender
Perhaps the most potent artifact in all the land, the
Icon of the Defender is a tremendous boon to its user.
When activated, this artifact renders its bearer
invulnerable for a short period of time. Legends abound
of mighty heroes who used Icons of the Defender to slay
their mightiest enemies, using the protection of the Icon
to best effect by approaching their foes and attacking at
close range. The
Icon’s effects vary slightly when used by different
individuals. The Paladin appears to turn to stone when he
uses the Icon; the Necromancer is shrouded in darkness;
the Assassin phases in and out of existence; and the
Crusader glows with an unearthly light.
|
 |
Tome of Power
The Tome of Power is a staple of all warrior guilds.
Tomes such as these bestow a supercharging effect upon
both mundane and magical weapons, augmenting their
natural strength, and in some cases producing new effects
altogether. Tomes’ effects are extremely limited in
duration, and are therefore best used when dealing with
particularly deadly foes. |
 |
Seal of the Ovinomancer
Perhaps the most dreaded artifact of all is the Seal of
the Ovinomancer. This terrible creation transforms an
ordinary human (or a lesser monster) into a brainless
sheep! Mages’ guilds have long denied the existence
of these artifacts, but all evidence points to the fact
of their existence. Sadly,
the Seal of the Ovinomancer is useless against the most
potent of foes. Thus, a hero with this Seal could not
merely approach Eidolon and transform him into a lowly
sheep. Were this the case, our beloved planet would
already be free of the Serpent Rider’s blighting
presence.
|
 |
Glyph of the Ancients
The Glyph of the Ancients is a curious artifact that
behaves differently in different heroes’ hands. When
activated by the Crusader, the Glyph acts as a
slow-moving mine that slides across the ground toward its
target–and explodes. The Necromancer drops the Glyph
in place and hurries away from the spot, as it detonates
in just a few short moments. The Paladin throws the Glyph
like a rock and watches as it explodes into a fireball.
Finally, the Assassin drops the Glyph and watches as it
sprouts a magical chain that attaches to a nearby wall.
The Glyph automatically explodes when anyone touches the
chain. |
 |
Force Cube
The Force Cube, sometimes known as the Magical Square, is
a small object that flies up to circle its owner’s
head when activated. As it circles, it attacks its
owner’s enemies with magical beams of light. The Force Cube lasts for only a short
while, and is therefore best activated in difficult
situations.
|
 |
Stone of Summoning
The Stone of Summoning allows its user to summon a giant
Imp that smites his foes. This Imp cannot be directly
commanded, and only remains for a short while. Therefore,
as with the Force Cube, the Stone of Summoning is best
used when fighting multitudes of foes. |
 |
Invisibility
Sphere
The Invisibility Sphere renders its user ghostly and
ethereal for a short while, thus making him or her much
harder to see and attack. This Sphere does not render its
owner completely invisible, but is nevertheless an asset
in many combat situations. |
Rings
Rings are a special class of magic item unlike all others.
Whereas some items (such as Healing Vials) cannot be carried to
and fro, and other items can be carried and used at their
owner’s leisure, rings fall somewhere in between. They can
be taken from place to place, but the user cannot decide when or
where to use them: their effects are triggered automatically, and
last until the magical power supply has been exhausted.
 |
Ring of Flight
The Ring of Flight was originally commissioned by King
Yasvim the Unruly as a "gift" for his
bothersome son. When the ring was complete he presented
it to his son, but neglected to mention that its effects
were limited, thus endangering a user that flew too high
for too long. Yasvim was notorious for his cruel pranks. Later the ring was copied by magicians
throughout the land, and while not exactly common, the
Ring of Flight can be found in many secret places
throughout the lands of Thyrion.
As the name suggests, the Ring
of Flight bestows the power of flight upon its wearer.
Flight begins as soon as the ring is picked up, and lasts
for a limited time. The wearer cannot "turn on"
or "turn off" this effect to conserve power, so
effective use of the Ring is not always easy.
|
 |
Ring of Water
Breathing
The Ring of Water Breathing allows its wearer to breathe
freely underwater. The ring automatically comes into use
when the wearer is underwater, and stops being used when
the wearer surfaces. The ring’s magical energy is
only drained while the ring is actually being utilized. |
 |
Ring of
Regeneration
The Ring of Regeneration slowly restores its wearer to
full health whenever he or she is injured. The ring does
nothing when the wearer is at full health; its magical
energy is only drained while the ring is busy healing its
owner. |
 |
Ring of Reflection
The Ring of Reflection occasionally reflects projectiles
that have been fired at its wearer. This effect is not
guaranteed: sometimes the ring works, and sometimes it
doesn’t. Magical energy is only drained from the
ring when it successfully deflects a projectile. |
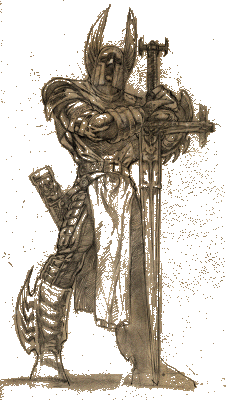 The Paladin
In my visions, I have seen four
mismatched heroes who seek to destroy Eidolon. The following
pages chronicle my visions, imparting what I have seen of each. I
know none of their names, but by observing them time and again in
my dreams, I have come to know the heart of each. The first
figure of my visions is a Paladin.
The Paladin, like the Crusader, is a
holy man. But while the Crusader is principally a healer, and his
skills emphasize defense, the Paladin is a true warrior. The
favor of his warlike god protects him, but also gives him
strength to smite his foes.
Few can match the Paladin in single
combat. He lacks stealth and subtlety, instead relying on his
mighty weapons and divine favor.
Profile of the Paladin
The Paladin is a devotee of Kravnos the War God. The Paladin
makes his home in the Great Temple of Kravnos, in the city of Mur
on Septimus. He blesses the warlike citizens who seek
Kravnos’ aid, and like his holy brothers, he rides with the
army of Mur whenever the city is threatened by external forces.
At the first coming of Eidolon, Mur was
among the first cities to fall. Realizing a quick counterstrike
would not succeed, the devotees of Kravnos took refuge in their
temple. They bided their time and looked for an opportunity to
strike, meanwhile honing their martial skills to a razor-sharp
edge. A fortnight before their attack, however, their secret was
betrayed. An army of Golems and Imps stormed through the temple
at midnight, slaughtering unprepared devotees and destroying the
holy relics of Kravnos. Only the Paladin, meditating in the bell
tower atop the temple, was overlooked.
Cursing the informant who gave them
away, and doubly cursing his brothers’ lack of preparation,
the Paladin decided to act immediately. Casting aside the
temple’s carefully-laid plans, he grabbed his mighty sword
and marched on Eidolon’s stronghold. Without a clear plan of
attack, his odds of success seem lean–but as the sole
survivor of his temple, Kravnos will certainly be guiding his
steps from afar.
The Paladin’s Abilities
During endless hours of training, the Paladin has pushed his
abilities to new levels. Invoking the power of his god, he has
developed magical powers unknown to the common human.
Kravnos the war god has an affinity for
water. As a minion of Kravnos, the Paladin is capable of moving
underwater without the same restrictions as a normal human. While
others are forced to laboriously swim, the Paladin traverses the
depths as if they were air instead of water. When engaged in
battle with a river or lake nearby, he prefers to carry the
battle underwater, where he can use this ability to great
advantage.
When brought to the brink of death by
his enemies, the Paladin sometimes receives a great boon from
Kravnos. As the lethal blow lands, the Paladin does not die.
Rather, he enters a mystical state: he grows in strength and
stature and becomes a holy scourge, seeking to avenge the
evildoers who tried to lay him low. In this state the Paladin
cannot be killed, and his powers grow to otherwise impossible
heights.
The Paladin’s Weapons
The Paladin’s weapons emphasize close-range power over
long-range projectiles. This lack of range is sometimes a
nuisance, but he often makes up for this deficiency by closing
the gap quickly, and conducting most combat at comfortably close
range.
Gauntlets
The Paladin is a true fighter, and often likes to use his armored
fists as weapons.
Though his Gauntlets may seem a puny
substitute for sword or axe, the Paladin nonetheless is capable
of felling mighty opponents with nothing more than these humble
weapons.
The Tome of Power has a supercharging
effect on the Paladin’s mailed fists, allowing him to knock
foes hither and yon like stuffed playthings, and making it
difficult for them to counterattack.
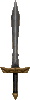 |
Vorpal Sword
The Paladin employs a powerful sword during most combats.
This sword can be used without mana to power its magic,
but its damage correspondingly decreases when there is no
such power source. When
the Tome of Power is employed in conjunction with the
Sword, both range and power are magically increased by a
bolt of magical lightning. The Paladin can cleave an
enemy in twain at fifty paces or more with the Sword
thusly powered, and damage several foes in one mighty
swing.
|
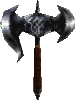 |
Axe
The Paladin’s axe is a mighty weapon. In addition to
its brutal close-range power, the axe casts a projectile
that ricochets from walls and obstacles. This projectile
does not stop when it impacts the Paladin’s foe, but
cuts right through and continues flying at lesser
strength, potentially damaging several foes at
once. The Tome of
Power turns the Axe’s projectile into a razor-sharp
wall of blades that issue forth from the Axe at various
angles and explode upon hitting their targets.
|
|
|
Purifier
The Purifier is the Paladin’s ultimate weapon: it
breathes a stream of glittering shards. These shards
issue forth in a deadly twin stream, rending anything
that breaks its brilliant path. The two halves of the
Purifier must be found and joined together before the
Paladin is able to devastate foes with this holy lance. The Tome of Power utterly changes the
Purifier’s effect. Instead of firing a stream of
small projectiles, the powered Purifier shoots a flaming
fireball that unfalteringly seeks its target and explodes
upon impact.
|
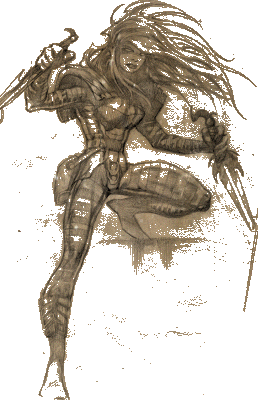 The Assassin
The Assassin is a master of stealth,
disguise, and trickery. Whereas the Paladin rushes into combat
with a mighty roar, the Assassin sneaks up from behind. Many of
the Assassin’s weapons and skills are geared toward trickery
and concealment. From her devastating ability to backstab an
opponent to the deadly Hand Crossbow, it is clear the Assassin is
always ready for an unfair fight.
Profile of the Assassin
The Assassin hails from Khitar, one of the few true cities in the
jungles of Mazaera. As a child she watched her parents toil as
farmers, reaping a meager harvest from the unforgiving jungle
soil. A farmer’s life is always difficult, but even more so
in Mazaera, where the land is particularly unsuited to the task.
The Assassin learned this by observation, and she learned even
more as she prowled the streets of Khitar–against her
parents’ wishes. Wealthy folk of all description wandered
those unpaved streets: gem merchants with stout bodyguards, proud
mercenaries bearing gold-hilted scimitars, and slavers in
ivory-trimmed palanquins. None spared a second glance for an
urchin in dirty rags.
As days and years went by, the Assassin
became scornful of her parents. Rich folk gained their wealth by
treading upon the weak, and only weak fools would till the
accursed, clay-filled soil of Mazaera. Vowing never to become a
fool like her parents, she ran away at the age of fifteen and
took up the dark career of the assassin. First preying upon
drunkards and the unwary, she gradually learned the tricks of her
bloody trade, and began to aim for wealthier victims. Her skills
grew by leaps and bounds. Nobody, it seemed, was safe from her
depredations.
With a small fortune accumulated in her
secret lair, the Assassin soon realized she had become bored with
her trade. She required ever richer victims, more and more
danger, to sustain the thrill of the hunt. Who remained that
could pose a challenge? Kings? Emperors? With a crooked smile,
she decided upon her next victim: the richest and most powerful
being on all of Thyrion. Armed with Katar and Crossbow, she set
forth on her quest to rid the world of Eidolon.
The Assassin’s
Abilities
The Assassin is a master of stealth and deadly strikes. The first
noteworthy ability the Assassin gains is that of stealth: she can
render herself invisible when standing perfectly still in a
shadowed area. It takes a few seconds for her to achieve this
invisibility, but once attained, the illusion is perfect. It is
rumored that Assassins can master this skill in broad daylight
when their skills are all but perfected.
The Assassin makes very little sound
when moving, and is often able to surprise her victims. Creeping
up from behind, she strikes before her foes acknowledge her
presence. When attacking in this fashion, she is capable of
dealing much more damage than she otherwise would. This ability
also comes into play when the Assassin strikes a foe who knows of
her existence, but allows her to get behind him. This is a rare
occurrence, but occasionally significant when she fights sluggish
opponents such as Golems.
The Assassin’s Weapons
The Assassin’s weapons are excellent for trickery and
deception: the Katar is ideal for vicious backstabbing, her small
incendiary Grenades can be lobbed down at unsuspecting passersby,
and her deadly Hand Crossbow is excellent for picking off foes
from afar.
Katar
The vicious Katar (or "punch dagger") is the
Assassin’s first weapon. It is the least of her weapons, but
deadly nonetheless. It deals moderate damage at limited range,
and can be wielded very effectively in close quarters.
The Tome of Power imbues the Katar with
a viscous nerve toxin and allows the Assassin to knock back her
enemies with great force.
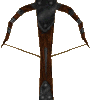 |
Hand Crossbow
The Hand Crossbow is a trademark weapon of the Assassin.
Light and portable, yet deadly, the Hand Crossbow fires
three iron bolts for an added measure of destruction. The
Assassin likes to employ this weapon against distant
foes, switching to Katar before closing to short range. The Tome of Power magically multiplies
the Hand Crossbow’s projectiles. Instead of three
bolts, five flaming bolts are fired from the Hand
Crossbow. These bolts stick in their target for a moment
before exploding for additional damage.
|
 |
Grenades
The Assassin wields small incendiary devices that only
she knows how to construct. These clusters of Grenades
tend to roll and bounce for a moment or two before
detonating, and therefore require careful aim and a
measure of foresight from the Assassin. When used in conjunction with the Tome of
Power, the grenades increase in size. Instead of hurling
a single, small incendiary, the Assassin throws a bigger
Grenade, which then detonates into many smaller
explosions.
|
|
|
Staff of Set
The Assassin possesses a magical staff with a special
power. It fires a scarab of concentrated magical energy.
The Assassin may increase the potency of this staff by
hesitating before firing it, and allowing magical energy
to build up within. This
weapon contains power that must be earned. There are two
pieces that must be joined together before it can be
unleashed.
The Tome of Power imbues the
Staff with a different ability. In its powered state, the
restless spirits imprisoned in the staff vent their rage
upon its hapless victims, wrapping them in a cocoon of
razor-sharp chains and violently stripping flesh from
bone.
|
A Bitter Farewell
It is with heavy hand and heavy heart,
dear reader, that I lay down my pen. I had hoped to write a full
chronicle of the attack on Eidolon, documenting these four
unlikely heroes’ quest to banish him from our world. But now
I must abandon my work, for my hiding place has been discovered.
Golems and Fire Imps will soon swarm through this place,
destroying all that they find here. There is no help for it; I
must flee for my life.
The future is uncertain. I have seen it
in scattered visions, but the play’s final act has not been
performed. Perhaps it is not yet written. Whatever the case, I
pray that one of these four heroes succeeds in their quest. If
not, this history–and the world that it chronicles–will
be forever lost to darkness. I pray it is not so.
–Themedes, Sage of Mur
DEMO MINIMUM SYSTEM REQUIREMENTS
- Windows« 95 or NT 4.0
with 100%-compatible computer system
- Pentium« 90 MHz processor
(120 MHz recommended)
- Windows 95: 16 MB RAM (24
MB recommended);
Windows NT: 24 MB
RAM - Hard disk drive with at
least 20 MB of uncompressed space available
- 100% Sound
Blaster-compatible sound card
- Joystick and
mouse-supported (3-button mouse recommended)
- Supports network and
Internet play via IPX and TCP/IP
GL Hexen Additional Requirements
- 24 MB RAM
- GLHexen supports some
OpenGL 3D accelerator cards. Consult your hardware
manufacturer to determine compatibility.
NOTE: Hexen II uses Microsoft DirectX 3a technology, and requires that your system have
the most updated drivers that fully support DirectX.
Back to top
DirectX
3a NOTE: The Hexen II demo
requires DirectX 3a or later. However, to keep the download time
to a minimum, the DirectX installer is not included with the main
H2Demo.exe file. You will need to download the DirectX 3a
installer separately. The installer is widely available on the
Net, and can be found at Activision's website. Once downloaded, the Microsoft DirectX
3a setup program will install the appropriate files on your
computer.
Who makes DirectX and how can I contact them?
Microsoft
created DirectX. If the
answer to the question you are looking for is not found on this
page, you may want to contact Microsoft by clicking here or via mail
at:
Microsoft Customer Sales and Service
One Microsoft Way
Redmond, WA 98052-6399, USA
Microsoft can also be reached in the USA at (800) 426-9400, or
internationally at +1(206) 882-8080.
What is DirectX and why do I need it?
Microsoft's DirectX 3a is an API (Application
Programming Interface) set that increases the speed at which
games play under the Windows 95 operating system. These APIs
allow direct access to the enhanced features of hardware under
Windows 95. With DirectX 3a, a program has instant access to the
hardware, allowing for great advances in graphics, sound, video,
3-D, and network capabilities of games.
Since Windows 95 and DirectX 3a are relatively new in the
computer world and have not achieved compatibility with some
older video cards, many manufacturers are releasing updated
drivers for Windows 95 to meet the DirectX standard. If you are
not sure about your video card's compatibility, consult the
company that makes your video card.
If the Microsoft DirectX Installer does not detect DirectX 3a on
your computer, it can install DirectX 3a for you. After
installation is complete, you will need to restart your computer
in order for DirectX 3a to take effect.
If you have other Windows 95 games on your computer, chances are
you already have an earlier version of DirectX installed on your
computer. In this case, the Microsoft Installer will overwrite
that version with DirectX 3a. The DirectX installation process
will then be complete. You will need to restart your computer for
the changes to take effect.
If you already have DirectX 3a installed on your computer, the
Microsoft DirectX 3a installer will detect it and not overwrite
any DirectX 3a files. You will not need to restart your computer
after installation in order to run Hexen II.
DirectX 3a should not affect any titles designed for the original
version of DirectX. Should you encounter difficulties with
DirectX 3a, please contact Microsoft for further information.
I am having problems with running Hexen II and think it
might be related to my Direct X installation. What should I do?
If you experience problems running Hexen II, try turning
off the "Enable 3D Acceleration" option in the DirectX
setup program. To disable 3D Acceleration, double click on the
dxsetup icon located in Program Files\DirectX\Setup. Uncheck the
option for 3D acceleration in the middle of the DXSetup window.
I have heard DirectX is not compatible with some video
cards. What can you tell me about that?
Windows 95 and DirectX are relatively new in the
computer world and have not achieved compatibility with some
older video cards. Many manufacturers are releasing updated
drivers to meet the DirectX standard. If you are not sure about
your video card's compatibility, consult the Vendor List for the
company that makes your video card.
If I don't have DirectX, will Hexen II install it for me?
Yes. If the Microsoft DirectX Installer does not detect DirectX
on your computer, it will install DirectX for you. After
installation is complete, you will need to restart your computer
in order for DirectX to take effect.
If the DirectX Installer copied over a previous version,
will the UnInstaller remove DirectX 3a? How will this affect my
other Windows 95 games?
DirectX 3a will remain on your computer and you will be able to
run other Windows 95 games that use Microsoft’s DirectX
libraries. DirectX 3a should not affect any titles designed for
the original version of DirectX. Should you encounter
difficulties with DirectX 3a, please contact Microsoft for
further information (address and phone number listed above).
How do I restore my video and/or audio drivers once DirectX has
been installed?
1. Place the disc in the CD-ROM drive and exit from any autoplay
screens.
2. Double-click on "My Computer".
3. Right-click on your CD-ROM drive and choose Install DirectX.
Choose the button that satisfies your need (e.g. Restore Audio
drivers). This process will install your previous drivers and
prompt you to restart Microsoft Windows.
The following manufacturers suggest running DirectX 3a with their
products using the configurations listed below. If you need
further assistance, please contact your video card manufacturer
directly.
Diamond Multimedia
Stealth SE
Stealth 64 Graphics 2000
Stealth 64 Video 2000
Stealth 64 Video 3000
Stealth Video 2001
Stealth Video 2001\TV
Stealth Video 2500
Stealth 3D 2000
If problems are encountered with the above Diamond Multimedia
video cards, we recommend that you restore your video card
drivers. Instructions are as follows:
1. Place the game disc in the CD-ROM drive and exit from any
autoplay screens.
2. Double-click on "My Computer".
3. Right-click on your CD-ROM drive and choose Install DirectX.
4. Click on the button labeled “Restore Video drivers.”
STB Powergraph64 with Vision 95
We have experienced numerous problems with STB video cards
running the STB Vision 95 set of display tools. Please uninstall
your STB Vision 95 display tools by reinstalling the STB drivers
without the STB Vision 95 display tools if you experience any
problems playing Hexen II.
ATI Mach 64
If you experience problems running with an ATI Mach 64, click on
your Start Button and select Run, then type SYSTEM.INI. Click OK.
Locate the section within the file labeled
[Display]
and add the line STRETCHENGINE=0
Example:
[Display]
STRETCHENGINE=0
Click on File, then choose Save. Click on File then choose Exit
to leave your System Configuration editor. Reboot the system and
try playing Hexen II again.
Back to top
3D
ACCELERATORS
The hardware world is changing
so fast that it is impossible for us to test, or even list, every
3D accelerator card with GLHexen. While some cards work extremely
well, we cannot guarantee that your card will work as expected.
How It Works:
The executable relies on
the OpenGL library created by 3Dfx to support their Voodoo
graphics cards. If you have a non-Voodoo graphics board that
fully supports OpenGL, you can try removing the file Opengl32.dll
from the Hexen II Demo directory. This will force the program to
use the GL library installed with your card's drivers. However,
there are no guarantees that this will work.
If you are using a Voodoo
graphics board and are still having trouble getting GLHexen
working, we suggest reinstalling your manufacturer's run-time
Glide drivers (not the Direct3D drivers if there is an option
between the two). Click here to
go to the 3Dfx driver page. Other popular manufacturer's driver pages are Diamond
Multimedia's driver page, and Orchid's driver page.
It installing the Voodoo run-time
drivers does not work, a file called "Glide2x.dll" is
located in the game directory on your CD. If you selected GLHexen
during the installation process, this file will be in a folder
called "Glide2x" in the Hexen II Demo directory. Simply
move this file out one level to the root of the Hexen II Demo
directory. Again, this may or may not work depending on the brand
of card you are using.
Back to top
REPORTING BUGS
As this is pre-release
software, you will undoubtedly find bugs. We would appreciate
your feedback and reports of any bugs you find.
Before you report, you might
want to use a Finger client to access the latest reports. Redwood
has an excellent finger page with this information. If that link does not
work for some reason, you can manually finger
h2bugs@mail.ravensoft.com.
When you are ready to report,
you can e-mail bugs to h2bugs@mail.ravensoft.com. Be sure to include:
- Your hardware
configuration
- The version number in the lower
right of the in-game console screen
- Detailed description of how to
replicate the bug.
Back to top
GETTING
STARTED
In the Main menu, you can start
a new single-player game by selecting the Single Player option
(press Enter), then selecting New Game and choosing a player
class.
You can play any of four
different characters in the full version of Hexen II, each with
his or her own special set of weapons, abilities, and attributes.
Only the Assassin and the Paladin are available in this demo,
however. Each character will be able to combat enemies and solve
puzzles with varying degrees of difficulty. For instance, the
Paladin may be a strong fighter but lacks magical powers, while
the Assassin can kill easily but can be killed just as easily.
Playing each character requires
slightly different gameplay styles, but that’s the fun of
Hexen II. Experiment and explore. You’ll be surprised with
the variety between the characters. For more information on each
of the characters, refer to the Chronicle of Deeds.
Back to top
THE BASICS OF PLAY
The goals in Hexen II are
simple: stay alive, solve the puzzles, and defeat your enemies.
Ultimately, you will face your greatest enemy, Eidolon, but your
journey along the way will be far from easy.
Staying Alive
Walking: Using the up
and down arrow keys will move you forward or backward at a steady
pace. Turn left or right with the left or right arrow keys or by
sliding the mouse in the desired direction.
Running: Hold down the
shift key while pressing the arrow keys to increase your speed.
Jumping: Press the space
bar to jump. You jump farther if you’re moving forward and
you jump higher if you’re moving up a slope. You’ll be
surprised at the spots you can reach in a jump. You can even
avoid some attacks this way.
Swimming: When
underwater, aim yourself in the direction you wish to go and
press the forward (up arrow) key. You have full three-dimensional
freedom, so use your look-up and look-down keys to swim up and
down. As in real life, you may lose your bearings while
underwater. Use the jump (space) key to kick straight up toward
the surface.
Once on the surface, tread
water by holding down the jump key. To get out of the water, swim
toward the shore and use the jump key to hop out. If you’re
down a well or can’t get a grip, you may not be able to
climb out. There is always another way out, but you may have to
submerge to find it.
Crouching: Press the
apostrophe key (‘) to squeeze into tight areas or small
openings.
Flying: Certain powerups
allow you to fly. In addition to your normal movement keys, use
the ‘D’ key to fly up and the ‘C’ key to fly
down.
Shooting: Press the Ctrl
key or the left mouse button to fire. Hold shoot down to keep
firing.
Use: The Hexen II key
has an automatic "use" function. To push a button or
open a door, walk up to it, or, in some cases, shoot at it.
Remember, some walls can be pushed or pulled. To move these
blocks, simply walk up to them and push in the desired direction.
If a door won’t open or a platform won’t work, you may
need to do something special to activate it.
Picking up Items: To
pick up items, weapons, power-ups, or armor, simply walk over
them. If you can’t pick something up, it means you already
have the maximum number of that item possible.
Inventory: Throughout
the game, you will pick up various powerups and inventory items.
To use an item in your inventory, use your bracket keys ([ and ])
to toggle between your items and then press the Enter key to use
the selected item.
Solving Puzzles
Buttons and Floorplates:
Buttons activate with a touch, and floorplates must be stepped
on. If you see a distinctive looking button in a spot you cannot
reach, it’s probably a shootable button.
Hints: Throughout the
game, there are books, plaques, and signs that can help you with
puzzles. To read these items, simply walk up to them and read the
text that appears on-screen.
Doors: Most doors open
at your approach. If one doesn’t, seek a button, floorplate,
key, or inventory item.
Secret Doors: Some doors
are camouflaged. Look for irregularities in the walls, protruding
edges, cracks along the walls, etc. Most walls can be pushed,
shot, or triggered with a nearby switch. Likewise, a switch may
be more obvious than the secret door.
The Secret of Secrets:
All secrets in Hexen II are indicated by clues. Don’t waste
your time hacking at every wall. It’s much more productive
(and fun) to use your brain and your eyes. Look up. An angled
texture, a light shining under a wall, a strange sound, anything
might be a clue. Something prominent in a room may be a
decoration, or it might be a clue.
Defeating your Enemies
There are a wide variety of
enemies in Hexen II that attack in many ways. Some fly, some
crawl, some just swing at you with their stubby arms, but each
requires a slightly different attack to defeat it. If you
can’t hit it with your hands, come back later and defeat it
with a projectile weapon. If you can’t get near it, shoot it
from afar. And when you meet the Four Horsemen and the last of
the Serpent Riders, be sure to have plenty of ammo and health
saved up. You’ll need it!
Back to top
YOUR
ENVIRONMENT
The Screen
The large upper area of the
screen is the view area. You can adjust the size of this view
area by hitting the ‘-’ or ‘+’ keys.
Increasing or decreasing your view area will have a direct effect
on game performance.
The Status Bar
Immediately below the view
area is the Status Bar. Press the Tab key at any time during the
game, and the status bar pops up to reveal much more information.
The Hub Level System
Hexen II uses a non-linear
hub level system. Each hub consists of several levels. When you
enter a hub, you will solve the various puzzles and defeat the
enemies that lead you to the Hub Room. From this room, you access
any of several teleporters that take you to other levels of the
hub. Solve those levels and return to the Hub Room. Once all the
levels in a hub are complete, you can move on to the next hub.
Back to top
COMMANDS, MENU & CONSOLE
Keyboard Commands
Press F1 (the Help key) or
select the Help option from the Main Menu to get a list of
keyboard commands.
By using the key configuration option
from the Main menu, you can customize the keyboard to suit your
fancy, except for the function keys, the Escape key, and the ~
(tilde) key.
Function Keys
| F1= Help |
F6 = Quicksave |
| F2 = Save |
F9 = Quickload |
| F3 = Load |
F11 = Zoom |
| F4 = Options |
F12 = Screenshot |
| F5 = Multiplayer |
|
Weapons
| Key |
Paladin |
Assassin |
| 1 |
Gauntlets |
Katar |
| 2 |
Vorpal Sword |
Grenades |
| 3 |
Axe |
Crossbow |
| 4 |
Purifier |
Staff of Set |
Movement
| Move |
Arrow Keys |
| Turn |
Mouse Left and Right |
| Jump/Swim |
Space Bar |
| Run |
Shift |
| Sidestep Left |
. or > |
| Sidestep Right |
, or < |
| Strafe |
* Alt |
| Swim Up |
D |
| Swim Down |
C |
| Inventory Toggle |
'[' or ']' (bracket
keys) |
| Inventory Use |
Enter |
| Crouch |
‘ (apostrophe) |
Other Controls
| Main Menu |
Escape |
| Console |
~ (tilde) |
| Look Up |
A or PgDn |
| Look Down |
Z or Del |
| Center View |
X or End |
| Mouse Look ** |
\ or center mouse
button |
| Keyboard Look *** |
Ins |
* With the Strafe key pressed, your turning keys
or mouse movements move you sideways rather change the direction
you’re facing.
** Sliding your mouse forward
and back looks up and down while the Mouse Look key is pressed.
*** When the keyboard Look key
is pressed, the walk forward/ backpedal arrows will let you look
up.
More Advanced Commands: Impulses
Although you can easily customize your
controls, some players prefer to set key bindings manually. There
are hundreds more commands available in the console. Some of the
new items to Hexen II are:
Customize Controls
Your keyboard commands are
highly customizable. To change the default commands at any time,
go to Main Menu> Options>>Customize Controls. Use your
up and down arrow keys to toggle between the various choices.
Press Enter to activate your choice, and then press the key or
mouse button you wish to bind to the command. Your configuration
is automatically saved.
Menu
The Menu system can be accessed
at any time during a game. Simply press the Esc key to activate
the menu during the game.
Use the arrow keys to move the
Hexen Glyph up and down the menu. Place the Hexen II glyph before
the desired option, and tap the Enter key. To return to Hexen II
the Main Menu, tap the Esc key again. To exit the menu and return
to the game, press the Esc key when you are in the Main menu.
SINGLE PLAYER:
NEW GAME: Discards the game
being played, and starts anew.
CLASS: Choose one of the
four character classes (see the Chronicle of Deeds for more
detailed information):
Class Key Attributes
| Paladin |
Strong fighter |
| Assassin |
Stealth, kills
easily, but physically weaker |
DIFFICULTY: Choose one
of four difficulty levels.
LOAD: Highlight the desired
slot, and press the Enter key.
SAVE: Highlight the desired
slot, and press the Enter key. Each saved game is identified
by the level's name, plus the proportion of kills achieved so
far in that game.
MULTIPLAYER: Controls
multiplayer game starting and details.
JOIN A GAME: Join a
pre-existing network game.
IPX and TCP/IP: Both
network protocols share the same options below. IPX works
better on Local Area Networks and TCI/IP is used for
internet play.
Address: Your
network address. This is automatically entered.
Port: The port at
which you will connect to the server. This is
automatically entered.
Search for Local
Games: Trolls the network for Hexen II servers.
Join a Game At: If
you know the name of a server on the network, type it
in here.
New Game: Launching
a new game will make you a host. Be sure your Setup
options (see below) are correct before launching a
new game.
IPX and TCP/IP: Both
network protocols share the same options below. IPX works
better on Local Area Networks and TCP/IP is used for internet
play.
Address: Your network
address. This is automatically entered.
Port: The port at which
you will connect to the server. This is automatically
entered.
OK
Begin Game: Starts
a multiplayer game.
Max Players: The
maximum number of players in a game. The Max allowed
in any game is four unless you are running a
dedicated server from a command line.
Game Type:
Deathmatch (you against your buddies) or Cooperative
(everyone works together to get through the level).
Teamplay:
Determines if your teammates’ health is affected
when you shoot them.
Skill: Choose one
of four difficulty levels.
Frag Limit: Maximum
number of kills one player can get in one level.
Time Limit: Maximum
amount of time of a game; zero to 60 minutes.
Episode: Selects
the hub in which you start unleashing your fury.
Level: Selects the
level within the hub.
Setup: Establishes the
parameters that identify you and/or your server.
Host Name: The name of
your server.
Your Name: Your name or
nickname.
Character: The
character class (see above) you wish to play as.
Shirt Color: Pick the
color of your shirt.
Pants Color: Ditto.
OPTIONS: Miscellaneous game
options.
Configure Keys: Permits you
to customize Hexen II so every action is linked to the button
or key that you prefer. First, move the cursor (via the arrow
keys) to the action you wish to change. Then press the Enter
key. Now press the key or button you want to bind to that
action. For instance, if you wish to use the Alt key for
Jump, move the cursor to Jump/Swim, press the Enter key, then
press the Alt key.
Each action can have two
different keys assigned to it. If you already have two keys
in an entry, you cannot add more from this menu. To clear the
keys bound to an action, move the cursor to that action and
press Backspace or Delete instead of Enter. This will clear
the keys formerly bound to that action, leaving it blank.
You can bind any key to an
action except Function keys, the Escape key, and the ~
(tilde) key. “Weird” keys such as Scroll Lock,
Print Screen, etc. may or may not work, depending on your
machine, but why bother?
For a list of impulses and
manual commands, go to the Impulses section.
Attack: Fires your
weapon.
Change Weapon: Switches
the next weapon in your inventory.
Jump/Swim Up: If you're
on land, jumps. If you’re underwater, kicks you
towards the surface. If you’re right at the
water’s edge, pops you up out of the water, if you
combine it with forward movement.
Walk Forward
Backpedal
Turn Left
Turn Right
Run: Press this while
moving, and you move at double speed.
Step Left: Sidesteps
left.
Step Right: Sidesteps
right.
Sidestep: Press this
when using turn left or turn right and you sidestep
(strafe) instead.
Crouch: Lets you fit
into tight places.
Look Up: Lets you angle
your view upward. Your view returns to horizontal when
you start walking forward.
Look Down: Lets you
angle your view downward. Your view returns to horizontal
when you start walking forward.
Center View: If you're
looking up or down, returns your view to dead center.
Mouse Look: Press this
to allow your mouse to look up or down (by sliding it
forward and back), and to remain looking up or down even
if you move forward.
Keyboard Look: Press
this to use your movement keys to look up or down.
Swim Up: Use to swim up
toward the surface of the water (also used to fly up).
Swim Down: Use to swim
down (also used to fly down).
Lift Object: Pick
objects up.
Use Inv Item: Use an
item in your inventory.
Drop Inv Item: Drop an
item in your inventory. Most useful in Coop games where
you can share resources.
Full Inventory:
Pressing this key will bring up the status bar.
Frag Count: In
multiplayer modes, this key will display the score.
Toggle Frags: Will turn
frag counting on or off.
Inv Move Left: Pressing
this key will toggle inventory items left.
Inv Move Right:
Pressing this key will toggle inventory items right.
Torch: Lights your way in dark
places.
Quartz
Flask: gives
you a health boost.
Mystic
Urn: completely
replenishes your health.
Krater: The
Krater of Might
replenishes your Mana.
Chaos
Device:
Teleports you out of trouble. Where you respawn, no one
knows.
Tome of Power: Imparts special powers on your weapons.
Summoning Stone: Summons some help from a giant imp.
Invisibility:
Glyph: Glyph of The Ancients is a magical item used
differently by each character class.
Boots: The
Boots of Speed double your speed.
Disk of Repulsion: Provides a modicum of
protection.
Bo Peep: The Seal of the Ovinmancer. One word: Lambination.
Flight: Ring
of Flight
provides momentary weightlessness.
Force
Cube: Attacks
your enemies for you.
Icon of the Defender: Provides invincibility.
Go To Console: Brings down
the Console. Also possible by pressing the ~ (tilde) key.
Reset To Defaults:
Everything you've changed in the options menu is reset by
this option. Consider it an "Oops" key.
Screen Size: A slider which
enlarges or shrinks your view area. All of the sliders use
the right and left arrow keys.
Brightness: Pretty much
self-explanatory. Choose a brightness which doesn't strain
your eyes.
Mouse Speed: Adjusts mouse
sensitivity. The farther you set the slider to the right, the
quicker your mouse reacts.
Music Volume:
Self-explanatory.
Sound Effects Volume:
Self-explanatory.
Always Run: When this is
selected, you do not need the Run key—you are always at
double speed.
Invert Mouse Up/Down: This
gives your mouse “airplane-style” controls. This
means that pushing the mouse forward “noses down”
and pulling it back “noses up.” Some people prefer
this control technique.
Lookspring: Returns your
view immediately to straight ahead when you release the look
up/down key. Otherwise, you must move forward for a step or
two before your view snaps back. Lookspring does not work
while you are underwater.
Lookstrafe: If you are
using the look up/down key, then this option causes you to
sidestep instead of turn when you try to move left or right.
Video Options: This screen
allows you to change the resolution of your screen while
playing Hexen II. Resolution has the greatest impact on game
performance.
Use Mouse: This option is
available only when you are in a Windowed mode (see Video
Options above). When turned on, Use Mouse allows you to use
your mouse as an input device in the game itself (to turn
left or right, for instance). However, you will not be able
use your mouse to control your cursor in this mode. Turning
Use Mouse off lets you use your mouse in Windows, but not in
Hexen II.
HELP: An abbreviated, in-game
version of this document.
QUIT: Exits Hexen II at once.
Back to top
MULTIPLAYER
GAMES
Equally as much fun as the
single player game is the multiplayer environment. Whether on a
LAN or on the Internet, there are several types of multiplayer
action available.
Cooperative
In a co-op game, you and your
friends work together to finish each level. Each player can play
any of the four character classes, and combining the strengths of
each class can substantially enhance puzzle-solving ability.
Deathmatch
In this all-out melee, the sole
object is to stay alive long enough to kill everyone else. The
player with the most kills wins. No enemies exist in Deathmatch
mode, just your so-called friends. Each player starts in a random
spot in the level, and various weapons and power-ups are randomly
spawned throughout. Items and player re-spawn points are
randomized in Hexen II to allow an even playing field.
Team Games
Similar to Deathmatch, Team
mode allows players to band against each other in groups. The
team with the most kills wins.
Multiplayer Detailed Information
A comprehensive guide to
multiplayer action is provided in the online documentation
installed with Hexen II.
Console
The console is a command line
interface that gives you access to many functions in the game
engine. Although it is not necessary to access the console to
play Hexen II, many environmental and gameplay settings can be
configured through this interface. To access the console, press
the tilde (~) key or go to Main menu>Options>>Go To
Console. For a complete list of console commands, please refer to
the online documentation installed with Hexen II.
Back to top
THE
HEXEN II TEAM
Raven
Project Director: Brian
Raffel
Art
Art Director: Brian
Pelletier
Artists: Shane Gurno,
Jim Sumwalt, Mark Morgan, Rebecca Rettenmund, Kim Lathrop, Les
Dorscheid, Ted Halsted
Animators: Mike Werckle,
Brian Schubart
Design
Lead Design: Eric
Biessman
Designers: Brian Raffel,
Brian Frank, Tom Odell
Programming
Lead Programmer: Rick
Johnson
Programmers: Bob
"The Doctor" Love, Mike Gummelt
Intern: Josh Weier
Music: Kevin Schilder
Sound: Kevin Schilder,
Chia Chin Lee
Activision
Producer: Steve Stringer
Localization Producer: Sandi
Isaacs
Marketing Product Manager: Henk
Hartong
Marketing Associate: Kevin
Kraff
Senior Quality Assurance
Lead: Tim Vanlaw
Quality Assurance Lead:
John Tam
Quality Assurance Team: Steve
Rosenthal, Mike Spann, Steve Elwell, Kelly Wand, Kip Stolberg,
Igor Krinitskiy, and Ian Stevens, Marilena Wahmann, Winnie Lee,
David Baker
Documentation: Mike
Rivera, Sylvia Orzel, Belinda Vansickle
Chronicle of Deeds written by: Joe Grant Bell
Installer by: Steve
Stringer, Adam Goldberg, Tanya Martino, Eric Schmidt, Ronnie Lane
Art Assistance by: Carey
"Damien" Chico and Franz Boehm
Deal Guru: Mitch Lasky
BizDev Babe: Jamie Bafus
id
Published by:
Id Software, Inc.
The Id Software Technology used under license
in Hexen II™ ⌐ 1996, 1997 Id Software, Inc. All Rights
Reserved.
Back to top
HexenII™⌐ 1997 Raven
Software Corporation. All Rights Reserved. Id Software, Inc.
Software code contained within HexenII™⌐ 1996 Id Software,
Inc. All Rights Reserved. Developed by Raven Software
Corporation.Published by Id Software, Inc. Distributed by
Activision, Inc. under sublicense. Hexen« is a registered
trademark and HexenII™ is a trademark of Raven Software
Corporation. The Id Software name and the id logo are trademarks
of Id Software, Inc. Activision« is a registered trademark of
Activision, Inc. All other trademarks and trade names are the
properties of their respective companies.
All images contained in
this document are the property of Activision, Inc., and may not
be used in any form without written consent from Activision,
Inc..
SOFTWARE
SUBLICENSE AGREEMENT
IMPORTANT - READ CAREFULLY:
USE OF THIS PROGRAM IS SUBJECT TO THE SOFTWARE SUBLICENSE TERMS
SET FORTH BELOW. "PROGRAM" INCLUDES THE SOFTWARE
INCLUDED WITH THIS AGREEMENT, THE ASSOCIATED MEDIA, ANY PRINTED
MATERIALS, AND ANY ON-LINE OR ELECTRONIC DOCUMENTATION, AND ANY
AND ALL COPIES AND DERIVATIVE WORKS (WHICH YOU SHALL NOT CREATE,
AS NOTED BELOW) OF SUCH SOFTWARE AND MATERIALS. BY OPENING THIS
PACKAGE, INSTALLING, AND/OR USING THE PROGRAM, YOU ACCEPT THE
TERMS OF THIS SUBLICENSE WITH ACTIVISION, INC.
("ACTIVISION").
LIMITED USE SUBLICENSE:
Activision grants you the non-exclusive, non-transferable,
limited right and sublicense to install and use one copy of this
Program solely and exclusively for your personal use. All rights
not specifically granted under this Agreement are reserved by
Activision and/or Activision’s licensors and sublicensors.
This Program is sublicensed, not sold. Your sublicense confers no
title or ownership in this Program and should not be construed as
a sale of any rights in this Program. Certain software code, such
as the engine, is owned by Id Software, Inc. and used under
license.
OWNERSHIP: All title,
ownership rights and intellectual property rights in and to this
Program and any and all copies thereof (including but not limited
to any titles, computer code, themes, objects, characters,
character names, stories, dialog, catch phrases, locations,
concepts, artwork, animation, sounds, musical compositions,
audio-visual effects, methods of operation, moral rights, any
related documentation, and "applets" incorporated into
this Program) are owned by Activision and/or Activision’s
sublicensors. This Program is protected by the copyright laws of
the United States, international copyright treaties and
conventions and other laws. This Program contains certain
licensed and sublicenesed materials and Activision’s
licensors and sublicensors may protect their rights in the event
of any violation of this Agreement. Certain software code, such
as the engine, contained within the Program is owned by Id
Software, Inc. and used under license.
YOU SHALL NOT:
• Exploit this Program or
any of its parts commercially, including, but not limited to,
use at a cyber cafe, computer gaming center or any other
location-based site. Activision may offer a separate Site
License Agreement to permit you to make this Program
available for commercial use; see the contact information
below.
• Use this Program, or
permit use of this Program, on more than one computer,
computer terminal, or workstation at the same time.
• Make copies of this
Program or any part thereof, or make copies of the materials
accompanying this Program.
• Copy this Program onto
a hard drive or other storage device; you must run this
Program from the included CD-ROM (although this Program
itself may automatically copy a portion of this Program onto
your hard drive during installation in order to run more
efficiently).
• Use the program, or
permit use of this Program, in a network, multi-user
arrangement or remote access arrangement, including any
online use, except as otherwise explicitly provided by this
Program.
• Sell, rent, lease,
license, distribute or otherwise transfer this Program, or
any copies of this Program, without the express prior written
consent of Activision.
• Reverse engineer,
derive source code, modify, decompile, disassemble, or create
derivative works of this Program, in whole or in part.
• Remove, disable or
circumvent any proprietary notices or labels contained on or
within the Program.
• Export or re-export
this Program or any copy or adaptation in violation of any
applicable laws or regulations. By using this Program you are
warranting that you are not a "foreign person," as
defined by U.S. government regulations, or under the control
of a foreign person.
LIMITATION ON DAMAGES: IN
NO EVENT WILL ACTIVISION OR ID SOFTWARE, INC. BE LIABLE FOR
SPECIAL, INCIDETAL OR CONSEQUENTIAL DAMAGES RESULTING FROM
POSSESSION, USE OR MALFUNCTION OF THE PROGRAM, INCLUDING DAMAGES
TO PROPERTY, LOSS OF GOODWILL, COMPUTER FAILURE OR MALFUNCTION
AND, TO THE EXTENT PERMITTED BY LAW, DAMAGES FOR PERSONAL
INJURIES, EVEN IF ACTIVISION OR ID SOFTWARE, INC.HAVE BEEN
ADVISED OF THE POSSIBILITY OF SUCH DAMAGES. ACTIVISION’S
LIABILITY SHALL NOT EXCEED THE ACTUAL PRICE PAID FOR THE
SUBLICENSE TO USE THIS PROGRAM. SOME STATES/COUNTRIES DO NOT
ALLOW LIMITATIONS ON HOW LONG AN IMPLIED WARRANTY LASTS AND/OR
THE EXCLUSION OR LIMITATION OF INCIDENTAL OR CONSEQUENTIAL
DAMAGES, SO THE ABOVE LIMITAIONS AND/OR EXCLUSION OR LIMITAION OF
LIABILITY MAY NOT APPLY TO YOU. THIS WARRANTY GIVES YOU SPECIFIC
LEGAL RIGHTS, AND YOU MAY HAVE OTHER RIGHTS WHICH VARY FROM
JURISDICTION TO JURISDICTION.
TERMINATION: Without
prejudice to any other rights of Activision or Activision’s
sublicensors and licensors, this Agreement will terminate
automatically if you fail to comply with its terms and
conditions. In such event, you must promptly destroy all copies
of this Program and all of its component parts.
U.S. GOVERNMENT RESTRICTED
RIGHTS: The Program and documentation have been developed
entirely at private expense and are provided as "Commercial
Computer Software" or "restricted computer
software." Use, duplication or disclosure by the U.S.
Government or a U.S. Government subcontractor is subject to the
restrictions set forth in subparagraph (c)(1)(ii) of the Rights
in Technical Data and Computer Software clauses in DFARS
252.227-7013 or as set forth in subparagraph (c)(1) and (2) of
the Commercial Computer Software Restricted Rights clauses at FAR
52.227-19, as applicable. The Contractor/Manufacturer is
Activision, Inc., 3100 Ocean Park Boulevard, Santa Monica,
California 90405.
INJUNCTION: Because
Activision and Activision’s sublicensors and licensors would
be irreparably damaged if the terms of this Agreement were not
specifically enforced, you agree that Activision and
Activision’s sublicensors and licensors shall be entitled,
without bond, other security or proof of damages, to appropriate
equitable remedies, including , without limitation, obtaining an
injunction against you, with respect to breaches of this
Agreement, in addition to such other remedies as Activision and
Activision’s sublicensors and licensors may otherwise have
under applicable laws.
INDEMNITY: You agree to
indemnify, defend and hold Activision and Activision’s
partners, affiliates, contractors, officers, directors,
employees, licensors, including Id Software, Inc., sublicensors
and agents harmless from all damages, losses and expenses arising
directly or indirectly from your acts and omissions to act in
using the Product pursuant to the terms of this Agreement.
MISCELLANEOUS: This
Agreement represents the complete agreement concerning this
sublicense between the parties and supersedes all prior
agreements and representations between them regarding this
sublicense. It may be amended only by a writing executed by both
parties. If any provision of this Agreement is held to be
unenforceable for any reason, such provision shall be reformed
only to the extent necessary to make it enforceable and the
remaining provisions of this Agreement shall not be affected.
This Agreement shall be construed under California law as such
law is applied to agreements between California residents entered
into and to be performed within California, except as governed by
federal law, and you consent to the exclusive jurisdiction of the
state and federal courts in Los Angeles, California; provided,
however, that all lawsuits and/or claims relating to any rights
and/or property of Id Software, Inc. shall be brought in the
federal and/or state courts in Dallas County, Texas where
exclusive venue for such matters shall lie and in the case of
such lawsuits and/or claims the laws of the state of Texas and
federal law shall govern this Agreement.
If you have any questions
concerning this sublicense, you may contact Activision at 3100
Ocean Park Boulevard, Santa Monica, California 90405, (310)
255-2000, Attn. Business and Legal Affairs.