Move programs without reinstalling them
Move programs without reinstalling them
|
If you want to move a lot of applications to another disk, or if you've lost the original program disks or disc, here's an alternative approach. Be warned that it requires many changes to the Windows Registry and may take an hour or more of steady work. Proceed at your own risk. Here's what to do. First, back up the following files in your Windows folder: system.dat, system.da0, user.dat, user.da0, win.ini, and system.ini. Next, decide where you want to place your application files, then drag the Program Files folder (and any other folder holding applications) to the new destination, and rename the folder(s) if you like.
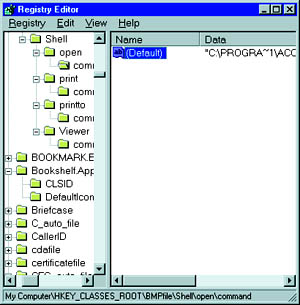
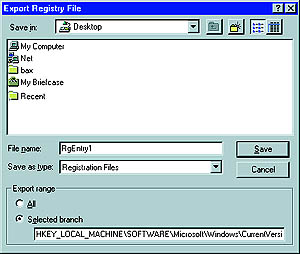
Caption: Move your programs to any drive or folder, but be sure to let Windows know by editing paths in the Registry, .ini files and Shortcuts The next step is to get your system to recognise where the applications have gone. Choose StartûRun, type regedit, and press <Enter>. In the Registry Editor, choose EditûFind. In the Find what box, type c:\progra and press <Enter>. If the Find command highlights a string value (indicated by an 'ab' icon), double-click it (or press <Enter>) and edit its Value data to change C:\Program Files or C:\Progra~1 to the new path. Note that the path may appear several times in a single Value data box; change them all. After editing, click OK to close the dialogue box, and press <F3> to find the next item to change. To speed things up, select the new path the next time you type it and copy it to the Clipboard (press <Ctrl>-C). Then you can just select the old path in each dialogue box and paste the new path by pressing <Ctrl>-V. Repeat as often as necessary. In a few instances, the Find command may turn up a binary value (indicated by an icon with 1s and 0s) in which the path is part of the Value name, which can't be edited. If this happens, you must export that part of the Registry to a text file, edit the text file, and then reimport it to the Registry. To do this, close the dialogue box and press <Tab> once to move the highlight to the folder in the tree pane. Choose RegistryûExport Registry File. Make sure the Selected branch option is selected, then save this portion of the Registry to an easy-to-find location (such as the desktop) with a name of your choice. Once the branch has been saved, press <Delete> to delete the folder you just exported. Minimise the Registry Editor and locate the file you just saved.
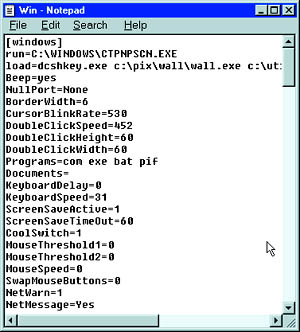
Caption: Editing a binary Registry entry is easy if you first export that Registry branch to an editable text (.reg) format Now right-click the icon, and choose Edit to open the file in Notepad. Edit the old path information as needed, following the form in the file. (For example, if the path uses pairs of slashes, don't disturb these as you change the names of drives and folders.) Save the file and exit Notepad. Then right-click the icon for the exported Registry file and choose Merge. Press <Enter> to acknowledge the confirmation. Next, you need to take care of any settings stored in win.ini or system.ini (files that Windows maintains for backward compatibility with older applications). Choose StartûRun, type win.ini, and press <Enter> to open this file in a text editor. Search for c:\progra as before, and edit each instance to reflect the new path. (If you're lucky, you won't find any occurrences.) Repeat this sequence for the system.ini file. Finally, update any affected Shortcuts. To edit Shortcuts on the Start menu, right-click the Start button and choose Explore or Open. Select an icon for an application whose path will be changed, and press <Alt>-<Enter> to open its Properties sheet (or you can right-click the icon and then select Properties from the menu). Next, click the Shortcut tab and edit the path in the Target and Start in boxes. Then click OK. If the proper icon doesn't appear, you may need to return to the Shortcut tab of the Properties sheet, click Change Icon, and point it to the proper path. If you're not sure which Shortcuts are linked to your new folder and which are linked to items in your Windows folder, you can skip this part of the process until you run into trouble and then edit each problem Shortcut in piecemeal fashion. But at this stage, you should at least check out all the Shortcuts in your StartUp folder in the Start Menu folder so you don't get errors when you start Windows. Now comes the acid test. Once all the files have been copied to the new drive and/or folder, rename the Program Files folder. Then restart your computer and try starting a few of your applications. If all is well, you can simply delete the Program Files folder and all the duplicate applications it contains. If you have problems with only one or two applications, reinstall them, this time specifying their new location. But if you are running into problems with all applications, copy your backup Registry and .ini files back to the Windows folder and restore the name of the Program Files folder. û Scott Dunn | Category:Win95 Issue: September 1998 |
These Web pages are produced by Australian PC World © 1998 IDG Communications