 Add designer colours to headlines
Add designer colours to headlines
|
The standard set of colours may suffice for most jobs, but sometimes you want text that's puce instead of red, chartreuse instead of green, or lapis lazuli instead of blue. Headlines and display text, in particular, can benefit from designer colours. Here's a guide to getting just the right shade to highlight your document. Word 97. When formatting regular text, Word limits you to a small selection of standard colours. Fortunately, you can turn display text into WordArt to access a full spectrum of hues: 1. Place the cursor where you want your fancy text to go. Then select InsertûPictureûWordArt. Word automatically switches to Page Layout view, if it wasn't already there. 2. In the WordArt Gallery dialogue box, choose a style for your text, then click OK. The plain style in the upper left corner works well for most headlines. 3. In the Edit WordArt Text dialogue box, choose a font and size, type your text, and click OK. 4. Drag the text to its final position in the document, then click the Format WordArt button on the WordArt toolbar. 5. The Format WordArt dialogue box will open with the Colors and Lines tab selected. In the Fill section, click the arrow next to the Color box and select More Colors from the pop-up box. 6. In the Colors dialogue box, click the Custom tab, then click in the Colors display to choose a basic colour, and use the shading slider to the right to pick the exact shade you want. Look at the preview box in the lower right corner as you work. When you are satisfied, click OK. 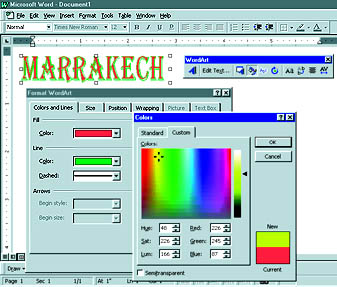 Caption: When standard colours won't do, turn display text into WordArt for more choices 7. Repeat Steps 5 and 6 to select a colour for the bordering line, if necessary. Then click OK in the Format WordArt dialogue box to finish the job. If you need to change these colours later, make sure you're in Page Layout view, right-click the text, and select Format WordArt from the menu. WordPerfect 8. WordPerfect 8 lets you add custom colours to regular text. 1. Type your text, select it, right-click it, and then choose Font from the menu. 2. In the Font dialogue box, select the font and size you want. 3. In the same dialogue box, click the Text Color icon, then click More in the resulting pop-up box. 4. In the Select Color dialogue box, click a colour close to the one you want in the colour wheel, then click in the shading bar to get the exact colour. Keep an eye on the Current color box as you work. 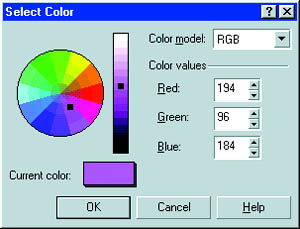 Caption: Enhance even regular text prepared in WordPerfect 8 by giving it a custom colour 5. Click OK in each dialogue box to apply the new colour and return to the document. To change the colour later, first select and right-click the text, then choose Font from the resulting context menu and repeat Steps 3 to 5 above. Word Pro 97. Word Pro 97 makes it easy to choose from a wide variety of stock colours for your text, but selecting a custom colour is not at all intuitive. 1. Type your text, then select it and pick a font and font size from the status bar at the bottom of the document window. 2. Click the Text Color button on the left side of the status bar. 3. Hold down <Ctrl> as you click a basic colour in the pop-up Color palette. 4. In the Custom Color Selector dialogue box, use the slider arrow to the right of the larger colour box to fine-tune your colour selection, watching the preview box as you work. You can also change the basic colour by clicking anywhere in the palette before moving the slider. When you're satisfied, click Add Color. Both of the colour selection palettes will disappear, but your new custom colour won't take effect yet. 5. Click the Text Color button on the status bar again. You'll find your new colour at the bottom of the Color palette. Click it to apply it to your text. New colours added to the palette in this way will be available on the basic Color palette the next time you start Word Pro. û George Campbell | Category:word processing Issue: October 1998 |
These Web pages are produced by Australian PC World © 1998 IDG Communications