 Add Pizzazz to Documents by Using Edge Effects Add Pizzazz to Documents by Using Edge Effects |
|
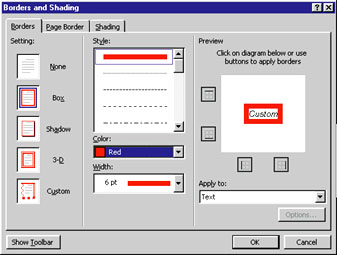
Looking for a fast, easy way to highlight text and graphics in your document? Apply borders to set material off and add impact. HereÆs a guide to the formatting associated with text borders in Word and WordPerfect. Text Borders Word 97 and 2000: Word 97 and 2000 can place a border around any block of text, down to an individual character. To surround text with a border, select the text, then select FormatòBorders and Shading. In the resulting dialog box (see FIGURE 1), select a quick border to surround the text by choosing one of the preset border style icons under Setting. To selectively add borders to one or more sides of the text, select the Custom icon and then click the boxes in the Preview section to add lines to individual sides. Control the style of border lines by choosing a pattern from the Style list. Pick a thickness for the lines in the Width list, and set the colour for the lines in the Colour list; in Word 2000 you can select More Line Colours for access to additional colours. To add a background colour or shading to your bordered area, click the Shading tab in the Borders and Shading dialog box. Then select a fill colour and a pattern, and finally click OK to apply the new border to the selected text.
WordPerfect 8 and 9: WordPerfect 8 and 9 let you add borders to only one or more paragraphs of text. Click in a paragraph or select multiple paragraphs, then select FormatòParagraphòBorder/Fill. Choose a border style from the examples in the æAvailable border stylesÆ list. Select the text you want to surround, and then choose Apply border to current paragraph only. Be sure to scroll through the entire list of style choices. To set colours for your border, click the Colour button and either pick a colour from the preset colours or click More to choose from the entire colour palette. To add a shadow to your border, click the Shadow tab (in WP 9) or the Drop Shadow button (in WP 8), and then pick a direction from the examples. In WP 9, set the Shadow Height and Shadow Width by watching the examples in the preview window. WP 8 doesnÆt give you as much control: Select the Advanced tab, click the Width button, and select an option. In both versions, the Colour button lets you set a colour for the shadow. To apply a fill colour or pattern inside the bordered area, click the Fill tab. Choose a fill style from the examples, again after scrolling through all possible styles, including gradient fills. Click the Pattern button to display other available patterns. Choose a foreground and background colour for your fill. For gradient fill styles, you can choose start and end colours. You can gain even more control over gradient fills by clicking the Advanced tab and adjusting the settings there. Watch the preview window to see the effects. View Any DOS File Extension in Word Non-standard file extensions donÆt always appear in the Open dialog box list in Word 97 or 2000. To force Word to display them, open Explorer, select ViewòFolder Options, and click the View tab in the Folder Options dialog box. In the æAdvanced settingsÆ scroll box, clear the Hide file extensions for known file types check box, as shown in FIGURE 2. To make this apply to all settings on your PC, click Like Current Folder, and then click Yes. 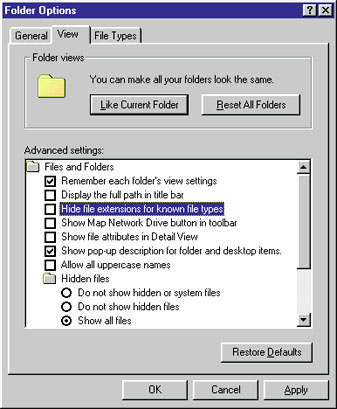 Eliminating Too-Wide Text When viewing the text of Word pages formatted in landscape orientation or displayed in a reduced-size window, you often find the words running off the right edge of the screen. To see all the text in its normal size but wrapped to fit the screen, select ViewòOnline Layout in Word 97 or ViewòWeb Layout in Word 2000. To see all the text with normal line endings but reduced in size, select ViewòZoom; then select Page width in the Zoom dialog box and click OK. Neither setting affects how the document prints. By GEORGE CAMPBELL |
Category:Word Processing Issue: October 2000 |
These Web pages are produced by Australian PC World © 2000 IDG Communications