Wrap text around graphic images in Word 97
Wrap text around graphic images in Word 97
|
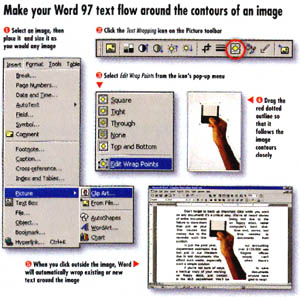
Tip Word 97 introduced a new way to wrap text around a graphic image, allowing the text to follow the contours of the image rather than just the box enclosing an imported graphic. Here's how to make this work for you. 1. Select Insert--Picture to import a picture into your document. Then size and position it as you would with any image. 2. Click the Text Wrapping icon on the Picture toolbar. 3. Select Edit Wrap Points from the resulting pop-up menu.
4. If your image is a .wmf file, Word contours the text wrapping points around the image automatically. Otherwise, you'll need to do this manually: Click the crosshair pointer anywhere on the red dotted outline around the graphic and drag the outline to a new position. Repeat this as often as you need to, until the dotted red outline closely follows the contours of the image. | Category: Word processing Issue: Jan 1998 Pages: 167-168 |
These Web pages are produced by Australian PC World © 1997 IDG Communications