Tip
Laser printers can be finicky beasts. And if you don't have a computer professional at your beck and call, someday your printer will mess up and leave you stranded. Here's a guide to handling many common laser printer crises.
Get some help
As Murphy would tell us, your printer will probably go haywire just when you're creating a critical document, one that you need right now. When that day comes, you can call on two Windows 95 tools.
First try the Printer Troubleshooter. To launch it, select Start--Help, click the Index tab, type tro in the first edit box, and then double-click printing problems in the list that appears. Alternatively, you could go to your printer's Properties screen (open the Printers folder by selecting Start--Settings--Printers, right-click the printer's icon, and select Properties) and click Print Test Page. If there's a problem printing the page, Windows 95 will ask whether you want to launch the Print Troubleshooter.
If that utility doesn't help, try Microsoft's more sophisticated Enhanced Print Troubleshooter, which is located on the Windows 95 CD-ROM in the \Other\ Misc\EPTS folder. Double-click epts.exe or run the program from the command line.
Both utilities cover most Windows 95 setup issues such as spooling settings, available memory, and driver versions. You can also check the printer manufacturer's Web site for a FAQ page or knowledge base. Hewlett-Packard, for example, offers a useful FAQ for laser printers (http://www.hp.com/cpso-support/laserjet/faq).
Check the basics
The first step is to make sure your printer is communicating with the computer. Typically, a button on the printer's control panel toggles it online and offline. After you've confirmed that the printer is online, turn the printer off and on and try printing again. Many printer errors occur apparently at random.
Next, print a test page from your printer -- check your manual for instructions. A problem here means that the trouble lies with your printer, not with its cable or software or network connection.
Look for "obvious" problems, too. Is the power off? Are any necessary cables disconnected? Is the printer's active paper tray stocked with paper? Does your document specify an odd paper size?
Inside the roller derby
If these steps don't do the trick, you may well have a paper jam, which means you'll have to open up the printer.
Most moving parts in a laser printer are rollers that guide the paper from its tray (or other starting point) through the printing process and out of the printer. As the paper travels through the printer, it passes under a rotating cylinder called the photoreceptor, where it picks up toner. The paper then moves through the fuser assembly, a set of high-temperature rollers that permanently bond the toner to the paper.
Most small and midsize laser printers integrate the photoreceptor into the toner cartridge. As the photoreceptor rotates in the cartridge, it moves past the charger corona wire, which places a uniform electrical charge on the photoreceptor's surface. Then a laser beam "writes" an oppositely charged electrical image onto the surface of the photoreceptor. Next, the photoreceptor rotates through the toner reservoir, where toner attaches to the image. Finally, the toner is pulled from the photoreceptor to the paper by an electrical charge placed on the paper by the transfer corona wire.
OK, so much for laser printer mechanics. If you think you're dealing with a paper jam, read your printer's manual for hints on finding the jam. But be careful -- there are high voltages in the corona wires, and the fuser assembly can be very hot. Always turn the printer off and, if possible, wait 10 minutes for it to cool down.
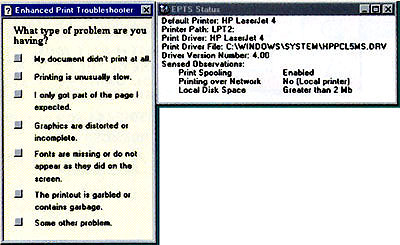
Windows 95's Enhanced Print Troubleshooter helps you find the best solutions to printing problems 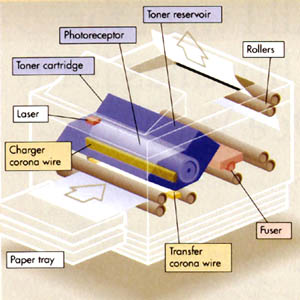
Here's what's under the hood of your laser printer. Be careful when you open it up - the corona wires contain high voltages, and the fuser assembly may be hot
When removing the errant sheet of paper, pull gently to avoid tearing it, and try to pull in the normal direction of paper movement. Make sure you remove all bits of paper; check the extracted sheet for tears or missing corners.
Also beware of unfused toner on the paper. Not only is it messy, but stray particles in your printer can cause further trouble. And if you're getting paper jams consistently, examine the rollers nearest the jam; they're often the culprits. You may be able to realign them.
If your paper won't feed correctly when you print, remove all the paper from the tray, gently fan the leading edges with your thumb, and try printing again. Paper tends to curl naturally; unless your manual says otherwise, turn the paper so that it curls under. And make sure the paper is properly inserted in the tray. Check the spring mechanisms that position the paper, which sometimes may need to be tweaked or realigned.
Looks are important
So you're not getting what you want from your printer? Here's a guide to some common problems.
Scrambled or fragmented images. If the output you're getting is fragmented, in the wrong typefaces, or just plain gibberish, your printer is having trouble processing the image. Check the printer cable connections and try swapping in another cable to eliminate that as the source of trouble. Also check your printer properties to make sure the right driver is installed. Sometimes a driver can become corrupted; you can try reinstalling it with the Add Printer Wizard (click the Add Printer icon in the Printers folder). And make sure your parallel port is configured properly; try setting the port to the standard setting in the system setup program.
Uneven print density across the page. The most likely cause is a low toner level. To redistribute the toner more evenly, remove the toner cartridge, holding one end in each hand, and tilt it back and forth. Also make sure the printer itself is level and not near any powerful lights.
Bands of uneven print density running down the page. See your manual for instructions on cleaning the photoreceptor's electrical contacts. If that doesn't help, replace the photoreceptor (which often means replacing the toner cartridge).
Light or grey print everywhere. As a photoreceptor wears out, it doesn't attract enough toner. You can often correct this in the short term by increasing the print density setting on the printer's external control panel or inside the unit itself.
Dark background or echoed images. Decrease the print density.
White patches or vertical white lines. The transfer corona wire may be dirty. Open your printer and look for the wire. If you can reach it, gently clean the wire with a cotton swab and alcohol.
All-white pages. The transfer corona wire may be broken. If it is, take the printer in for service.
All-black pages. The charger corona wire (which is probably located in the toner cartridge) isn't working correctly. Remove and replace the toner cartridge to clear the electrical contacts. If that doesn't work, replace the cartridge.
Spots. Spots that repeat in a similar pattern indicate either a damaged photoreceptor, which may call for a new toner cartridge, or a dirty fuser assembly. Call a service technician.
Toner flaking off the page. The fuser is malfunctioning. Call that technician.
Blurry images. Some paper doesn't take well to toner. Blurring also may be caused by moist paper. Try using fresh, dry paper.
Someday my prints will stop
Not all problems are worth fixing. Eventually, your printer's gears and motors will wear out, and you'll be better off buying a new printer. Expect to get between 20,000 and 40,000 pages from a low-end personal laser printer and more than 100,000 pages from a higher-quality model. Most office lasers should provide at least 300,000 pages. (Check your manual for exact numbers.) Also look for a built-in page counter. Hewlett-Packard's 4P, 5P, and 6P (but not L) series printers, for example, have a counter available through their self-test function.
- Kirk Steers
[ |
Category: Hardware
Issue: Nov 1997
Pages: 186-187
|
 Troubleshoot laser printers