Slash WordPerfect file size
Slash WordPerfect file size
|
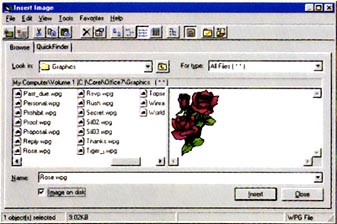
Tip If you have a template that contains a graphic, such as your company's logo, odds are that documents you create from that template are larger than they need to be. By default, WordPerfect 6.1 and 7 save the graphic in each document. But you'll save tonnes of space if you link the graphic to the document instead. Here's how. 1. Close all documents and select File--New. In the New Document dialogue box, click once on the name of the template you want to alter, click Options, then select Edit Template from the drop-down list. 2. Click the graphic in the template, then press <Delete> to get rid of it. 3. Select Graphics--Image. Locate the graphic in the Insert Image dialogue box, and click once on its filename. To avoid storing the graphic in each document, check the Image on disk box, then click Insert (OK in Version 6.1). 4. Move and resize the graphic if necessary. 5. When you're finished, select File--Save, then File--Close. From now on, documents created with this template will store the location of the graphic file instead of the graphic itself. - George Campbell
Instead of saving a graphic in a template, save a link to it so the graphic isn't saved with every document
| Category: Word processing Issue: Oct 1997 Pages: 170 |
These Web pages are produced by Australian PC World © 1997 IDG Communications