 From Quicken to spreadsheet
From Quicken to spreadsheet
 In my work as treasurer for an election campaign, I kept track of contributions using Quicken 5. Now I want to bring the raw transaction data into a spreadsheet database to do some queries and what-if analyses. What's the easiest way to do this? - Mark Russell
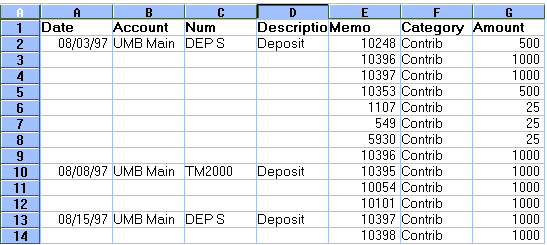 Figure 1 The data's all there, but columns A through D are missing some cell entries you'll need for your database operations. For example, instead of repeating the date 08/03/97 in A3..A9, 1-2-3 leaves the cells blank. You can, of course, infer that the dates for rows 3 through 9 are the same as the date in cell A2. However, when you sort the data for querying and what-if analyses, all these blank cells will appear at the beginning or end of the column. To fill the blank cells with their correct entries, enter +A2 in cell I2 (in Excel, enter =A2) and copy it to J2..L2. This formula copies the first row of data to a temporary area in the worksheet. In cell I3, enter the formula @if(@cell("type",A3)="b",I2,A3) and copy it to I2..L14. (In Excel, enter =if(isblank(A3),I2,A3) and copy it to I2..L14.) This formula tests whether the current cell is blank. If it is, 1-2-3 returns the entry in the cell above. Finally, select I2..L14 and select Edit--Copy. Select A2, choose Edit--Paste Special, select Formulas as Values in the dialogue box and click OK. Now delete columns I through L. Your database (shown in Figure 2) is ready for sorting or querying. 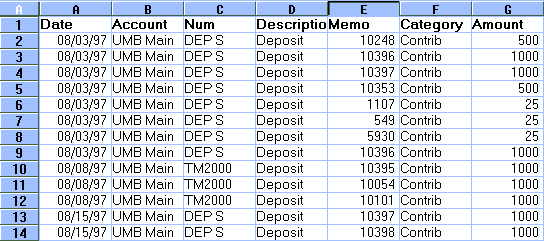 Figure 2 - Richard Scoville | Category: Spreadsheet Issue: Sep 1997 Pages: 167-170 |
These Web pages are produced by Australian PC World © 1997 IDG Communications
