Tip
The April cover story ("Revealed: Secrets for Windows 95, 3.x and NT") elicited some questions and improvements from our ever-resourceful readers.
Easier moves to floppies. You can indeed add a batch file to the Send To menu so you can move a file to a floppy disk rather than simply copying it. But Brett Stallman points out a way to do this without writing a batch file: right-click the file name, then hold down <Shift> as you choose Send To--3 Floppy (A).
If you added a new destination to your Send To menu (by creating a Shortcut to a folder in the Windows\SendTo folder), any file from the same drive you try to send to that location via the Send To menu will get moved, not copied. In that case, you can force the Send To menu to copy (not move) by right-clicking the object and holding down <Ctrl> while you choose the destination from the Send To menu.
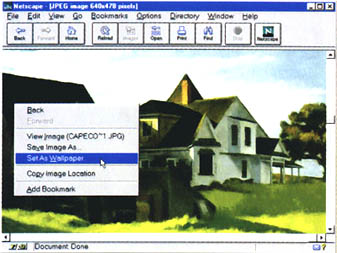
Figure 2: New wallpaper is just a couple of clicks away from your Web browser
Instant wallpaper. To make a prettier desktop, you can simply convert a picture into a .bmp file and use it as wallpaper. But just how to convert a picture file to the BMP format baffled Don Varney. The answer: use a utility specially designed to convert any graphics file to BMP format. You'll find many such inexpensive utilities online. My favourite is PolyView, at http://www.kagi.com/authors/polybytes/default.html
To use the picture as wallpaper, select Start--Settings--Control Panel, double-click the Display icon, and make sure the Background tab is selected. To find your picture, click the Browse button. Double-click the filename, select the Tile or Center button, then click OK.
Not fast enough? Try this: if you find a nice image while surfing the Internet with Netscape Navigator 3.x or Microsoft Internet Explorer 3.x, you can change your wallpaper instantly without first saving the file. With the image displayed in your browser, right-click the image and choose Set As Wallpaper. The new wallpaper will be either centred or tiled, depending on this setting in the Control Panel's Display Properties sheet.
Snap to it -- or don't. Reader Jim Goss tried arranging his icons and Shortcuts along the edge of his screen for neatness and efficiency, but they stubbornly kept snapping back to where they had been.
If this happens to you, right-click on the desktop and choose Arrange Icons. If you see a check mark next to Auto Arrange, you've found the culprit. This feature provides a handy way to keep things neatly arranged and works best if you don't have too many items on your desktop. For more control, however, turn Auto Arrange off and put your icons where you want them -- not where Microsoft does.
Update that screen saver for password protection. You may assume that adding password protection to your screen saver will foil nosy coworkers (unless they reboot your computer). Those who don't know the password will not be able to clear the screen saver. But Jeff Labute has discovered that in Windows 95, some password-protected screen savers can easily be circumvented.
If you're using an old Windows 3.x screen saver in Windows 95 (such as Starfield Simulation, whose file name is ssstars.scr), all it takes is a simple <Ctrl>-<Alt>-<Delete> to display the Close Program dialogue box. Select the name of the screen saver (such as Stars) and click End Task (twice if necessary), and suddenly the screen saver is gone -- along with your privacy. The moral of the story: stick to the screen savers that come with Windows 95 or the Microsoft Plus Pack.
Conceal some of your past. A tip in the April cover story asserts that you can't use a batch file to delete files of a specified extension from the Documents menu because the menu is constructed from Shortcuts with the .lnk extension residing in the Windows\Recent folder. Nevertheless, Brian Sheffield does just that with an easy batch file like the following:
del c:\windows\recent\*jpg*.lnk
del c:\windows\recent\*gif*.lnk
This example hides the graphics files you've been viewing by deleting .jpg and .gif files from the Documents menu (your path and extension may differ). Just enter lines like the above in Notepad and save them in a file with the .bat extension. For top efficiency, right-click your batch file in Windows Explorer and choose Properties. Click the Program tab, select Minimized from the Run drop-down list, check Close on exit, and click OK. Then run the file any time you need to cover your tracks.
For maximum peace of mind, Brian suggests one more step: if you have Microsoft Plus, you can use System Agent to run your batch file automatically so that you never have to give it a second thought. Choose Start--Programs--Accessories--System Tools--System Agent. In the System Agent dialogue box, choose Program--Schedule a New Program. In the Program box of the resulting dialogue box, type in the path to the Shortcut you created when you set properties for your batch file (or click Browse, locate and select the file, and click Open). Click When To Run, and set the interval of your choice -- for example, Hourly for the extra paranoid. Then click OK and close System Agent.
Conceal your entire past more quickly. To clear all the files from the Documents menu, you could right-click a blank area on the Taskbar, select Properties, click the Start Menu Programs tab, click Clear and then click OK. Or you could save yourself a few clicks by using the following one-line batch file submitted by Corvus Elrod:
echo Y | del c:\windows\recent\*.*
Just enter this line (your path may differ) in Notepad, and save it with the .bat extension. (Naturally, you can also add the bells and whistles described in the previous tip.) Run this batch file from a Shortcut on the Start menu, or (if you have Microsoft Plus) automate it with System Agent as described above.
A final tip: if you don't have Microsoft Plus, don't worry: you can still make this or any other batch file run automatically every time you start your computer by simply copying its lines and pasting them to the end of your autoexec.bat file in the root directory of your start-up disk.
- Scott Dunn
|
Category: Win95
Issue: Sep 1997
Pages: 166-167
|
 New and undocumented tips