Ten tune-up tips for Windows 3.x
Ten tune-up tips for Windows 3.x
|
Tip Windows 3.1 and 3.11 still get the job done for many of us. But when your Windows resources become intolerably low, the only sure way of recovering those resources is to exit Windows and restart. To keep your version of the operating system in top shape, make sure you're using these tried-and-true memory management techniques. 1. Cache in. Running Windows without a cache is like trying to run a race while holding your breath. A disk cache is an area of memory that stores recently used data from your hard disk, so your computer doesn't have to take the comparatively slow route of looking on the drive for everything it needs. Fortunately, Windows 3.x installs and uses a cache of its own -- SmartDrive. To make sure SmartDrive is in use, look for a line containing smartdrv.exe in config.sys or autoexec.bat. (If you don't see it, ask the person who configured your computer whether a third-party cache program has been installed.) If you're using Windows for Workgroups 3.11, open the Control Panel, double-click the 386 Enhanced icon, click Virtual Memory, click Change, and make sure Use 32-Bit Disk Access is checked. The cache size (both in this Control Panel dialogue box and in your smartdrv command line) should be big enough to boost your speed but small enough to keep it from taking too much memory away from applications. If you don't have time to experiment with different cache sizes, just accept the default values. 2. Buff it down. DOS has a kind of built-in disk cache that you control with the buffers= line in your config.sys file. But if you're using SmartDrive, a larger DOS buffer setting can actually hurt efficiency. Open config.sys (it's in the root of your start-up drive) using a text editor such as Notepad, and try a setting like buffers=15. If you're not using SmartDrive, use the setting buffers=30, or whatever your caching software recommends. 3. Tune it up. Run an optimising utility once a week to defragment your hard disk. This procedure is especially important if you are using a temporary swap file (see Tip 4), but defragging also improves SmartDrive's performance. If you can't afford a third-party tool such as SpeedDisk -- part of the venerable Norton Utilities -- use the Scandisk and Defrag utilities that come with DOS 6 (you'll need to exit Windows to use these tools). If you're using disk compression other than DoubleSpace or DriveSpace, stick with the defragmenting utility that came with your compression software. 4. Swap till you drop. When you run out of memory, Windows uses free hard disk space, or virtual memory, as a temporary swap file. But you'll get much better performance if your computer uses a permanent swap file -- a dedicated portion of your hard drive that Windows can use only for this purpose. Some applications, in fact, won't even start unless you have a permanent swap file. To make sure you've got one, open up the Control Panel, double-click the 386 Enhanced icon, and click Virtual Memory. The Swapfile Settings list at the top of the Virtual Memory dialogue box tells the story. If you see Type: Permanent, you're in good shape. If that isn't what you see, exit Windows and defragment your hard disk(s) as described in Tip 3. Then return to the Virtual Memory dialogue box and click Change to get to a dialogue box with a New Swapfile Settings section. Select a fast hard disk with lots of free space (but don't choose a compressed drive, a network drive, or a RAM drive), and enter a virtual memory size in the New Size box. If you have oodles of hard disk space, you needn't use the entire amount that Windows recommends for virtual memory. As a rule of thumb, set a swap file size that is double the amount of your total RAM (or a little less if you have 16Mb or more). Depending on the apps you use and your disk space requirements, you can come back and change this size later. Click OK and follow the prompts to restart Windows.
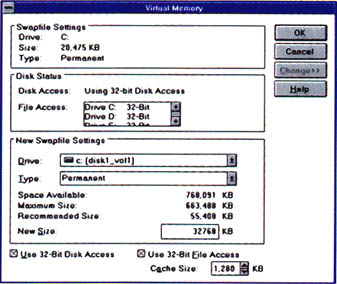
Speed up Windows by (1) setting up a permanent swap file on the fastest drive you have, (2) making the swap file as big as possible, (3) checking Use 32-Bit Disk Access, and (4) checking Use 32-Bit File Access and setting a cache size that minimises the need for disk access
5. Access with 32 bits. While you're in the Virtual Memory dialogue box (see Tip 4), notice whether the Use 32-Bit Disk Access box in the bottom left of the dialogue box is checked. (If you don't see the check box, click Change to expand the dialogue box.) Checking this box lets Windows use a special device driver for faster disk access. To take advantage of this feature, you must be using a Western Digital WD-1003 (or compatible) hard disk controller. How do you know what you've got? Make sure the box is checked, then click OK and follow the prompts to restart Windows. If Windows won't restart, you probably don't have a compatible system. In that case, type win /d:f at the DOS prompt to start Windows without this feature; then return to the Virtual Memory dialogue box and uncheck the box. | Category: Windows 3.x Issue: Jul 1997 Pages: 167-168 |
These Web pages are produced by Australian PC World © 1997 IDG Communications