Tame Program Manager
Tame Program Manager
|
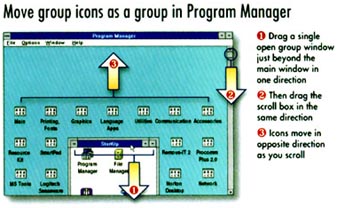
Tip Program Manager can balloon into a crowded mess of icons with overlapping titles. Here are six tips for taming all those wayward icons: 1. Use Auto Arrange. Isn't it nice how Control Panel icons never wander out of line? To get a similar effect with the icons in Program Manager groups, choose Options--Auto Arrange (if you see a check mark by Auto Arrange, it's already on; choosing it again will turn it off). For a one-time fix, choose Window--Arrange Icons. 2. Clean up groups. Unfortunately, no Auto Arrange feature exists for the group icons in Program Manager. Instead, close or minimise your group windows, and choose Window--Arrange Icons from the menu. 3. Move a group of groups. To move all your minimised group icons in unison up, down, left or right, first close or minimise all your group windows, and then cluster the icons so they all fit within the Program Manager window (that is, so Program Manager shows no scroll bars). Next, open one group window and drag that window in the opposite direction from the way you want to move your icons. Keep dragging until the window is beyond the edge of the Program Manager window. For example, to move all group icons upward, move the open group window downward until its edge disappears. This forces at least one scroll bar to appear. Click in that scroll bar and scroll in the direction you want all the group icons to move. The open group window and all the group icons should reposition themselves within the Program Manager window. Repeat this process as needed. 4. Space your icons horizontally. Does the Auto Arrange or Arrange Icon command leave your icons too crowded, or maybe not crowded enough? Start Control Panel. Double-click the Desktop icon and change the Spacing setting. A larger number (up to 512 pixels) spreads things out; a smaller number makes things tighter. If you want your icon labels to appear on a single line, uncheck Wrap Title while you're there. Then click OK. 5. Space your icons vertically. To increase or decrease the space above and below icons, you must edit the infamous win.ini file. In Program Manager or in File Manager, choose File--Run, type win.ini and press <Enter>. Under the [desktop] heading (but before the next bracketed heading), add the line IconVerticalSpacing=75 (the actual default value varies, depending on your system). To see the effect of your addition, you'll have to save the file and restart Windows. Experiment with bigger or smaller numbers to add or remove space between rows of icons. This setting also affects the vertical position of minimised icons on the desktop. 6. Trim icon names. If space is a problem, bring icons closer together by shortening their names -- for example, change "Acme WordWrite for Windows" to the stylishly slim "WordWrite". Just select an icon and choose File--Properties (or press <Alt>-<Enter>); then edit the description. Use this trick for group icons as well as for application and document icons. - Scott Dunn
| Category: Windows 3.x Issue: May 1997 Pages: 157 |
These Web pages are produced by Australian PC World © 1997 IDG Communications