Create push-button menus
Create push-button menus
|
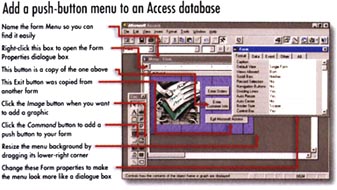
Tip It's easy to create a database menu form with push-button controls. You can start from scratch or copy a menu from a sample database and customise it. I often start with a blank form, change it a bit, then pirate some buttons from another menu. Next, I change the code attached to the buttons and call the form Menu -- unimaginative but easy to identify. These steps apply to Access. For other databases, visit US PC World Online at http://www.pcworld.com/hereshow.html. 1.Create a new blank form: in the database window, select the Forms tab, then click the New button. In the New Form dialogue box, leave Design View highlighted and click OK. You don't need to choose a table or a query for the form. 2. The grid area that appears represents the background of your menu. To resize the grid area, click and drag its lower right corner. 3. Change some of the form properties to make the form look more like a dialogue box and less like a window for viewing records. Right-click the box to the left of the horizontal ruler, choose Properties, and select the Format tab. Set Scroll Bars to Neither, Record Selectors to No, and Navigation Buttons to No, as in the figure. 4. To change the background colour of the form, leave the Properties box open and click the Detail bar on the form. Make sure the Format tab is selected, and click the Back Color line. Click the ... button that appears at the end of the line to open the Color dialogue box. Select a shade, then click OK. Click the Detail bar again to see how your choice looks.
5. Before you start adding push buttons, click the Label tool in the toolbox, drag the mouse to create a box for the title, then enter a title in the box. If you decide that using an appropriate file name for the form is enough, select File--Save and enter a name like Menu. | Category: Data management Issue: Apr 1997 Pages: 170-174 |
These Web pages are produced by Australian PC World © 1997 IDG Communications