|
|
|
|
|
If you dual-boot between Windows 9x and NT, you must be careful to avoid wasting valuable disk space. Accordingly, have every version of Windows on your system use the same file for virtual memory (disk space that Windows treats like RAM to give your system an extra boost and allow more applications to run at once). First, boot to Windows NT. Right-click My Computer and choose Properties. In the System Properties dialogue box, click the Performance tab. In the Virtual Memory section, click the Change button. In the Drive list, select the drive that you want Windows to use for virtual memory. Typically, this is the disk with the most free space. (The box below the Drive list identifies the amount of space available on the selected drive.) Click in the Initial Size (MB) box, and type the amount of space (in megabytes) you want devoted to virtual memory. Microsoft recommends that this amount be equal to or greater than the amount listed as the recommended size in the Total Paging File Size for All Drives section of the dialogue box. Then type that same amount in the Maximum Size (MB) box, and click Set. If you previously designated a different drive, select that drive from the list now, enter 0 in both the Initial Size and Maximum Size boxes, and click Set to remove the virtual memory file from that drive. After you're finished, click OK and then Close. When prompted to do so, click Yes to restart your computer. Now boot to Windows 95 or Windows 98. Right-click My Computer and choose Properties. In the System Properties dialogue box, click the Performance tab and then click the Virtual Memory button. Select Let me specify my own virtual memory settings. From the Hard disk list, choose the same drive you selected in NT. (If your software lets you boot to multiple operating systems, remember that the drive letter you selected in NT may not correspond to the same drive in Windows 9x. Use Explorer to check the drive letters against their volume names, if necessary.) In the Minimum and Maximum boxes, enter the same size you entered in the corresponding boxes in NT. Click OK and then Yes to ignore the scary warning. Click Close in the System Properties dialogue box, and click Yes to restart your computer. 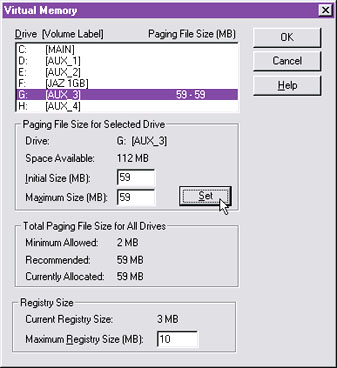
Caption: Save disk space by specifying the size of Finally, restart the computer in Windows 9x. Choose Start-Run, type sysedit and press <Enter>. Locate the heading "[386Enh]" in system.ini. Beneath this heading and before any other bracketed headings, look for a line that reads PagingDrive=C: (the drive letter may differ for your system). If you don't see it, add it on a separate line. Similarly, make sure you have a line under the "[386Enh]" heading that reads PagingFile=C:\PAGEFILE.SYS (you may have to add this line as well, adjusting the drive letter as needed to match the drive you chose for your virtual memory). Save the file and restart your computer once again. Both operating systems will now use the same file for virtual memory. If your Windows 9x drive contains a Win386.swp file, you can delete it to recover disk space. - Scott Dunn |
Category:win9x, windows NT Issue: November 1999 |
These Web pages are produced by Australian PC World © 1999 IDG Communications
 Save disk space on dual-boot systems