 Unique folder icons Unique folder icons |
|
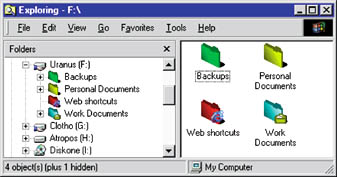
It turns out that, if you have Windows 98 or Windows 95 with Internet Explorer 4's Desktop Update installed, you can assign different icons to your boring yellow folders using little more than Notepad. To confirm you have Windows 98, or Windows 95 with IE 4's Desktop Update, open the folder whose icon you want to customise. Choose View*Folder Options, click the View tab, make sure "Show all files" is selected under "Hidden files", and click OK. Look for a file named Desktop.ini (the extension won't be visible if that option is turned off). This file is created any time you customise a folder, such as with a background picture. Double-click Desktop.ini to open it in Notepad. If you don't see Desktop.ini, just start Notepad. If you opened a previously existing Desktop.ini file, look for the line '[.ShellClassInfo]' and add a carriage return at the end of that line. If you don't see it, or if you started with an empty Notepad window, type [.ShellClassInfo] at the top of the file and press <Enter>. On the next line, type IconFile= followed by the full path and name of the file containing the icon you want to use -- for example, IconFile=c:\windows\system\shell32.dll. Press <Enter> again. Since some files (such as the shell32.dll file that comes with Windows) may contain multiple icons, you must indicate which icon you want by specifying its order number in the file. To find out an icon's number, right-click any shortcut and choose Properties. Click the Change Icon button. Type the path to the file that contains the icon you want, or use the Browse button to select it from its folder location. When you see the icons displayed in the Change Icon dialogue box, count -- starting from zero (the number of the first icon in any file) -- from top to bottom, left to right. When you get the right number, click Cancel twice and return to Notepad. Then add this line: IconIndex=0 (replace 0 with the number of your icon). If your file contains a single icon (as is the case with .ico files), leave this setting at 0 or omit the line entirely. Now choose File*Save. If you started with an empty Notepad window, a dialogue box will prompt you for a name and location. Navigate to the folder whose icon you want to change. In the File name box, type "desktop.ini", including the quotation marks so Notepad won't add its default .txt extension. Click Save. There is still one more step. This trick only works with folders that have the attribute that marks a folder as a "system file". To add it, first locate the icon for your folder in Explorer (or on the desktop). Choose Start*Run and type attrib +s. Leave the Run box open, and drag and drop your folder from Explorer (or the desktop) into the Open box of the Run box. The text should look something like: attrib +s "c:\My Documents" (the path to your folder will, of course, differ). Click OK. A DOS box will flash momentarily on screen as it applies the system attribute to your folder. Finally, select your folder and press <F5> to refresh the display. You should see your new icon. If you view it in a two-pane Explorer tree, the icon in the left (file tree) pane may not look as it should, but this should be corrected the next time you start Windows (see FIGURE 2). As a final touch, if you created a desktop.ini file, you might want to hide it when hidden files aren't displayed: Right-click the file and choose Properties. Check the Hidden box and click OK.
If this sounds like too much trouble, try a utility. I like the easy-to-use Change Icon by Pierre-Marie Devigne, available from home.nordnet.fr/~pmdevigne. The author calls this "e-mailware"--if you like it, just drop him a line. |
Category:Windows 9x Issue: March 2000 |
These Web pages are produced by Australian PC World © 1999 IDG Communications