 The ten commandments of installing upgrade cards
The ten commandments of installing upgrade cards
|
For Moses, the Ten Commandments were carved in stone. Thou shalt do this, thou shalt not do that. Life was simpler then. Nowadays we have PCs. They're supposed to make our lives easier by doing this and not that. Take Plug and Play. The technology has made adding new hardware a snap ù especially with Windows 98 ù but it's still far from foolproof. Installing a network card or video accelerator, for instance, can cause a ripple effect of conflicts even when the device is installed correctly. And a botched installation can cost you several hours, if not days, of downtime. You can avoid all the pitfalls associated with card upgrades by following what I call the ten commandments of installing upgrade cards. 1. Don't burn your bridges. Installing hardware usually entails installing driver software as well. And if you experience problems during the installation, important files may be changed, corrupted, or even deleted. So always have a recent backup of your data handy. Ideally, you have a complete replica of your hard disk ù PowerQuest's Drive Image 2.0 is great for this ù stored in a safe place. If that's not practical, at least back up your key system files: system.dat, user.dat, system.ini and win.ini (all in the Windows folder) and autoexec.bat and config.sys (in the root folder). 2. Do your homework. Installation often requires you to make obscure and non-intuitive choices, so read the documentation. Gather all setting information like COM ports or, for non-Plug-and-Play hardware, IRQs and DMA addresses. Next, go to the vendor's Web site and look for confirmation of the installation instructions. While you're there, see if a more recent version of the card's driver exists and if it does, download it. But be wary: many companies will post beta versions of a card's drivers. Unless you have good reason to believe a beta driver is stable, avoid it. They are works in progress and may not qualify for tech support. Benefit from the experience of others. If there's a FAQ or knowledge base on the vendor's site, check it for known problems and other issues with your card. 3. Consult the experts. If you don't find satisfactory answers online or in the printed documentation, call the card vendor's technical support line before you start the installation. Support technicians are your best source of current information and troubleshooting tips on specific hardware. The single largest library of collected troubleshooting information is located at Microsoft's online KnowledgeBase (support.microsoft.com) and at its associated, more technical database, TechNet (www.microsoft.com/technet). 4. Remove old drivers first. If you're replacing an existing card, remove the old card's drivers before installing the new one. Go to Device Manager (right-click My Computer-Properties, select the old device and hit the Remove button; or starting from the Control Panel, run Add/Remove). You can't remove a video card driver, so ù to work around this problem ù double-click the display driver entry in Device Manager, hit the Update-Driver button on the Driver tab and replace your current driver selection with Windows' Standard VGA driver. 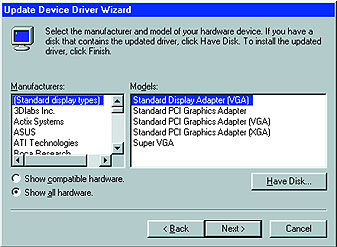
Caption: Install Windows' VGA driver before you remove your old graphics card 5. Never interrupt a driver installation. Always finish the installation of a driver and then, if you want, uninstall it. Stopping in mid-installation may change or damage key system files. And you may not be able to undo the damage by removing the partially installed components with Add/Remove or by reinstalling the driver. 6. Install one card at a time. If you're adding more than one card, install one first and then use your system for a while. Make sure it has no performance conflicts before you add the others. This will make any problems that arise far easier to isolate and resolve. 7. Get grounded. Static electricity on your body can destroy chips. Always ground yourself by touching a large grounded conductive object (aluminium or steel). If no such object is available, touch your PCs case while it's still plugged in to a grounded outlet. 8. Be gentle but firm. Insert cards with care. Sometimes substantial pressure is needed to insert a card into an expansion slot. If the motherboard flexes at all, back off and try realigning the card. 9. Use the screws. Always fasten the card's bracket to the PCs frame. The card may seem to be firmly in place, but it can easily come loose, causing all kinds of trouble. 10. Save your old card and software. Murphy's Law of Installations: the day after you throw something away, you'll need it. - Kirk Steers |
Category:hardware Issue: June 1999 |
These Web pages are produced by Australian PC World © 1999 IDG Communications