 Take charge of the Windows Registry
Take charge of the Windows Registry
|
If you are a regular Help Screen reader you will have heard of the Windows Registry. You probably have some idea of its purpose, too. The Registry is a large repository for storing information about Windows and Windows applications. This information ranges from the very simple (product and user names, for example) to highly obscure chains of hexadecimal numbers that most of us find impenetrable. Novice users are often nervous of making changes to the Registry, and with good reason ù a careless amendment or deletion can easily bring Windows to a shuddering halt. However, Registry-editing doesn't have to be dangerous, and it isn't ù provided you only change settings you understand. Changing a value for RegisteredOwner, for example, from your name to somebody else's, is unlikely to lead to catastrophic system failure. (OK, I'll stick my neck out and say it won't lead to catastrophic system failure!) Deleting a setting called FontData, on the other hand, is obviously asking for trouble. Here are a couple of Registry "tricks" that we hope you will find useful. If you don't want to make changes to your system, run the Registry Editor anyway and take a look around ù it will give you an idea of how the Registry works.
Speed up the Start menu Have you ever clicked the Start button and wondered why Windows takes so long to display the menu? Well, you can hurry it along by tweaking the Registry. The first step is to start the Registry Editor. To do this, choose StartûRun and type regedit in the Run dialogue box. Clicking OK will launch the editor. Next, expand the branch called HKEY_CURRENT_USER. (To expand a branch, click the "+" sign next to the branch name; if a branch is already expanded, click the "-" sign to collapse it.) You will notice that sub-branches are listed alphabetically ù navigate down the branch by expanding first Control Panel and then Desktop. Highlight Desktop and all the relevant settings will appear in the right-hand pane of the Registry Editor window. The setting we are interested in is MenuShowDelay, which probably has a value of 400. That's the Windows default. To change this value, double-click MenuShowDelay, delete the current value and type a lower number (0 gives you maximum speed, but it may make you dizzy!). To finish, click OK and choose RegistryûExit. Although some Registry changes take effect immediately, you won't notice this one until your restart Windows. 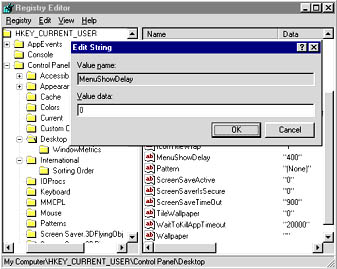
Caption: Speed up the Windows Start menu by editing the Windows Registry
Create your own Windows tips Remember the first time you installed or used Windows? Every time you started your system you would have seen a Welcome dialogue box and a one- or two-line tip. Most users turn this feature off after a while, either because they have read all the tips or because they find them distracting. However, by editing the Registry, you can adapt this feature to display any text you want. Here's how it's done. Launch the Registry Editor as before and drill down to HKEY_LOCAL_MACHINE\SOFTWARE\Microsoft\Windows\CurrentVersion\Explorer\Tips. With Tips highlighted, you will see all the Windows default tips in the right pane. If you would like to add your own tips to the list, browse through the numbers in the Name column and make a note of the highest one (probably 49). Alternatively, if you would prefer to replace the default tips entirely, delete the existing entries. The quickest way to do this is to click the second entry in the Name column (just below (Default)), scroll down to the end of the list, hold down the <Shift> key and click the last entry. Hit the <Delete> key and confirm your choice when prompted. 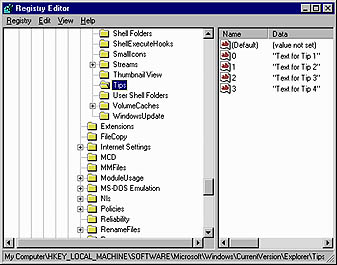
Caption: Breathe new life into the Windows Tips feature by creating your own tips To create a new tip, right-click a blank area of the right-hand pane and choose NewûString Value. The text New Value #1 will appear. If you are extending the Windows tips, rename the new value by typing 50 (assuming 49 is the value you noted earlier). If you are creating a new list, type 0. Press <Enter> to confirm the name. Now that you have created some space to store the new tip, it's time to add the tip text. To do this, double-click the new value name (probably 0 or 50) and type the message you want to be displayed. (You can type just about anything here, with one caveat: the message length must not exceed 255 characters, including spaces.) Click OK to dismiss the dialogue box. You can repeat this procedure to create as many tips as you like ù just be sure to number the new keys sequentially (0, 1, 2, 3 etc). Check the results by restarting Windows and cycling through the tips. If the Welcome dialogue box doesn't appear, click the Start button, choose Run and type c:\windows\welcome.exe. Clicking OK will launch the Welcome screen. To make it appear automatically in future, make sure that the Show this Welcome Screen next time you start Windows check box is checked. û Neville Clarkson | Category:newbie Issue: January 1999 |
These Web pages are produced by Australian PC World © 1999 IDG Communications