Browser caching explained
Browser caching explained
|
Caches are everywhere - on your motherboard, on your processor, on your hard drive - but unless you're an avid reader of manuals and online Help files you might not be sure what they are.
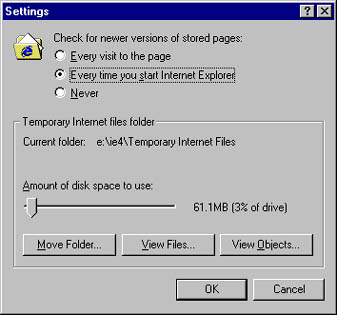
A cache (usually pronounced "cash") is an intermediate storage area designed for speed of access. We humans "cache" things too, in a sense. Take office stationery, for example. There's probably a stationery cupboard somewhere in your building, which, if it's well maintained, contains all the pens, envelopes and toner cartridges you are ever likely to need. But you don't walk down the hall every time you need an envelope. To save time, you keep a small supply of the items you use most frequently in your desk drawer. That drawer is your cache. For a Web browser, the stationery cupboard might be a Web server several thousand kilometres away across a slow modem link. The desk drawer is a folder on your hard drive which stores copies of the pages you visit most often. Browsers manage their caches more or less automatically, so there's often no need to intervene. But if you are looking for top performance, you might want to make a few adjustments: 1. Adjust the cache size. The efficiency of your browser's cache depends largely on its size. Obviously, the more files that are stored on your hard drive, the less often your browser will have to fetch pages from Web servers. If you plan to browse offline (ie while not connected to the Net), a large cache is an obvious advantage, since the page you want to view is more likely to have been cached. To improve performance, try increasing the cache size. If you are using Internet Explorer 4.x, you can do this by choosing ViewûInternet Options and selecting the General tab. Then click the Settings button in the Temporary Internet Files section of the dialogue box. Drag the Amount of disk space to use slider to the right to increase the cache size. You can make it as large as you like - the only limiting factor is the amount of disk space available. In Communicator 4.x, choose EditûPreferences and, in the Category panel, double-click Advanced. With the Advanced branch expanded, the cache setting will be visible: click it once to view your cache settings. Netscape's default cache size is 7680KB (7.5MB), but you can expand or shrink it by typing a new figure in the Disk Cache field. When the cache size reaches the limit you have defined, the oldest files will be deleted and replaced by new items. 2. Modify caching behaviour. As we've said, once your browser has saved an HTML page to its cache, the file can be retrieved instantly because there's no need for your browser to access the Web server. But what happens if the file on the server changes? You will be left with an outdated version of the file. Fortunately, both IE 4 and Communicator allow you to work around this problem. IE 4's Settings dialogue box lets you choose how often the browser "refreshes" its cache. The last option, Never, is rarely a good choice: select Never and IE 4 will never look for a more recent version of a file. The first option, Every visit to the page, may be the right choice if you habitually view pages that change frequently. Bear in mind, though, that with such frequent checking, you will lose much of the performance benefit of caching. The second option, Every time you start Internet Explorer, is usually the best compromise. The same options (worded slightly differently) are available in Navigator's Preferences dialogue box. 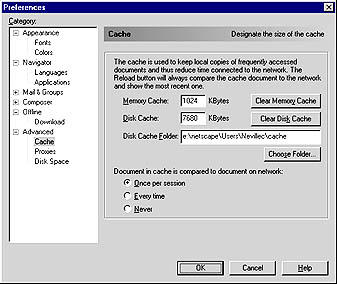
Caption: Configure your browser's cache in Netscape's Preferences or IE 4's Settings dialogue box 3. Clear the cache. From time to time, you may need to recover a significant amount of disk space to make room for a new application. Or you may have been viewing confidential Web pages that you don't want others to see. In both cases, the solution is to empty the cache. In Internet Explorer, choose ViewûInternet Options and, on the General tab, click Delete files. To empty the cache, click OK when prompted. In Communicator, choose EditûPreferences, double-click Advanced and then highlight the Cache option. Click the Clear Disk Cache button and hit OK when prompted. - Neville Clarkson | Category:newbie Issue: December 1998 |
These Web pages are produced by Australian PC World © 1998 IDG Communications