 Write in the margins
Write in the margins
|
Now you know how to indent epigraphs and long quotes within the body of a document, but what about the opposite problem: writing in a document's margins? Perhaps you need a marginal note to annotate a passage of text or draw attention to a point. Here's how to create marginal notes in Word, WordPerfect, and Word Pro. Word 6.0 and later: Before you can write anything in the margin, you must create a frame or text box. 1. Select File-Page Setup and increase the size of the left margin to fit in the marginal text. Keep in mind that most printers can't print any closer than a centimetre or so from the edge of the paper. 2. Select Insert-Frame (Word 6 and 7) or Insert-Text Box (Word 8). Word automatically switches into Page Layout view. Click and drag in the margin to draw the frame or text box where you want it to appear. 3. Adjust the size and position of the box as needed by dragging the box's handles, being careful at the same time to keep the box at least a centimetre from the edge of the page. Adjust the margins for the frame or text box by dragging the margin icons on the ruler (if the ruler is not visible, select View-Ruler). 4. Type your note and format the text as needed. Word will automatically increase the height of the box to accommodate your marginal text. 5. To remove the line border in Word 6 and 7, right-click the border of the box, select Borders and Shading from the context menu, select None in the Presets area of the resulting dialogue box, and then click OK. In Word 8, you also right-click the border of the text box, but select Format Text Box in the resulting context menu. In the Line area of the resulting dialogue box, select No Line from the Color drop-down list, and then click OK. 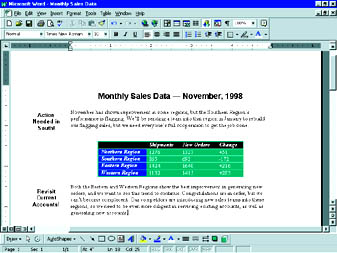
Caption: Create marginal notes to annotate documents or emphasise points by inserting a frame or text box within the margin WordPerfect 6.1 and later: As in Word, you enter marginal notations in a text box. 1. Select Format-Margins, then increase the size of the left margin to accommodate the marginal text. 2. In WordPerfect 8, select Insert-Text Box; in 6.1 and 7, select Graphics-Text Box. When the box appears, drag it to the margin. 3. Adjust the size and position of the box by dragging the sizing handles, making sure the box is at least a centimetre from the page's edge. 4. Type your note in the box, formatting it as you normally do. WordPerfect will automatically adjust the height of the box. 5. In WordPerfect 6.1, a feature bar should appear at the top of the document window. If it doesn't, right-click the text box and select Feature Bar from the menu. Click the Border/Fill button on the feature bar, select None from the dialogue box's Border Style list, and click OK to turn off borders for your text box. In WordPerfect 7 and 8, right-click the text box, select Border/Fill from the menu, click the blank area in the Available border styles list, and then click OK. Word Pro (all versions): Unlike Word and WordPerfect, Word Pro does not automatically resize a frame so that the text within the frame will fit. 1. Right-click anywhere in the document screen and select Page Properties from the context menu. Increase the left margin to accommodate your marginal notes. 2. Select Create-Frame and then click the Size & Place Frame Manually button in the Create Frame dialogue box. 3. Click and drag to draw the frame, remembering to keep it at least one centimetre from the edge of the page. 4. Type your note in the frame, formatting it as you normally do. Because Word Pro does not automatically adjust the height of the box, use the sizing handles to increase the height, if necessary. 5. To remove the line border, just right-click the frame and select Frame Properties from the menu. Click the Line Style tab, and then click the none button in the Lines around frame region. Then close the InfoBox. - George Campbell | Category:word processing Issue: December 1998 |
These Web pages are produced by Australian PC World © 1998 IDG Communications