 Share an Outlook Calendar Share an Outlook Calendar |
|
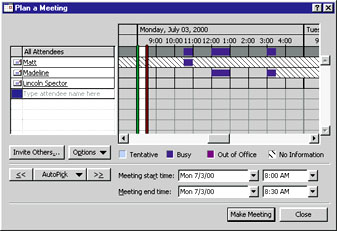
Q: We want to share one Outlook 2000 calendar across a small-office LAN. We can't figure out how to do it. Can you help? Matthew Brenengen A: Outlook 2000 offers several ways to share calendar information. I'll describe two that are easy to set up. Net Folders relies on e-mail, so if everyone on your LAN uses Outlook as their e-mail client, you can use Net Folders. First, select FileòShareòCalendar (you may have to wait for the Share option to appear). If you are told that a feature must be installed, click Yes and insert your Office CD-ROM. Once everything is installed, Outlook will bring up the Net Folder Wizard. On the wizard's second page, where you identify the people you want to share your calendar with, click the Permissions button to allow them to alter the calendar. The next time you send e-mail, Outlook will mail invitations to everyone you listed. When recipients click the invitation's Accept button, a copy of your calendar is loaded onto their computer. To see that calendar, they select ViewòFolder List. To make the calendar more readily available, they can drag it from the folder list to the shortcut bar. E-mail exchanges are generated automatically to keep individual copies of the calendar in sync. Internet Free/Busy won't show you someone's whole calendar, but it will let you see the times other people are available, which is useful for setting up a meeting. The function is designed to work over an Internet connection, but it will work on any network with shared folders if you make the paths to those folders a URL (more on this below). The first step is to create a folder that everyone can access on a network server or workstation. If you put it on a workstation, that system's owner must give everyone full read/write rights to it. Don't use spaces in the folder name (URLs can't have spaces). To publish your own information, select ToolsòOptions, click the Calendar Options button and then the Free/Busy Options button. In the resulting dialog box, check Publish my free/busy information. Then, in the 'Publish at this URL' field, enter the path to your as-yet-uncreated file in the shared folder. This path must be entered as a URL, starting with file:// and using forward slashes (/) instead of backslashes (\). For instance, if the shared folder is called freebusy and is on a computer identified as 'shared' on the network, and your name is Matthew, you might enter file://shared/freebusy/matthew.vfb. (The file extension must be .vfb.) In the 'Search at this URL' field, enter a URL to a generic file in the same path: file://shared/freebusy/username.vfb. Click OK three times to return to Outlook. After you've set up your information, you'll have to send it manually. Select ToolsòSend/Receive, wait for Free/Busy Information to appear on the menu, then select it. From now on, Outlook will update this information automatically. To use other people's Internet Free/Busy, follow the steps above for sharing your own information, then go to Outlook's Contacts page and double-click the name of a coworker whose information you want to access (add any coworkers who aren't listed). In the resulting Contact dialog box, click the Details tab. At the bottom of the dialog box, in the Internet Free/Busy section, type the URL path to them, such as file://shared/freebusy/irving.vfb. Save and Close the dialog box. Outlook provides a number of ways to use this information. For instance, go to the date in the Calendar and select ActionsòPlan a Meeting. Click the Invite Others button to select people to invite. After you select them and return to the Plan a Meeting dialog box, you'll see when each invitee is available (see FIGURE 2).
By Lincoln Spector |
Category:Windows 9x Issue: December 2000 |
These Web pages are produced by Australian PC World © 2000 IDG Communications