 The Future Is Here:Self-Typing Text The Future Is Here:Self-Typing Text |
|
We all type the same things over and over in the course of our work. By using the automated text-entry systems in Word 97, 2000 and Wordperfect 8 and 9, you can reduce duplicated effort and speed up your work. You can insert formatted text quickly by selecting an entry from a list or by typing an abbreviation and pressing a key. Here's how to latch on to these valuable tools. Word 97 and 2000: To insert a ready-to-use AutoText entry, right-click any available space on a Word toolbar or on its menu bar, and select AutoText from the list of available toolbars. Place your cursor at the desired insertion point, click All Entries on the AutoText toolbar, point at a category, and select the entry you want. Or select InsertòAutoText, point at a category, and select the entry to insert it. ò To preview all the existing AutoTexts, select InsertòAutoTextòAutoText. ò To create a new AutoText entry, type the text you want to use, and then select it. This text can be as short as a single word or as long as several paragraphs. AutoText entries store all the formatting that was present in the original text. Next click New on the AutoText toolbar, press <Alt>-<F3>, or select InsertòAutoTextòNew. In the Create AutoText dialog box, type a shortcut word for your new entry and click OK. Hint: Choose a name that's easy to remember but isn't a real word you'd otherwise use. For example, if you're creating an AutoText entry for a liability disclaimer in a contract, name it something like LiabilityDisclaimer. Your new AutoText entries will be found in the AutoText list's somewhat enigmatically named Normal category. ò To create AutoText entries for graphics, Word fields, WordArt objects, or any other object that Word supports, just select the object and follow the instructions listed in the previous tip. This feature lets you store logos, tables, charts, and other items for quick recall. ò To delete an existing AutoText entry, select InsertòAutoTextòAutoText, click the entry, and then click Delete and OK. ò To arrange to have Word suggest AutoText automatically while you are typing an entry's shortcut name, select InsertòAutoTextòAutoText, click Show AutoComplete tip, and click OK. The entry name will appear as a yellow tool tip above the current line as you type. To insert the entry at any point during typing, press <Enter> (see FIGURE 1). 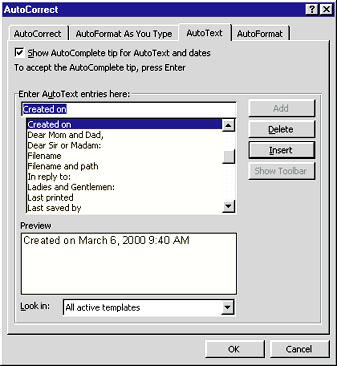 In WordPerfect 9, you can create QuickWords shortcuts for graphical objects such as logos, TextArt objects, and charts. Select the object, select ToolsòQuickWords, type a name for the entry in the Abbreviated form box, and click Add Entry. ò To delete an existing QuickWords entry, select ToolsòQuickWords, click on the entry in the Abbreviated form list, and then click Delete Entry. ò To rename an existing QuickWords entry, select ToolsòQuickWords, click on the entry, and click Options. Type a new name for the entry in the Rename QuickWord dialog box, and click OK. ò If WordPerfect does not insert your QuickWords entries when you type them, press <Space> or <Enter>, select ToolsòQuickWords, click Expand QuickWords, and then click OK (see FIGURE 2). 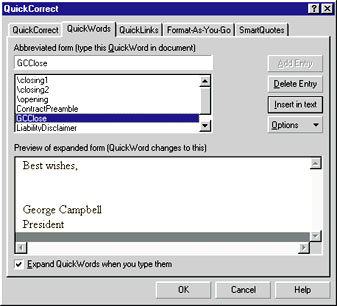 |
Category:Word Processing Issue: August 2000 |
These Web pages are produced by Australian PC World © 2000 IDG Communications