 Migration migraines and how to avoid them
Migration migraines and how to avoid them
|
Moving from an old PC to a new one is a time-consuming chore. Sure, you can reinstall your word processor and spreadsheet in less than an hour ù if you still have all your original disks. But making your new PC as useful as your old one means finding or downloading old shareware utilities, re-entering countless application tweaks, and transferring a host of passwords for Web sites, dial-up settings, and the like. Add the time spent resolving the inevitable hardware glitches and compatibility problems, and you're looking at hours or even days of downtime. What if you could continue to work on your old PC while transferring your data to the new one, ensuring that your new hardware is up to speed? So you don't have room for two space-hungry PCs. You can still copy your old PC's operating system and installed applications over to your new system. Then, with both of the operating systems coexisting on the same hard disk, use a multiboot utility like V Communications' System Commander Deluxe (www.v-com.com) or PowerQuest's PartitionMagic (www.powerquest.com) to choose, each time you boot, which OS you want to work with. The overall process has two steps: installing the old hard disk into the new PC, and configuring your old copy of Windows 95 or Windows 98 to work with the hardware on your new PC. You'll need two utilities in addition to the multiboot program: one to adjust disk partitions, and one to move data from disk to disk. Several worthy programs perform one or both of these tasks. I recommend the Partition Commander from V Communications. Products such as PartitionMagic, DriveImage and DriveCopy, all from PowerQuest, also contain terrific sets of tools that can help you accomplish these tasks.
In with the old Installing an IDE drive in your new PC isn't hard. First, get the hard disk setup information from your old PC's CMOS setup program ù you'll need this to ensure that the drive will work properly in your new PC. Enter the CMOS setup program by hitting <Delete> or <F1>, or another indicated key combination during start-up. Go to the hard disk setup menu and write down the setup parameters for the disk. These should include numbers for Cylinders, Heads, and Sectors. Your new PC will likely detect these settings when you install the drive, but there's an outside chance you may have to enter this data manually. Also, uninstall any antivirus software on the new PC, since it may be confused by your new settings and give you a bogus virus alert. Now copy the setup directory from your old system's Windows CD-ROM to your hard disk. That way, if things go wrong with CD-ROM drivers on the new PC, you can still access setup files and update components. For Windows 95 it's the 34MB Win95 directory. For Window 98 it's the Win98 directory; you only need to copy the 105MB of files in the directory, not anything else within that folder. Also, have your new PC's driver disks handy in case Windows asks for them. Remove the old hard disk. Before unplugging the power cord or touching any components or wires, ground yourself by touching the metal frame of the case. Disconnect the drive's power cable and the flat IDE connector cable. Then look carefully at how the hard disk attaches to your computer. It's often easier to remove the entire drive bay assembly than it is to remove the drive itself. Prepare for transplant. Most Pentium and later motherboards have two built-in EIDE connectors, one for the primary channel and one for the secondary. Each channel supports two hard drives or other devices. One device is designated the "master" and the other the "slave," distinguishing between the two devices installed on a single channel. The hard disk that came inside the new computer is almost certainly the master device on the primary channel. If you intend to attach the old drive to the primary channel ù provided a CD-ROM or other drive isn't already installed there ù you must set the jumpers on the outside of the old drive for slave operation. A diagram on the hard drive case should illustrate the proper jumper settings. Install hard disk in new system. Now attach the hard disk and mount it inside the appropriate internal bay. Power up the system and re-enter the CMOS setup program. Go to the EIDE hard disk autoinstall or autodetect menu, select the hard disk you just installed, and configure it. The look of these menus varies depending on the BIOS manufacturer, but using them to do the configuration should not be difficult. Typically, autodetect looks for four drives ù a master and a slave on both the primary and secondary channels. For the just-attached drive, toggle selections until you come to the proper channel designation, and select the drive. When in doubt, check your system's documentation. Next, prepare the new disk to accept data from the old. For this task, you must create a separate partition on your new hard disk so that it can hold the contents of the old drive. Your new drive probably has one big partition, usually C:. You need to shrink this partition, using a utility such as Partition Commander, so that there is room for a second partition that will be dedicated to the contents of the old drive. After you have created this second partition, you can mirror the contents of the old drive over to the dedicated partition of the new drive by using a disk copy utility such as DriveCopy 2.0. 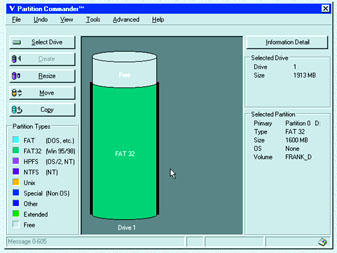 Caption: Partition CommanderÆs graphical interface makes changing hard disk partitions easy
Old Windows in a new home Next, install System Commander. A multiboot menu will then let you select from your installed operating system choices when you boot the new PC. Now comes the tricky part. The Windows setup you moved onto that new partition is configured for your old system's motherboard, BIOS, and components. The first time you boot to Windows 98 in the new system, Windows will start reconfiguring itself. Windows 98 is very good at this; Window 95 is less so. Once Windows completes its first boot, check Device Manager (select Control Panel-System) and make sure all your hardware is working. If a device is missing from the list or a yellow circle appears next to a device name, that piece of hardware is not properly installed. In this case, try rebooting again once or twice. If the trouble persists, run Windows' setup program; it will perform a complete reinstallation while keeping your installed programs intact. And if that tactic doesn't work, manually install the driver for the device in question with the Add New Hardware wizard in Control Panel.
Two Shortcuts If you are lucky enough to have large compatible removable storage drives ù such as Jaz drives ù on both your new and your old systems, you can simply use the removable media to transfer data. If all your data won't fit on a single removable disk, you'll need the compression and disk-spanning capabilities of a disk-imaging program like DriveImage. This utility creates compressed images of the hard disk ù at about half the original size ù that can be copied to one of your removable drives and then restored on another machine. DriveImage provides sufficient partitioning ability to set up your target drive. Finally, if you have the space, you can run both of your systems side by side. Shell out a few dollars for cables and a data switch box, and you'll be able to run your two PCs using a single keyboard, mouse, and monitor. - Kirk Steers |
Category:hardware Issue: April 1999 |
These Web pages are produced by Australian PC World © 1999 IDG Communications