 Moving monster files without nets or zip drives
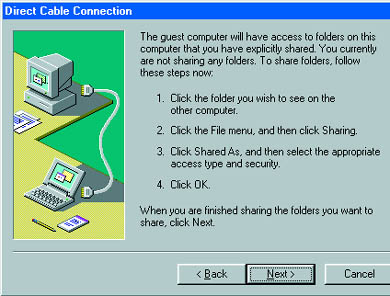
Face it ù 1.44MB just isn't what it used to be. When you're trying to move today's ever-larger documents, program files and graphics between your laptop and desktop PCs, the venerable 3.5in floppy disk just can't hack it. If both computers are networked, or if you can shuttle an external Zip-type drive between machines, you can still get by. Otherwise, here are three approaches you can try. (These methods also help cope with a flood of small files.) Squeeze play You can't make your floppy disk bigger, but you can make your files smaller. File compression utilities often can shrink files to a quarter or less of their original size, possibly making files up to around 6MB fit onto a single floppy. Two of the best such utilities are available in free trial versions on our cover CD: WinZip 6.3 from Nico Mak Computing and PKZip from PKWare. Compress that file! File type Average WinZip compression ratio (per cent) How much you can fit on a 1.44MB floppy (MB) Word 7.0 61 3.6 Excel 7.0 73 5.1 HTML 69 4.6 JPEG image 2 1.5 If you can't squeeze everything onto one floppy, either of these utilities will let you compress your data across a span of floppy disks. If you need more than two or three floppies, mark each one clearly with numbers. Some floppies must be inserted into the drive at both the beginning and the end of the process, so don't lose track of the order. Cable up a pipeline If you've got a lot of data to move between two nearby machines, try connecting them by cable. Several software packages let you move data through a cable between either the serial or the parallel ports of two computers. If possible, always use the parallel ports ù they're much faster. Excellent data transfer utilities come in two remote-access software packages, LapLink 7.5 and pcAnywhere32 8.0. Both offer sophisticated features that speed up transfers, such as moving only new files or only files that have been updated. Both come with a parallel cable in the box. If you don't need remote access software, there's a free but clumsier alternative ù the Direct Cable Connection utility included in Windows 95. DCC actually establishes a network connection between the two computers using Window 95's Dial-Up Networking accessory. Once a link is established, the DCC interface lets you manipulate files by dragging and dropping them between the two systems. You can also use the utility to install software on one PC using a CD-ROM drive located on another ù which can come in very handy if your notebook lacks a CD-ROM drive. You can access DCC through StartûProgramsûAccessories. If you don't see it in the menu, click the Add/Remove Programs icon in Control Panel, click the Windows Setup tab, double-click Communications, check the Direct Cable Connection box, click OK, click Apply and follow any further instructions. You may have to insert your Windows 95 CD-ROM or floppies. DCC starts with a wizard program that must run on both machines. It asks you to designate one computer as the host (the one with the files) and one as the guest (the one to receive the files). This is a one-way relationship ù the guest PC has access to the host PC, but not vice versa. But before you start DCC on either machine, you must jump through quite a number of hoops. Both machines need Dial-Up Networking, Client for Microsoft Networks and the IPX/SPX network protocol. DUN can be installed in exactly the same manner as DCC. To install Client for Microsoft Networks, right-click the Network Neighborhood icon (on the desktop or in Explorer) and select Properties, then click the Add button, select ClientûAddûMicrosoft and follow the prompts. Use the same procedure for IPX/SPX support, selecting Protocol this time instead of Client. Again, you may need your Windows 95 disc or floppies. To let the guest machine access the host computer's files, you'll need to set the appropriate host drive or drives so that they can be shared. First go back to the Network Neighborhood Properties screen and click the File and Print Sharing button. Check I want to be able to give others access to my files, then right-click the proper drive icon in Explorer, select the Sharing tab, click the Shared As radio button and click Apply. You'll also want to check Full access for the drive. And, of course, you'll need a cable. You will find serial cables (called null modem cables) and parallel cables (also known as interlink or laplink cables) for less than $30 at your local computer shop. If speed is of the essence and your PCs have high-performance ports that support the Enhanced Parallel Port or Extended Capabilities Port standard, you may want to buy a DirectParallel Universal Cable. This device can sense what types of parallel ports are in use and optimise transfers accordingly. Catch the red-eye If you hate the hassle of plugging and unplugging cables, check out an infrared connection ù much like that in a television's remote control ù for wireless two-way links between your laptop and your desktop. An IR connection needs two components: software that supports infrared transfers and an IR port attached to each computer. Most recent laptops come with an IR port installed. Your desktop machine needs an IR adapter that attaches to a serial, parallel or network port. Extended Systems makes the $279 JetEye PC (AC&P Technology: 1300 366 369), which attaches to the desktop PC's serial port. This connection limits your transfer speeds to the serial port maximum of 115Kbps. The IR ports on many laptops also top out at 115Kbps, so this may be no problem. Transfers at up to 4Mbps are possible, but for this you need a more expensive adapter, like the $775 JetEye Net Plus, which serves as a wireless network connection and plugs into a parallel or Ethernet port. Also, make sure your notebook's IR port supports v1.1 of the Infrared Data Association, or IrDA, standard. In addition, you need the latest version (2.0) of the Windows 95 Infrared Communications Driver, which supports IrDA 1.1. To install or upgrade your PC to IrDA 1.1, download the latest version of the driver file, win95ir.exe, from Microsoft (premium.microsoft.com/support/kb/articles/q139/4/45.asp) and install it on your PC. If your system has IrDA 1.0, you must uninstall it first before installing the newer version. Once the IR driver is installed, you can access the Windows 95 Infrared Monitor through a Control Panel icon. The Infrared Monitor tells you the status of connections and lets you set various options. When you are ready, make sure the Infrared Monitor is running on both machines, then place the two computers so that their IR ports are within 1 to 2 metres of each other. When you have established an IR link, fire up a file transfer package that supports IR communications. û Kirk Steers
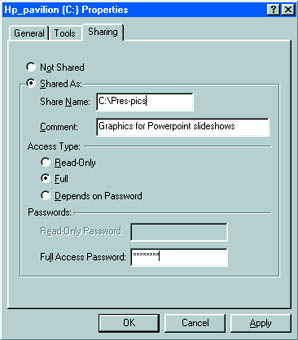
The host PC must learn to share files before you can transfer them using Direct Cable Connection
Category: hardware
Issue: May 1998