 Optimise networking in Windows for Workgroups
Optimise networking in Windows for Workgroups
Tip These days most users of Windows for Workgroups 3.11 are connected to a network. Here are a few choice tips for keeping Windows networking in top shape. 1. Save time, not your screen. If you're sharing your disks, directories, or files with other people on the network, avoid using a screen saver. It can degrade performance for those using your shared resources. In Windows' Control Panel, double-click the Desktop icon. Under Screen Saver, choose (None) from the Name drop-down list, then click OK. If you must use a screen saver, choose one that makes minimal use of your CPU, such as Marquee. 2. Set your priorities. If you have a computer that is set up just as a file server or print server, adjust its performance priorities accordingly in Control Panel. Double-click the Network icon, then click the Startup button. Under Performance Priority, drag the slider toward Resources Shared Fastest if the system is used only as a file server. If you sometimes use the computer or if it acts as a server for a locally connected printer, leave the slider somewhere in the middle so that the Applications Run Fastest option isn't neglected. That's because print servers must run Print Manager, which is an application. Click OK until you've closed all dialogue boxes. Note that you can use the Performance Priority slider only on systems running in 386 Enhanced Mode. 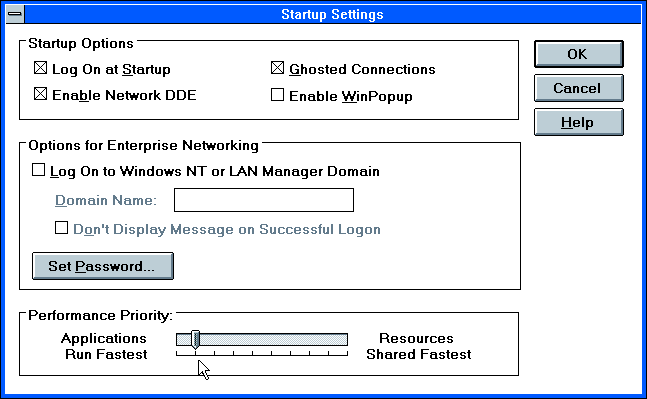 Improve network performance in Windows for Workgroups by adjusting priorities 3. Simply separate. Do you use Print Manager's separator page option to keep printouts organised by user? You can make printing go a bit faster by using the Simple separator page option instead of the standard one (which includes a Windows logo and takes longer to print). In Print Manager, choose Options--Separator Pages and select Simple Separator Page. To save even more time -- and plenty of paper -- select No Separator Page. Then click OK. 4. Swap locally, not globally. Whether or not you're on a network, you should use a permanent swap file so Windows can use disk space when you run out of RAM, improving its performance. To do this, double-click the Enhanced icon in Control Panel and click Virtual Memory. Then click Change, and in the New Swapfile Settings section, select Permanent from the Type drop-down list. But whatever kind of swap file you select -- permanent or temporary -- don't choose a networked disk from the Drive drop-down list: You'll strangle performance on your own PC as well as on the networked computer. 5. Share and share alike -- not! If the computer you're using never shares files or printers with other systems on the network, you can get more memory for your Windows applications by disabling file sharing and print sharing. First, double-click the Windows Setup icon in Program Manager, and choose Options--Change Network Settings. Click the Sharing button, then uncheck the two boxes in the Sharing dialogue box. Click OK twice to close all dialogue boxes.  Get more memory for your own applications by keeping other network users away from your files and printer 6. Don't give up the ghost. Make sure that you're using the Ghosted Connections option, which prevents your system from physically connecting to remote resources until you actually attempt to use them. Enabling Ghosted Connections slows things down a tad when you go to use a remote resource (a network drive, for instance), but it greatly speeds start-up each time you go into Windows. In most cases, it's well worth the trade-off. To make sure you're using this feature, double-click the Network icon in Control Panel and then click the Startup button. Make sure that Ghosted Connections is checked, and click OK twice to close all dialogue boxes. - Scott Dunn | Category: Networking, Windows 3.x Issue: Mar 1998 Pages: 160-162 |
These Web pages are produced by Australian PC World © 1997 IDG Communications