 Add graphics to your page header Add graphics to your page header |
|
Excel users frequently ask me, "How can I insert my company's logo into the page header?" The simple answer: You can't. Despite thousands of user requests, Microsoft hasn't made this feature available. But there are a few ways to fake it. Perhaps the simplest solution is to print your reports on company letterhead -- paper that's preprinted with your logo. Another option is to use a custom font with a character that displays your logo. You can create this custom font using shareware or commercial font creation programs, or hire a professional to do the job, but even professionals will be limited to the use of simple line graphics. Another way to display a graphic within a page header involves a bit of trickery. Excel lets you specify that one or more rows print at the top of every page (these are known as print titles). You can take advantage of this option and use a print title row to store your logo. FIGURE 1 shows a graphic that will print at the top of each page. Note that the row height is adjusted to fit the image. Here are the basic steps. First, specify the rows for the print titles. Choose File-Page Setup and click on the Sheet tab in the Page Setup dialog box. Our example uses the first two rows as the print titles, so that both the graphic (row 1) and the column headers (row 2) will appear at the top of every printed sheet. You can also combine standard header options (found in the Header/Footer tab of the Page Setup dialog) with this title rows trick--but make sure the graphic doesn't obscure the text. For example, if the graphic sits on the left side of the page (as in the example), you'll need to put the page numbers in the right or centre sections of the sheet's header. Now, here's where it gets tricky. Click the Print Preview button to preview your worksheet. In the preview window, click the Margins button to display the margin handles, which let you adjust the margins and column widths. Specifically, you'll need to adjust the top margin and the header margin, represented by horizontal lines in the preview window. Normally, the upper horizontal line represents the header margin, and the second horizontal line the top margin. Drag these lines up or down until the page header looks correct. In FIGURE 1 the header margin has been moved above the page margin, so the page margin overlaps with the header margin. The result is that the graphic will align vertically with the normal header text (in the example shown, the page number). 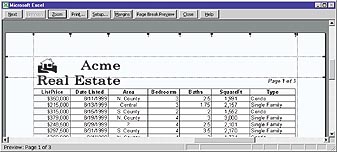 If your worksheet happens to be wider than a page, you'll need to copy the graphic and paste it to the cell that occupies the same location on the subsequent pages. |
Category:Spreadsheets Issue: April 2000 |
These Web pages are produced by Australian PC World © 2000 IDG Communications