|
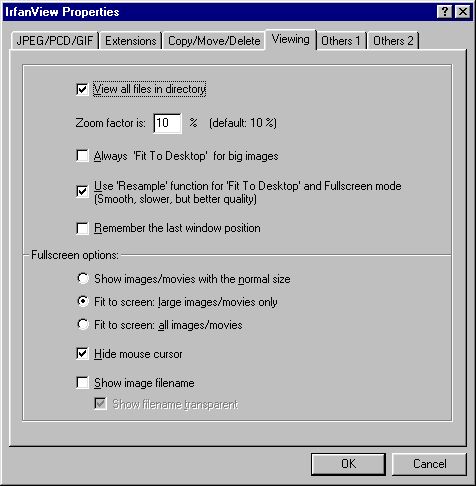
Click on the Options Menu, then click Properties, or press
ALT-O, followed by P to access these options. A dialog box
opens from which you can change many of the basic functions
of IrfanView.

There are several tabs on the options dialog. If the tab
for Viewing is not at the front, click it to bring it to
the top of the stack.


Viewing
The top half of this dialog has several options. The
first is View all files in directory. Click this to
have the viewer display all file names, even non-images,
in each directory. If this is un-checked, only files
supported by IrfanView will be displayed for Open
and Save operations.

The rest of the options affect the display of images.
They have no lasting affect on the image, unless you
re-Save it.

The next option sets the Zoom factor for Zoom in and
Zoom Out. The default is 10%, which is the amount of
size increase or decrease each time you zoom the image.
Type a new number in the box to change this amount for
more zoom or less.

The next option is Always 'Fit To Desktop' for big images.
Click this to have the viewer reduce oversized images
until they can be seen fully on the screen. Images smaller
than the screen's size will not be changed.

The next option is Use 'Resample' function for 'Fit To
Desktop' and Fullscreen mode. Click this to have the
viewer display the best possible version of an image,
whenever you put it in Fullscreen or Fit To Desktop mode.

The next option is Remember the last window position.
Click this, and each time you open the viewer, it will
be positioned on your screen wherever it was when you
last closed it. This is handy if you always want it to
appear at a specified location on your screen.

The bottom half of this tab contains options for the
Fullscreen mode. The first is a set of option buttons:
Show images/movies with the normal size, Fit to screen
large images/movies only, and Fit to screen all images/
movies. Click your choice; Fullscreen mode will display
the images as you instruct. The next option is Hide mouse
cursor. Click this to stop the mouse cursor (that arrow)
from showing on the screen while the images are displayed.
The next option is Show image filename. Click this to have
the name of each image displayed on the screen, along with
the image. Below this option is Show transparent. If this
is un-checked, the filename will appear in a small box;
useful to pick it out against images that fill the screen.
Click the check-box and the filename will be shown without
a box around it.

When you are done, click OK at the bottom of the dialog.
To exit without making any changes, click Cancel. Another
way to close is to click the X in the upper right corner.

For a helpful reminder of many of the functions in the
Viewing dialog, click the ? in the upper right corner of
the box, point the mouse at an item in the box, and click
again. A message will appear to tell you what that item
is for.
|
