The Photoshop 4.0 document included with this package
contains twenty-four different layers. The first layers
work as:
- Masks for each of the interface elements, and
show you how to select each element for pasting
into the proper file for the final production of
your skin.
- Example interface elements taken from the
"Base" skin available from WinAmp.
- A mock display that allows you to get an idea of
how your skin will look while a song is playing.
- The actual background image used for the main
form of the display.
- And element used to help you with the creation of
your skin.
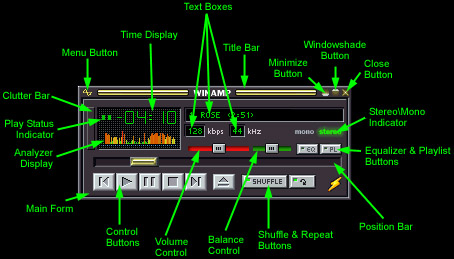
Before you begin, you should have an idea of what you
want your skin to look like. Here are a few steps to help
you get started on the right foot.
- Familiarize yourself with all the interface
elements. Below is a diagram identifying each
element.
- Choose a background image.
When choosing a
background image, be sure to think about what it
will look like after it has all the interface
elements on top of it. Although some elements can
be made to work with the background, some cannot.
Elements such as the spectrum analyzer, the time
numbers, and the three text boxes will cover up
their respective portions of the background
image.
- Decide what kind of buttons you skin should have.
What
type of buttons do you want your skin to have?
There are several types to choose from. You can
have buttons that look like buttons, buttons that
are transparent as not to take away from the
background, or you can have completely original
buttons.
- Decide what you want your title bar to look like.
- Decide what your clutter bar should look like.
What's
the clutter bar, right? The clutter bar is that
little thing next to the area where the analyzer
and the time is displayed. You can use it to open
the options menu, the preferences box, the ID3
editor, set the screen size to double, and to
start the visualization plug-in. This little item
has seven different modes, but the main two are
up and down, you should decide how you want it to
look while it up, and how it will look when it's
pushed down.
Once you have an idea of how you want your skin to
look, you're all set to get started.
The first step to creating a functioning skin is to
create the background for it. If you plan to create a
background image from scratch, all you need to do is hide
all the layers of the template and go to work on your
background, other wise, here are some directions for
getting your background image into your skin.
- First, open the image you wish to use for your
background with Photoshop.
- Next, press "ctrl-A" to select all of
the image, then press "ctrl-C" to copy
it. Bring the skin template window to the front,
and then hide all of the layers except the
"Main Form" layer. Then press
"ctrl-V" to paste your background image
into the template.
- Move your background image layer behind the
"Main Form" layer, and then set the
"Opacity" of the "Main Form"
layer to 50%. This will allow you to see your
image through the "Main Form" layer,
and give you an idea of where you want it to be.
- Go back to your background image layer and
position it where you want. If you need to scale
the image, from the "Layer" menu,
choose "Scale" from the
"Transform" sub-menu. Scale the image
to the size you want the then double-click in the
center of it.
- Once you have your background image sized and
positioned where you want it, it's time to make
it look like the WinAmp background. Hide the
"Main Form" layer, and select the
"Main Interface Pieces" layer. This
layer consists of all the main interface pieces
that are part of the main form: The title bar
area, the display area, the three text boxes, the
position bar track, and the window border. If you
do not want one of these items to appear on your
skin, or would like it to look differently,
change or erase it here. Once you have it the way
you want it to look, set the "Opacity"
to 50%, and move it so that it is the only layer
above the background image layer in the
"Layers" list. If you would like these
to appear lighter or darker on your skin, adjust
the "Opacity" accordingly. When you
done, press "Ctrl-E" to merge the two
layer together.
Once you have your background image set up, you are
ready to move on to the next step.
Now you are ready to create your skin's title bar. You
can put pretty much anything you like in the title bar,
as long as you make sure your buttons stay in the same
location as those that appear on the template. You can
use the "Title Bar Buttons" layer to give you
an idea of where to position your buttons. Here are a few
tip to help you in creating your title bar:
- Create a new layer to work on your title bar
with, that way you can more piece around without
have to mess up the background image.
- Use the "Title Bar Mask" layer to give
you an idea of how much of the title bar you will
be pasting into the skin files.
It is recommended that you have one layer with all the
elements you wish to have in your title bar when you
finished working with it.
The control buttons are another area where you will
have to decide how you want them to appear in your skin.
There buttons have two states: and "Up" state
and a "Down" state. To create your buttons,
here are a few pointers to get started:
- Create a two new layers to do your scratch work
with.
- Look are the "Buttons Mask" layer so
that you have an idea of how much space your
buttons can take up.
- Keep in mind that you will have to create two
sets of buttons, an up set and a down set.
- Look are the "Buttons" layer for a
reference to where the buttons are positioned on
the WinAmp window.
- Be creative!
You must create two sets of buttons: One set of all
the buttons in their "up" state, and a second
set with all the buttons in their "down" state.
When doing this it is recommended that you have two
layers, a "Buttons Up" layer and a
"Button's Down" layer. When you've finished
creating your control buttons, it's time to work on the
other buttons in the WinAmp interface.
Now it's time to work on those other buttons. These
buttons are the EQ, the Playlist, the Shuffle, and the
Repeat buttons. Unlike the control buttons, each of these
have four states: "Up On," "Up Off,"
"Down On," and "Down Off." This is
because each of these buttons will stay a certain way
depending on how the user has them set. For instance, if
the user is using the "repeat" mode in WinAmp,
then the "Repeat" button will stay
"lit" so to speak. And when the user turns off
that feature, the "Repeat" button will look
"dimmed." So consequently, each button has two
extra states.
These buttons will also depend on how you want them to
look. You can follow the same steps you took to create
the control buttons, only this time you'll have to make
two extra sets for the "Off" state of the
buttons. It is recommended that you have eight layers for
these buttons when you finish working on them:
- An "EQ\PL Up On" layer.
- An "EQ\PL Up Off" layer.
- An "EQ\PL Down On" layer.
- An "EQ\PL Down Off" layer.
- A "Shuffle\Repeat Up On" layer.
- A "Shuffle\Repeat Up Off" layer.
- A "Shuffle\Repeat Down On" layer.
- And a "Shuffle\Repeat Down Off" layer.
You can combine the "EQ" and "PL"
buttons into one layer because the are right next to one
another on the interface. You can do the same with the
"Shuffle" and "Repeat" buttons for
the same reason.
The Mono and Stereo indicators are a some what tricky
area to work with. This is due to the fact that each of
these two interface items overlap one another by two
pixels. You may wish to simply modify the original
examples so fit in with your skin. However, if you do
wish to create your own Mono and Stereo indicators, you
might want to keep the following suggestions in mind.
- You will need to create two different states for
each item. You'll need a "Mono On"
state, a "Mono Off" state, a
"Stereo On" state, and a "Stereo
Off" state.
- When creating your "Mono off" state,
keep in mind that the "Stereo On" state
will over it up by two pixels on the right side.
- When creating your "Stereo off" state,
keep in mind that the "Mono On" state
will over it up by two pixels on the left side.
- Look at the "Mono Mask" and the
"Stereo Mask" layers for an idea how
much area your designs can take up.
It is recommended that you have four layers when you
complete your work with these two interface items:
- A "Mono On" layer.
- A "Mono Off" layer.
- A "Stereo On" layer.
- And a "Stereo Off" layer.
Once you're finished with this portion of the
interface you're ready to go on to the next step.
The volume and balance sliders are one of the easiest
interface elements to create. If you want to use the
original style of the sliders, then your job is even
easier. If you would like to create your own volume
slider, do what ever you like, just remember to stay
inside boundaries set for the slider. You can see these
boundaries by looking at the "Volume Mask"
layer.
The balance is actually a portion of the volume
slider, so you can not design them individually. If your
background allows you have the same portion of the image
behind each slider, you've got it made. However, if you
have an image such as a photograph, where the portion of
the image that is behind the volume slider will be
different than the portion of the image that is behind
the balance slider, you will have to do a little more
work.
Because WinAmp uses a portion of the volume slider as
the balance slider, so the background used by the volume
slider will also be used by the balance slider. This is
easily fixable, but we'll go over that latter on when
it's time to actually put you skin together. For now just
keep these ideas in mind while working on your volume
slider:
- You cannot
design the balance slider to look differently
than the volume slider.
- Look at the "Volume Mask" layer to get
an idea of how to make your volume slider.
- You can go ahead and design your button now, but
you will not have to worry about this until
later.
After you your volume slider the way you want it, you
can move onto the next step.
Now it is time to work on the clutter bar. The clutter
bar has seven states. But at this time you will only have
to worry about one, the "Up" state. Most of the
time, you will not want your clutter bar to take away
from the image, so you would only use the 3D outline that
goes around it, allowing the background image to show in
the middle of the bar. However, you are free to do
anything you wish with the clutter bar, as long as you
stay inside the clutter bar area, which is outlined in
the "Clutter Bar Mask" layer.
Out of all the skin that you will probably create,
this will remain the simplest piece of the interface to
work on. All you have to do is pick a color for the
indicator, and then make each of the seven indicators
using that color. Below is a diagram of the seven items
that are part of this interface element.
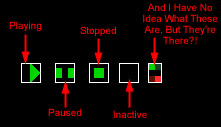
The two little items on the end seem to represent some
thing, but I'm not exactly sure what. Nevertheless, they
have an active and inactive mode, so you'll have to still
with them. When you create your indicators, be sure to
follow individual mask layers in the template.
Once you've done all the designing you can do with the
template, it is time to start putting it all together.
The next section will help get started with the process
of copying and pasting your new skin into the files that
WinAmp uses to put your skin into action.
This section will help you with the process of copying
and pasting your skin from the Photoshop template
document into the bitmap files that WinAmp will use to
put your skin into action. Each of the template here are
fairly self explanatory, and are easy to understand. For
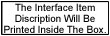
the purpose of making some of the more confusing
templates more understandable, they have been edited from
the original WinAmp "Base" skin to show you
where certain items should go. Some interface items have
been replaced in the template with a box like this one:
You'll need to do all of you editing with Photoshop,
so that you will be able to just copy and paste you skin
from the Photoshop template document.
Before you get started, you'll need to make a new
directory for you skin. So that you can test you skin as
you are working with it, create a directory with the name
that you want to use for your skin, in the
"skins" directory inside you "winamp"
program directory.
After you have created your skin's directory, copy all
the files from the "Templates" directory to
your skin's directory. Now you are all set to get
started.
The "main.bmp" file is the file WinAmp uses
for the background of your skin. To export your
background from the Photoshop template you worked on,
open the "main.bmp" file and the skin template
file in Photoshop.
Now you are ready to export your background into your
skin.
- In the template window, hide all the layers
except the background layer that you created.
- Press "Crtl-A" to select all of the
image, then press "Ctrl-C" to copy it.
- Bring the "main.bmp" window to the
front and press "Ctrl-V" to paste the
background image into the file.
- Make sure that your image lines up in the center
of the window and the choose "Flatten
Image" from the "Layer" menu.
- Once you've done the first four steps, press
"Ctrl-S" to save the file, then close
the "main.bmp" window.
To see if you got it right, open up WinAmp, and press
"Alt-S" to open the skins window. Choose your
skin from the list and click "OK." If your
background appears behind the other interface elements,
you've done everything right.
The "titlebar.bmp" file is the file WinAmp
uses for the title bar, the clutter bar, and windowshade,
and the minimize, menu, close, and windowshade buttons of
your skin. To export all of these from the Photoshop
template you worked on, open the "titlebar.bmp"
file and the skin template file in Photoshop.
Here are the directions for exporting the title bar
into your skin.
- In the template window, hide all the layers
except the background layer and the title bar
layer that you created.
- Show the "Title Bar Mask" layer and
select the black all of the black mask with the
"Marquee" tool (the one that draw the
little box of marching ants).
- After you've selected the title bar mask, hide
the "Title Bar Mask" layer. Choose
"Copy Merged" from the "Edit"
menu.
- Bring the "titlebar.bmp" window to the
front and press "Ctrl-V" to paste the
title bar image into the file.
- Position the title bar image so that it lines up
with the box labeled "Active Title Bar"
and press "Ctrl-E" to merge the two
layers.
- Now press "Ctrl-V" again to paste a
second copy of the title bar image into the file,
but this time position it over the box labeled
"Inactive Title Bar."
- From the "Image" menu, select
"Adjust" and then
"Variations." From the window that
appears, click the "Lighter" image on
the right side of the window twice, to lighted
the title bar image for the inactive title bar.
When you are finished click "OK."
- Now press "Ctrl-E" for merge the
lightened title bar image with the file.
- Press "Ctrl-S" to save the file.
Now you are ready to create the Windowshade for your
skin. To do so, follow these directions:
- Bring the template window to the front and make
sure only the "Windowshade Mask" layer,
and the background layer you created are showing.
- Using the "Marquee" tool, select the
black box made by the "Windowshade
Mask" layer. Deselect the portions of the
box that are not black by holding down the
"Alt" key and selecting those portions
Then hide the "Windowshade Mask" layer.
- Select "Copy Merged" from the
"Edit" menu, then bring the
"titlebar.bmp" window to the front.
- Press "Ctrl-V" to paste the image into
the file. Position is so that the red button
mask's line up with holes in the image, then
press "Ctrl-E" to merge the image into
the file.
- Using the "Marquee" tool, select the
menu, minimize, windowshade, and close buttons
from the "Active Title Bar" area of the
file. You can select multiple areas by holding
down the "Shift" key will selecting an
area.
- Press "Ctrl-C" and the
"Ctrl-V" to copy and paste the buttons
into the file again. Reposition the buttons so
that the fill in their respective places in the
"Active Windowshade" area. When you are
finished, press "Ctrl-E" to merge the
buttons into the file.
- Now you will have to design your own set of
control buttons for the "Active
Windowshade" by filling in the red masks.
You'll also have to fill in the display box for
the analyzer, which is the first red box from the
menu button. The second red box is the time
display box. You will also have to fill in your
own design here.
- When you have completed the above designs, you
can continue to design the position bar for the
windowshade that is on the left side of the file,
just under the button squares that you will work
with later. Below is an example of what where the
position bar is located:

When designing the position indicator, keep in
mind that only half of it is used. You will need
to mirror the right side of it to look like the
left side.
- When you are finished with your design of the
position bar, use the "Marquee" tool to
select only the bar portion of position bar.
- Press "Ctrl-C" and then
"Ctrl-V" to copy and paste it into the
file again. Reposition it over the last red box
left on the "Active Windowshade" area.
Once you have it positioned, press
"Ctrl-E" to merge it into the image.
- Now use the "Marquee tool to select all of
the "Active Windowshade" portion of the
file.
- Press "Ctrl-C" and then
"Ctrl-V" to copy and paste it into the
file again. Reposition it over the "Inactive
Windowshade" area.
- From the "Image" menu, choose
"Adjust" and then
"Variations." Click the
"Original" image in the upper left of
the window, and the click the "Lighter"
image, in the middle right of the window, twice.
When you are finished click "OK."
- Press "Ctrl-E" to merge the
"Inactive Windowshade" into the file.
- Press "Ctrl-S" to save the file.
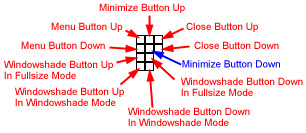
Now it is time to make your title bar button the
active buttons in your skin. The small cluster of boxes
to the left side of the "titlebar.bmp" file are
the ones used for each of the buttons. Below is a diagram
of which box goes with which button with an example image
on the right:
Using this diagram for a reference, here are the
instructions for copying and pasting your buttons into
your skin.
- Bring the template window to the front and show
the "Title Bar Buttons Mask" layer. Be
sure that you still only have the background and
title bar layers that you created showing.
- Using the "Marquee" tool, select the
first black box in the "Title Bar Buttons
Mask" layer. After you have selected the
first black box, select the other three by
holding down the "Shift" key and
selecting each individual box.
- Once you have the four boxes selected, hide the
"Title Bar Buttons Mask" layer, and
choose "Copy Merged" from the
"Edit" menu.
- Bring the "titlebar.bmp" window to the
front. Press "Ctrl-V" to paste you
title bar buttons into the file.
- With the "Marquee" tool, select the
menu button that you pasted into the file and
position it over the box corresponding to the
"Menu Button Up" box on the diagram
above. Repeat this step for each of the other
buttons, positioning them over their respective
"Up" boxes from the diagram.
- When you have completed step 5, use the
"Marquee" tool to select each of the
button images. Press "Ctrl-C" and the
"Ctrl-V" to copy and paste them again
into the document.
- Reposition each of the copied button over their
respective "Down" positions from the
above diagram.
- From the "Image" menu, choose
"Adjust" and then
"Variations." From the window that
appears, click the "Original" image in
the upper left of the window. Then click the
"Darker" image, in the lower right of
the window, twice. When you are done click
"OK."
- Using the "Marquee" tool, select both
of the windowshade buttons.
- Select "Copy Merged" from the
"Edit" menu, and then press
"Ctrl-V" to copy and past them into the
document again.
- Position the second windowshade buttons over the
"Windowshade Button In Windowshade
Mode" area.
- Once you have completed the above steps, choose
"Flatten Image" from the
"Layer" menu, and the press
"Ctrl-S" to save the file.
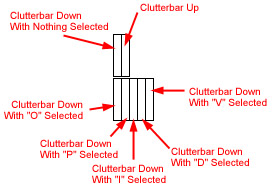
Now you are ready to move the cluster bar into your
skin. The small cluster of long boxes to the right side
of the "titlebar.bmp" file are the ones used
for each of clutter bar's states. Below is a diagram of
which box goes with which state with an example image on
the right:
Using this diagram for a reference, here are the
instructions for copying and pasting your clutter bar
into your skin.
- Bring the template window to the front and all
the layers except the "Clutter Bar Up"
layer, the "Clutter Bar Mask" layer,
and the background layer that you created.
- Using the "Marquee" tool, select the
black box made by the "Clutter Bar
Mask" layer, and then hide the "Clutter
Bar Mask" layer.
- From the "Edit" menu choose "Copy
Merged."
- Bring the "titlebar.bmp" window to the
front and press "Ctrl-V" to paste the
clutter bar into the file. Position it over the
box marked as "Clutterbar Up" in the
diagram above, the press "Ctrl-E" to
merge it into the file.
- Return the template window to the front and show
the "Clutter Bar Down Mask" and
"Clutter Bar Down" layers, and hiding
the "Clutter Bar Up" layer. Using the
"Marquee" tool, select the black box
made by the "Clutter Bar Down Mask"
layer. Deselect the "O", "P",
"I", "D", and "V"
portions of the window by holding down the
"Alt" key and dragging the tool over
the portions of the "O", "P",
"I", "D", and "V"
that are not black, and then hide the
"Clutter Bar Down Mask" layer.
- Choose "Copy Merged" from the
"Edit" menu.
- Bring the "titlebar.bmp" window to the
front. Press "Ctrl-V" to paste the down
cluster bar into the file. Position the pasted
image so that the "O", "P",
"I", "D", and "V"
all fit over the black letters that are part of
the file. When you are finish, press
"Ctrl-E" to merge the image into the
file.
- Return the template window to the front and show
the "Clutter Bar 'O' Mask" layer. Using
the "Marquee" tool, select the black
box made by the "Clutter Bar 'O' Mask"
layer. Deselect the "O" like you did in
step 5, and then hide the "Clutter Bar 'O'
Mask"layer.
- Choose "Copy Merged from the
"Edit" menu, and then bring the
"titlebar.bmp" window to the front.
- Press "Ctrl-V" to paste the image into
the file. Position it so that it lines up with
the white "O" that is part of the file.
When you are finished press "Crtl-E" to
merge it into the file.
- Repeat steps 8 and 9 for each of the
"P", "I", "D", and
"V" mask layers, being sure to position
them over their respective letters in the
"titlebar.bmp" window.
- When you have finished pasting all the clutter
bar modes into the file, you can re-design the
letter is you like. Other wise you are finished.
- Press "Ctrl-S" to save the file, and
then close the "titlebar.bmp" window..
Now that you have finally the "titlebar.bmp file
finished, switch to WinAmp and press "Alt-S" to
open the skins window. Choose another skin, and then your
skin again from the list and click "OK." See if
your title and clutter bars appear correctly on the
interface. Be sure to test all the items and make sure
they look right. Click the windowshade button to see if
you windowshade looks correct. If something isn't quite
right, go back and retrace your step to make sure you
didn't leave something out, or do something wrong.
The "cbuttons.bmp" file is the file WinAmp
uses for the control buttons in your skin. To export your
control buttons from the Photoshop template you worked
on, open the "cbuttons.bmp" file and the skin
template file in Photoshop.
Now you are ready to export the control buttons into
your skin.
- In the template window, hide all the layers
except the background layer, the "Buttons
Mask" layer, and the "Buttons Up"
layer that you created.
- Use the "Marquee" tool to select the
large black box made by the "Buttons
Mask" layer, then hide the "Buttons
Mask" layer.
- From the "Edit" menu, choose "Copy
Merged."
- Bring the "cbuttons.bmp" window to the
front and press "Ctrl-V" to paste the
buttons up image into the file.
- Position the buttons up image over the
"Buttons Up" area of the file. When you
are finished press "Ctrl-E" to merge
the image into the file.
- Return the template window the to front. Hide the
"Buttons Up" layer and show the
"Buttons Down" layer, then choose
"Copy Merged" from the "Edit"
menu, and bring the "cbuttons.bmp"
window to the front.
- Press "Ctrl-V" to paste the buttons
down image into the file. Reposition it over the
"Buttons Down" area of the file, and
then press "Ctrl-E" to merge it into
the file.
- Bring the template window to the front again, and
show the "Buttons Mask" layer. Use the
"Marquee" tool to select the small
black box made by the "Buttons Mask"
layer, and then hide the "Buttons Mask"
layer, then choose "Copy Merged" from
the "Edit" menu.
- Return the "cbuttons.bmp" window to the
front. Press "Ctrl-V" to paste the
eject button down image into the file. Position
it over the "Eject Down" area of the
file, and press "Ctrl-E" to merge it
into the file.
- Bring the template window the to front. Hide the
"Buttons Down" layer and show the
"Buttons Up" layer, then choose
"Copy Merged" from the "Edit"
menu, and bring the "cbuttons.bmp"
window to the front.
- Press "Ctrl-V" to paste the eject
button up image into the file. Position it over
the "Eject Up" area of the file, and
press "Ctrl-E" to merge it into the
file.
- Once you've done the above steps, press
"Ctrl-S" to save the file, then close
the "cbuttons.bmp" window.
When you're done, switch to WinAmp, and press
"Alt-S" to open the skins window. Choose
another skin, and then your skin again from the list and
click "OK." If your buttons appear on the
interface, you've done everything right. Be sure to test
each button and make sure that it looks right.
The "shufrep.bmp" file is the file WinAmp
uses for the shuffle, repeat, EQ, and Playlist buttons in
your skin. To export your shuffle, repeat, EQ, and
Playlist buttons from the Photoshop template you worked
on, open the "shufrep.bmp" file and the skin
template file in Photoshop.
Now you are ready to export the shuffle, repeat, EQ,
and Playlist buttons into your skin.
- In the template window, hide all the layers
except the background layer, the "Shuffle
Mask" layer, and the "Shuffle\Repeat Up
Off" layer that you created.
- Use the "Marquee" tool to select the
black box made by the "Shuffle Mask"
layer, then hide the "Shuffle Mask"
layer.
- From the "Edit" menu, choose "Copy
Merged."
- Bring the "shufrep.bmp" window to the
front and press "Ctrl-V" to paste the
shuffle up off image into the file.
- Position the shuffle up off image over the
"Shuf Up Off" area of the file. When
you are finished press "Ctrl-E" to
merge the image into the file.
- Return the template window the to front. Hide the
"Shuffle\Repeat Up Off" layer and show
the "Shuffle\Repeat Down Off " layer,
then choose "Copy Merged" from the
"Edit" menu, and bring the
"shufrep.bmp" window to the front.
- Press "Ctrl-V" to paste the shuffle
down off button image into the file. Reposition
it over the "Shuf Dw Off" area of the
file, and then press "Ctrl-E" to merge
it into the file.
- Hide the "Shuffle\Repeat Down Off"
layer and show the "Shuffle\Repeat Up
On" layer. From the "Edit" menu,
choose "Copy Merged."
- Bring the "shufrep.bmp" window to the
front and press "Ctrl-V" to paste the
shuffle up on image into the file.
- Position the shuffle up on image over the
"Shuf Up On" area of the file. When you
are finished press "Ctrl-E" to merge
the image into the file.
- Return the template window the to front. Hide the
"Shuffle\Repeat Up On" layer and show
the "Shuffle\Repeat Down On " layer,
then choose "Copy Merged" from the
"Edit" menu, and bring the
"shufrep.bmp" window to the front.
- Press "Ctrl-V" to paste the buttons
down image into the file. Reposition it over the
"Shuf Dw On" area of the file, and then
press "Ctrl-E" to merge it into the
file.
- Repeat steps 1 through 12 with the repeat button,
- Bring the template window to the front again.
Hide the "Shuffle\Repeat Down On"
layer, and show the "EQ Mask", "PL
Mask, and "EQ\PL Up Off" layers. Use
the "Marquee" tool to select the small
black box made by the "EQ Mask" and
"PL Mask layers, and then hide the "EQ
Mask" and "PL Mask" layers. Choose
"Copy Merged" from the "Edit"
menu.
- Return the "shufrep.bmp" window to the
front. Press "Ctrl-V" to paste the EQ
and PL down off button image into the file.
Position it over the "E U OF" and
"P U OF" areas of the file, and press
"Ctrl-E" to merge it into the file.
- Bring the template window the to front. Hide the
"EQ\PL Up Off" layer and show the
"EQ\PL Down Off" layer, then choose
"Copy Merged" from the "Edit"
menu, and bring the "shufrep.bmp"
window to the front.
- Press "Ctrl-V" to paste the EQ and PL
down off button image into the file. Position it
over the "E D OF" and "P D
OF" areas of the file, and press
"Ctrl-E" to merge it into the file.
- Bring the template window the to front. Hide the
"EQ\PL Down Off" layer and show the
"EQ\PL Up On" layer, then choose
"Copy Merged" from the "Edit"
menu, and bring the "shufrep.bmp"
window to the front.
- Press "Ctrl-V" to paste the EQ and PL
up on button image into the file. Position it
over the "E U ON" and "P U
ON" areas of the file, and press
"Ctrl-E" to merge it into the file.
- Bring the template window the to front. Hide the
"EQ\PL Up On" layer and show the
"EQ\PL Down On" layer, then choose
"Copy Merged" from the "Edit"
menu, and bring the "shufrep.bmp"
window to the front.
- Press "Ctrl-V" to paste the EQ and PL
down on button image into the file. Position it
over the "E D ON" and "P D
ON" areas of the file, and press
"Ctrl-E" to merge it into the file.
- Once you've done the above steps, press
"Ctrl-S" to save the file, then close
the "shufrep.bmp" window.
When you're done, switch to WinAmp, and press
"Alt-S" to open the skins window. Choose
another skin, and then your skin again from the list and
click "OK." If your buttons appear on the
interface, you've done everything right. Be sure to test
each button and make sure that it looks right.
The "volume.bmp" file is the file WinAmp
uses for the volume and balance sliders in your skin.
There are 28 different changes in the volume slider as it
moves from louder to softer. You will have to paste the
background onto each of these changes. To export your
volume slider from the Photoshop template you worked on,
open the "volume.bmp" file and the skin
template file in Photoshop.
Now you are ready to export the volume slider into
your skin.
- In the template window, hide all the layers
except the background layer and the "Volume
Mask" layer.
- Using the "Marquee" tool, select the
black box created by the "Volume Mask"
layer. Deselect any pieces of the box that are
not black by holding down the "Alt" key
and selecting those areas with the tool.
- Hide the "Volume Mask" layer and then
choose "Copy Merged" from the
"Edit" menu.
- Bring the "volume.bmp" window to the
front. Press "Ctrl-V" to paste the
volume background into the file. Position it so
that it lines up with the first colored volume
bar, then press "Ctrl-E" to merge it
with the file.
- Repeat step 4 for each of the other 27 colored
volume bars.
- If you wish to use a different volume bar then
the default, you will now have to go through the
file and create your individual volume bar for
each of the 28 bars. WinAmp uses the first bar as
the lowest volume setting and the last bar as the
loudest volume setting.
- When you have finished designing your volume
bars, you can design the button for your volume
and balance sliders. There are two images in the
bottom left of this file that make up this
button. The first image is the button in its
"down" state, and the second is the
button in its "Up" state.
- Once you've done the above steps, press
"Ctrl-S" to save the file.
Because WinAmp uses a portion of the volume bar as the
balance bar, your skin could look incorrect if the
background is not the same behind each slider. Below is a
diagram of what portions WinAmp uses of the volume bar
for the balance bar:
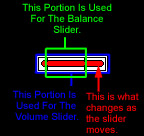
The balance portion of the bar begins exactly 10
pixels from the left of each volume bar. Because most
people never set there balance control to anything but
centered, and few people ever turn their volume all the
way down to 0%, it is possible to paste the background
image of the balance bar over the first volume bar, so
that it will appear correctly on the interface. However,
if you do this, setting the volume to 0% and moving the
balance off center will cause the skin to appear
incorrectly. Follow these steps to paste the balance
background over the first volume bar.
- In the template window, hide all the layers
except the background layer and the "Balance
Mask" layer.
- Using the "Marquee" tool, select the
black box created by the "Balance Mask"
layer. Deselect any pieces of the box that are
not black by holding down the "Alt" key
and selecting those areas with the tool.
- Hide the "Balance Mask" layer and then
choose "Copy Merged" from the
"Edit" menu.
- Bring the "volume.bmp" window to the
front. Press "Ctrl-V" to paste the
balance background into the file. Position it so
that it lines up with the first colored volume
bar, then press "Ctrl-E" to merge it
with the file.
- Once you've done the above steps, press
"Ctrl-S" to save the file, and the
close the "volume.bmp" file.
To see if you volume and balance sliders look
correctly in action, switch to WinAmp, and press
"Alt-S" to open the skins window. Choose
another skin, and then your skin again from the list and
click "OK." Test your volume and balance
sliders to see if they work. If you performed the last
five steps to paste the balance background over the first
volume bar, then the balance slider will become distorted
when you move it off of the center position. The same
thing will occur when you move the volume slider to the
0% position.
The "monoster.bmp" file is the file WinAmp
uses for the mono and stereo indicators in your skin. To
export your mono and stereo indicators from the Photoshop
template you worked on, open the "monoster.bmp"
file and the skin template file in Photoshop.
Now you are ready to export the mono and stereo
indicators into your skin.
- In the template window, hide all the layers
except the background layer, the "Stereo
Mask" layer, and the "Stereo On"
layer that you created.
- Use the "Marquee" tool to select the
black box made by the "Stereo Mask"
layer, then hide the "Stereo Mask"
layer.
- From the "Edit" menu, choose "Copy
Merged."
- Bring the "monoster.bmp" window to the
front and press "Ctrl-V" to paste the
stereo on image into the file.
- Position the mono image over the "St.
On" area of the file. When you are finished
press "Ctrl-E" to merge the image into
the file.
- Return the template window the to front. Hide the
"Stereo On" layer and show the
"Stereo Off " layer, then choose
"Copy Merged" from the "Edit"
menu, and bring the "monoster.bmp"
window to the front.
- Press "Ctrl-V" to paste the stereo off
image into the file. Reposition it over the
"St. Off" area of the file, and then
press "Ctrl-E" to merge it into the
file.
- In the template window, hide the "Stereo
On" layer, and then show the "Mono
On" and "Mono Mask" layers.
- Use the "Marquee" tool to select the
black box made by the "Mono Mask"
layer, then hide the "Mono Mask" layer.
- From the "Edit" menu, choose "Copy
Merged."
- Bring the "monoster.bmp" window to the
front and press "Ctrl-V" to paste the
mono on image into the file.
- Position the mono on image over the "Mo.
On" area of the file. When you are finished
press "Ctrl-E" to merge the image into
the file.
- Return the template window the to front. Hide the
"Mono On" layer and show the "Mono
Off " layer, then choose "Copy
Merged" from the "Edit" menu, and
bring the "monoster.bmp" window to the
front.
- Press "Ctrl-V" to paste the mono off
image into the file. Reposition it over the
"Mo. Off" area of the file, and then
press "Ctrl-E" to merge it into the
file.
- Once you've done the above steps, press
"Ctrl-S" to save the file, then close
the "monoster.bmp" window.
When you're done, switch to WinAmp, and press
"Alt-S" to open the skins window. Choose
another skin, and then your skin again from the list and
click "OK." See if the indicators look right in
their "off" state. Then play an MP3 and see if
the stereo indicator looks correct in the "on"
state. To test the "mono" on state you can set
WinAmp to down-sample the MP3 (see the WinAmp
documentation for information about how to do this).
The "posbar.bmp" file is the file WinAmp
uses for the position bar and the button that indicates
position of song in your skin. To export your position
bar and the position indicator from the Photoshop
template you worked on, open the "posbar.bmp"
file and the skin template file in Photoshop.
Now you are ready to export the position bar into your
skin.
- In the template window, hide all the layers
except the background layer, and the
"Position Bar Mask" layer.
- Using the "Marquee" tool, select the
black box created by the "Position Bar
Mask" layer, and then hide the
"Position Bar Mask" layer
- From the "Edit" menu, choose "Copy
Merged."
- Bring the "posbar.bmp" window to the
front and press "Ctrl-V" to paste the
play indicator background image into the file.
- Position the image so that it lines up with the
play triangle. When you are finished press
"Ctrl-E" to merge the image into the
file.
- Now you will have to design a button for you
position indicator. The button has two states,
and "up" state and a "down"
state. You will have to design the "up"
button state over the "Up" area of the
file, and the "down" button state over
the "Down" area of the file.
- Once you've done the above steps, press
"Ctrl-S" to save the file, then close
the "posbar.bmp" window.
When you're done, switch to WinAmp, and press
"Alt-S" to open the skins window. Choose
another skin, and then your skin again from the list and
click "OK." Open an MP3 and see if your
position bar and position indicator look right.
The "playpaus.bmp" file is the file WinAmp
uses for the play status indicators in your skin. To
create the play status indicators for your skin, open the
"playpaus.bmp" file and the skin template file
in Photoshop. Below is a diagram of how the indicators
appear in the file:
To create you play status indicators, simply edit the
green and red symbols you see in the file already, then
follow these steps to paste the proper backgrounds for
each indicator into the file.
-
- In the template window, hide all the layers
except the background layer, and the "Play
Indicator Mask" layer.
- Using the "Marquee" tool, select the
black box created by the "Play indicator
Mask" layer. Deselect any pieces of the box
that are not black by holding down the
"Alt" key and selecting those areas
with the tool.
- Hide the "Play Indicator Mask" layer
and then from the "Edit" menu, choose
"Copy Merged."
- Bring the "posbar.bmp" window to the
front and press "Ctrl-V" to paste the
play indicator background image into the file.
- Position the image so that it lines up with the
play triangle. When you are finished press
"Ctrl-E" to merge the image into the
file.
- Bring the template window to the front, and show
the "Pause Indicator Mask" layer.
- Using the "Marquee" tool, select the
black box created by the "Pause indicator
Mask" layer. Deselect any pieces of the box
that are not black by holding down the
"Alt" key and selecting those areas
with the tool.
- Hide the "Pause Indicator Mask" layer
and then from the "Edit" menu, choose
"Copy Merged."
- Bring the "posbar.bmp" window to the
front and press "Ctrl-V" to paste the
pause indicator background image into the file.
- Position the image so that it lines up with the
pause bars. When you are finished press
"Ctrl-E" to merge the image into the
file.
- Bring the template window to the front, and show
the "Stop Indicator Mask" layer.
- Using the "Marquee" tool, select the
black box created by the "Stop indicator
Mask" layer. Deselect any pieces of the box
that are not black by holding down the
"Alt" key and selecting those areas
with the tool.
- Hide the "Stop Indicator Mask" layer
and then from the "Edit" menu, choose
"Copy Merged."
- Bring the "posbar.bmp" window to the
front and press "Ctrl-V" to paste the
stop indicator background image into the file.
- Position the image so that it lines up with the
stop square. When you are finished press
"Ctrl-E" to merge the image into the
file.
- Bring the template window to the front, and show
the "Play Status Blank Mask" layer.
- Using the "Marquee" tool, select the
black box created by the "Play Status Blank
Mask" layer. Deselect any pieces of the box
that are not black by holding down the
"Alt" key and selecting those areas
with the tool.
- Hide the "Play Status Blank Mask" layer
and then from the "Edit" menu, choose
"Copy Merged."
- Bring the "posbar.bmp" window to the
front and press "Ctrl-V" to paste the
blank play status indicator background image into
the file.
- Position the image so that it lines up with the
blank space to the left of the stop square. When
you are finished press "Ctrl-E" to
merge the image into the file.
- Bring the template window to the front, and show
the "What Are These Things? Mask"
layer.
- Using the "Marquee" tool, select the
black box created by the "What Are These
Things? Mask" layer. Deselect any pieces of
the box that are not black by holding down the
"Alt" key and selecting those areas
with the tool.
- Hide the "What Are These Things? Mask"
layer and then from the "Edit" menu,
choose "Copy Merged."
- Bring the "posbar.bmp" window to the
front and press "Ctrl-V" to paste the
What Are These Things? indicator background image
into the file.
- Position the image so that it lines up between
the first two What Are These Things? items.. When
you are finished press "Ctrl-E" to
merge the image into the file.
- Press "Ctrl-V" again and position the
background between the second set of What Are
These Things? items. When you are finished press
"Ctrl-E" to merge the image into the
file.
- Once you've done the above steps, press
"Ctrl-S" to save the file, then close
the "posbar.bmp" window.
When you're done, switch to WinAmp, and press
"Alt-S" to open the skins window. Choose
another skin, and then your skin again from the list and
click "OK." Play an MP3 and see if your play
status indicators look correctly.
The "text.bmp" file contains all the text
character that WinAmp uses to display song information,
kbps, and kHz data. You can select any color for this
text, but there is not much you can do for a different
font. Below is an example of the text file:

You can edit this file by opening it in Photoshop and
then change the color of each letter using the
"Pencil" tool. Once you have edited the
"text.bmp" file the way you want it, press
"Ctrl-S" to save it and the close the file.
When you're done, switch to WinAmp, and press
"Alt-S" to open the skins window. Choose
another skin, and then your skin again from the list and
click "OK." Play an MP3 and see if your text
looks correctly.
The "numbers.bmp" file contains the text
characters 0 through 9 and a blank space that WinAmp uses
to display the time for a song. You can select any color
or font for these text characters, as long as you stay in
the space outlined in the "numbers.bmp"
template file. Below is an example of several different
numbers files:
|
|
Example 1 |
|
|
Example 2 |
|
|
Example 3 |
|
|
Example 4 |
|
|
Example 5 |
You can edit the file buy opening it in Photoshop and
using the "Type" tool to create the individual
numbers. When you are finished press "Ctrl-S"
to save it, and the close the file.
When you're done, switch to WinAmp, and press
"Alt-S" to open the skins window. Choose
another skin, and then your skin again from the list and
click "OK." Play an MP3 and see if your numbers
look correctly.