
Luminancekey example
Setup dialog
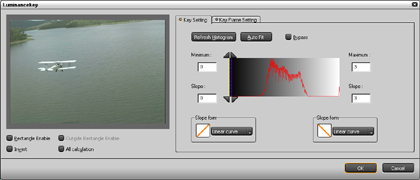
Specify the luminance range in the Key Setting tab.Like the Chromakey filter, there is a Key Frame Setting tab where you can set up key frames and fades.
To specify a range by using a rectangle
You can click Auto Fit to automatically specify the luminance range so that the background becomes more or less completely transparent.If you check Rectangle Enable, you can narrow down the luminance range by dragging a rectangle on the preview window. If you want to use the part of the picture outside the rectangle as the key, check Invert. If you want to use the whole picture as the key, check Outside Rectangle Enable. If you want to calculate the luminance by using the whole picture, check All calculation.
To set the luminance range
When you click Auto Fit, the luminance range is set automatically so that the background becomes more or less completely transparent.To use a histogram, check Refresh Histogram.
Drag the Maximum slider to the far right side (maximum luminance), and then drag the Minimum slider to an appropriate luminance.
Clicking Bypass allows you to temporarily disable the key effect.
To specify edge regions
Drag the Slope form sliders to set upper and lower luminance limits. You can select the variation in luminance at the edges from the Slope form lists.