Rapid Application Development with WSED
Part 2: Struts Development, Integration, and Test
INTRODUCTION
This lab will take you through the steps of using the Struts tools of WSED.
You will build the client portion of a web application and integrate the
Struts classes with the EGL server built in Part 1.
The application is a web banking application. The client portion of this
web application lets the user enter their account number and an amount
to withdraw from that account, and then press a button to initiate the
withdrawal. After withdrawal has completed, a confirmation page is returned
that also shows the new account balance.
Struts tools will be used to
- create a Struts enabled web project
- visually define the web application
- create Struts enabled web pages
- create Struts enabled server side code
- connect the web client to the EGL server program

Note: This workshop requires that
the following products are installed:
- WebSphere Studio Enterprise Developer Early Availability Version 5.0
- DB2 UDB 7 (tested with V7.2 fixpak 6, other levels may work)
- ATM Database must be installed (T3.ddl)
|
Section 1 - Visually define the ATM web application
___ 1. Create a Web Project
| One of the benefits of Enterprise Developer's Struts tools is that, as
part of creating a web project, all of the standard J2EE, Struts and resource
files needed for your web project are automatically generated. After the
web project has been created, ATM, an Enterprise Application project, and ATMWeb, a Struts-based web project, will appear in the Navigator view. |
- From the menu bar of the Workbench window, select File, New, Project
- On New Project - Select wizard,
- select Web in the left-hand list
- double click on Web Project in the right hand list.
- The Create a Web Project wizard opens.
- set Project Name to ATMWeb
- set Use Default checked
- select J2EE Web Project
- check Add Struts support and Create a default CSS file
-
click Next
- On the J2EE Settings Page,
- set Enterprise Application Project to New
- set New project name to ATM
- set Use default checked
- set Context root to ATMWeb
- set J2EE Level to 1.3
-
click Next
- On the Struts Settings page,
- set Create a Resource Bundle... checked
- set Java Package to struts (the wizard will create a new
package folder)
- set Resource bundle name to ApplicationResources
-
click Finish
___ 2. Create a Web Diagram
| Enterprise Developer provides a way to graphically define a web application
by laying out nodes that represent web pages and business logic in a Web
diagram editor. Later, using the Struts Tools of WSED, these nodes can
be turned into real JSP's and code (these nodes are then said to be realized). |
- In the Navigator view, select ATMWeb and type Ctrl+N
- The New wizard appears.
- Expand Web in the list on the left and then select Struts
- From the list on the right, double click on
Web Diagram (equivalent to
selecting
Web Diagram and then clicking Next).
- On the Create a Web diagram page,
- set Enter or select the folder to ATMWeb/misc
- set File Name to ATM
- press Enter (or click
Finish)
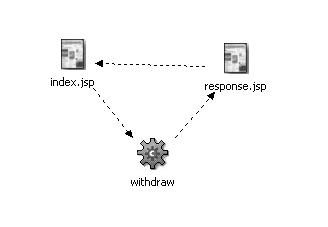
___ 3. Layout the ATM application in the Web Diagram
| The web diagram provides a way to describe a web application before any
coding has to take place. The file, ATM.gph, is opened in the web diagram
editor, ready for you to layout a web application using nodes that represent
web pages (Web Page Node), business logic (Action Mapping Node), and application
flow (Connections).
Our ATM application will need business logic that will take the input
from index.jsp and return a message to response.jsp. Importantly, this logic can be written in any number of technologies (COBOL,
Java, EGL). Such flexibility is possible, in-part, because this is a Struts-based model-view-controller design paradigm. The key aspect of this approach is that JSP's and business
logic are separated to allow greater flexibility. The separation is maintained
via action
mappings, which are used to define how JSPs and business logic communicate.
|
- Right-click in the web diagram editor and then select New, Web Page Node from the context menu.
- Click on the left side of the web diagram editor to drop the web page node,
which will appear on the design surface with the name, page.jsp, highlighted.
- Type index.jsp and hit Enter. (If page.jsp is not highlighted, double click on page.jsp and enter
index.jsp.)
- Right-click in the web diagram editor and then select New, Web Page Node from the context menu
- Click on the right side of the web diagram editor to drop the web page
node, which will appear on the design surface with the name, page.jsp,
highlighted.
- Type response.jsp and hit Enter to change the node's name.
- Right-click in the web diagram editor, select New, Action Mapping Node from the context menu, and click in the web diagram editor between and
a little below the 2 web page nodes to drop the Action Mapping node. A
new Action Mapping Node will appear on the design surface with the name,
/action, highlighted.
- Type /withdraw and press Enter to change its name.
- Right-click on index.jsp and select Connection from the context menu. A line will appear connecting index.jsp to the mouse cursor. Click on withdraw. A dotted line appears from index.jsp to withdraw.
- Repeat this process to connect the withdraw action mapping
to response.jsp. Enter success for the label, <new>, that appears in the middle of the connection line.
- Repeat this process again to connect response.jsp to index.jsp.
- Type Ctrl+S to save your changes
- Your web diagram editor should look similar to this, which is the basic
design for our ATM sample application. Notice that the web page and the
action mapping nodes are all gray. A gray node indicates that the component
represented by the node is not realized (a node that is realized is linked
to a component in the workspace. If you double click on the node for a
realized component, an editor opens for that component).
Section 2 - Use Struts wizards to create the client parts
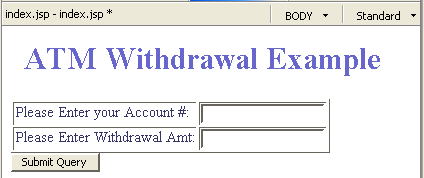
___1. Use Page Designer to define the Input web page
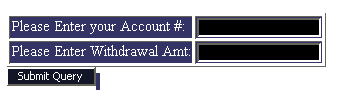
When completed the web page, index.jsp, should look like the following in the Design view or the Source view, respectively:
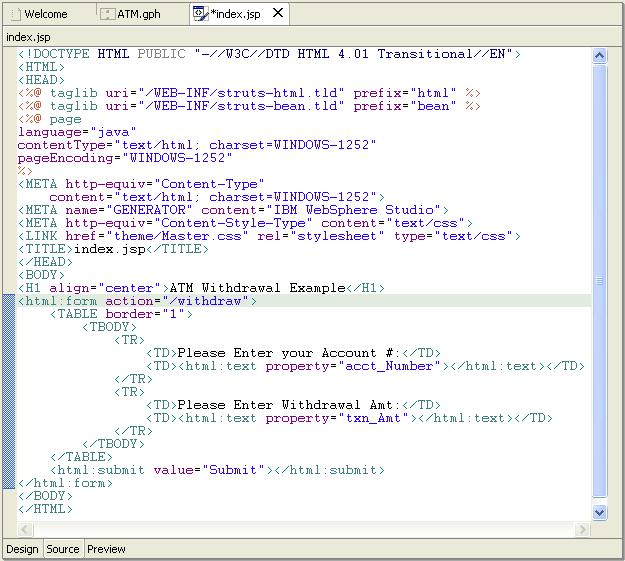
Use the following if you would like to Copy and Paste the definition of
index.jsp.
<!DOCTYPE HTML PUBLIC "-//W3C//DTD HTML 4.01 Transitional//EN">
<HTML>
<HEAD>
<%@ taglib uri="/WEB-INF/struts-html.tld" prefix="html" %>
<%@ taglib uri="/WEB-INF/struts-bean.tld" prefix="bean" %>
<%@ page
language="java"
contentType="text/html; charset=WINDOWS-1252"
pageEncoding="WINDOWS-1252"
%>
<META http-equiv="Content-Type"
        content="text/html; charset=WINDOWS-1252">
<META name="GENERATOR" content="IBM WebSphere Studio">
<META http-equiv="Content-Style-Type" content="text/css">
<LINK href="theme/Master.css" rel="stylesheet" type="text/css">
<TITLE>index.jsp</TITLE>
</HEAD>
<BODY>
<H1 align="center">ATM Withdrawal Example</H1>
<html:form action="/withdraw">
        <TABLE border="1">
                <TBODY>
                        <TR>
                                <TD>Please Enter your Account #:</TD>
                                <TD><html:text property="acct_Number"></html:text></TD>
                        </TR>
                        <TR>
                                <TD>Please Enter Withdrawal Amt:</TD>
                                <TD><html:text property="txn_Amt"></html:text></TD>
                        </TR>
                </TBODY>
        </TABLE>
        <html:submit value="Submit"></html:submit>
</html:form>
</BODY>
</HTML>
|
- In the ATM.gph editor, double click on index.jsp node.
- The New JSP File wizard appears. Accept the default values and click Finish.Enterprise Developer automatically creates index.jsp with Struts taglib references. The JSP opens ready for editing.
- Close the editor for index.jsp and then in the ATM.gph editor, double click on index.jsp node. For this driver, closing and reopening the editor will fix a problem
that exists when a jsp has just been created.
- Click on the Design tab at the bottom of the editor
- Replace "Place index.jsp's content here" with ATM Withdrawal Example
- Right click on ATM Withdrawal Example and select Attributes from the context menu. The Attributes view (lower left corner) is brought into focus.
- In the Attributes view set the Paragraph attribute to Heading 1 and set Alignment to center

- Click below the paragraph containing the text ATM Withdrawal Example.

- Type Ctrl+T and in the Insert Table window, click OK. A 2x2 table appears.
- Place the cursor in the left cell of the first row of the table and type
Please Enter your Account #:
- Tab to the second cell in the first row (upper right)
- From the menu bar select JSP, Insert Custom...
- In the Insert Custom Tag window, in Tag libraries in document select the URI of /WEB-INF/struts-html.tld, select the Custom tag of text, click Insert. Do not close as you will use this window again, but move it so that it
is out of the way.
- Place the cursor in the left cell of the second row of the table and type
Please Enter Withdrawal Amt:
- Tab to the second cell in the second row
- In the Insert Custom Tag window click Insert (the text tag is still selected from the previous insert)
- Click below the table (cursor should be outside of the table and at the
lower left corner)
- In the Insert Custom Tag window, select the Custom tag of submit, click Insert, and then click Close

- Highlight the table and submit button (Hint: place the cursor above the
upper left corner of the table, while holding down mouse button 1 drag
the cursor down across the table and submit button)
- In the Insert Custom Tag window, select the Custom tag of form, click Insert. Close this window. This will place the selected text within the form.
Note: In the GA product, you should be able to start with adding the form
to the design first and then inserting the table and button inside the
form.

- Click on the Source tab at the bottom of the editor
- Locate the text, <html:form action="">, enter /withdraw between "". The result is <html:form action="/withdraw">
- Locate the text, Please Enter your Account #:
- Just below, in <html:text property="">, type acct_number between "". The result is <html:text property="acct_number">
- Locate the text, Please Enter Withdrawal Amt:
- Just below, in <html:text property="">, type txn_amt between "". The result is <html:text property="txn_amt">
- Change the button definition from <html:submit> to <html:submit value="Submit"> (hint: try code assist to add value="")
- Type Ctrl+S to save your changes
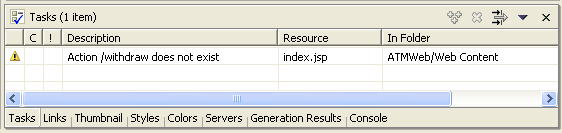
- Check the Tasks view to see if there are any errors for index.jsp. There should be only
1 information message which will be resolved later. Resolve any other messages
related to index.jsp.
- Close index.jsp editor.
___2. Define the Output JSP
When completed the web page, index.jsp, should look like the following
in the Design view or the Source view, respectively:

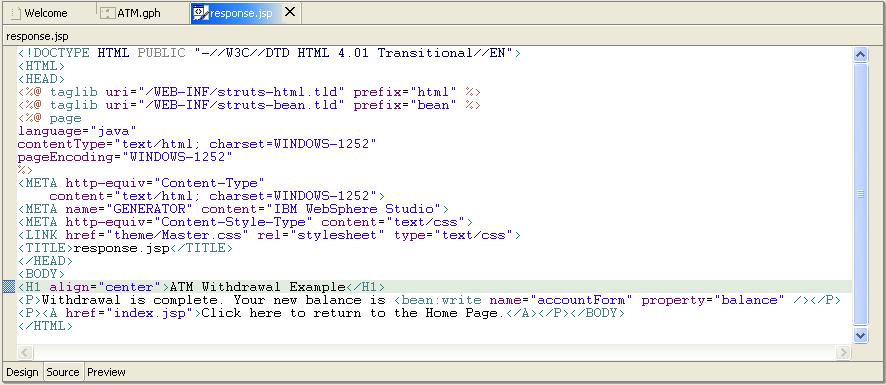
Use the following if you would like to Copy and Paste the definition of
response.jsp.
<!DOCTYPE HTML PUBLIC "-//W3C//DTD HTML 4.01 Transitional//EN">
<HTML>
<HEAD>
<%@ taglib uri="/WEB-INF/struts-html.tld" prefix="html" %>
<%@ taglib uri="/WEB-INF/struts-bean.tld" prefix="bean" %>
<%@ page
language="java"
contentType="text/html; charset=WINDOWS-1252"
pageEncoding="WINDOWS-1252"
%>
<META http-equiv="Content-Type"
        content="text/html; charset=WINDOWS-1252">
<META name="GENERATOR" content="IBM WebSphere Studio">
<META http-equiv="Content-Style-Type" content="text/css">
<LINK href="theme/Master.css" rel="stylesheet" type="text/css">
<TITLE>response.jsp</TITLE>
</HEAD>
<BODY>
<H1 align="center">ATM Withdrawal Example</H1>
<P>Withdrawal is complete. Your new balance is
<bean:write name="accountForm" property="balance" /></P>
<P><A href="index.jsp">Click here to return to the Home Page.</A></P></BODY>
</HTML>
|
- In the Web Diagram editor, double click on response.jsp node.
- The New JSP File wizard appears. Accept the default values and click Finish.
Enterprise Developer automatically creates response.jsp with Struts taglib references. The JSP opens ready for editing.
- Close the editor for response.jsp and then in the ATM.gph editor, double click on response.jsp node. For this driver, closing and reopening the editor will fix a problem
that exists when a jsp has just been created.
- Click on the Design tab at the bottom of the editor
- Replace "Place index.jsp's content here" with ATM Withdrawal Example
- Right click on ATM Withdrawal Example and select Attributes from the context menu. The Attributes view (lower left corner) is brought into focus.
- In the Attributes view set the Paragraph attribute to Heading 1 and set Alignment to center
- Click below the paragraph containing the text ATM Withdrawal Example.

- Type "Withdrawal is complete. Your new balance is "
- From the menu bar select JSP, Insert Custom...
- In the Insert Custom Tag window, in Tag libraries in document select the URI of /WEB-INF/struts-bean.tld, select the Custom tag of write, click Insert, and then click Close
- From the menu bar select JSP, Show Visual Custom Tags. This will uncheck Show Visual Custom Tags, which will cause a button to appear for the bean:write tag. Because of
an error in this driver the Visual Custom Tags for bean tags do not appear.

- Place the cursor under this text and type "Click here to return to the Home Page."
- Highlight the text, Click here to return to the Home Page. (Hint: place the cursor above the "C" in click and while holding
down mouse button 1 drag the cursor down across the text)

- Right click, and select Insert Link...
- In the Insert Link window,
- set Type to File
- set URL to index.jsp (you can use the Browse button)
- click OK

- Click on the Source tab at the bottom of the editor
- Change the struts tag, <bean:write name="" />, to <bean:write name="accountForm" property="balance" />
- Type Ctrl+S to save your changes.
- Check the Tasks view. There should be no errors for response.jsp. Resolve any that exist.
- Close response.jsp editor.
| You have now created both JSPs that you will need. Notice that now the
JSP nodes appear in color in ATM.gph (they have been realized), and one of your connections have changed from
a dotted line to a solid line. |
__ 3. Create a FormBean
|
In our ATM Sample, we need to pass an account number and an amount to withdraw
from that account to the logic that performs the withdrawal action, and
then pass the new account balance back to response.jsp. A Struts formbean will help us do that. Basically, a formbean is a simple
Java class that holds the data to be passed between JSPs and Actions that
perform business logic.
|
- To create a formbean, select ATMWeb and type Ctrl+N
- The New wizard appears.
- Expand Web in the list on the left, and then select Struts
- From the list on the right, double click on Action Form Class.
- On the New ActionForm Class - New ActionForm Class
page,
- set Folder to /ATMWeb/Java Source
- set Java package to struts (or select using Browse...)
- set ActionForm class name to AccountForm
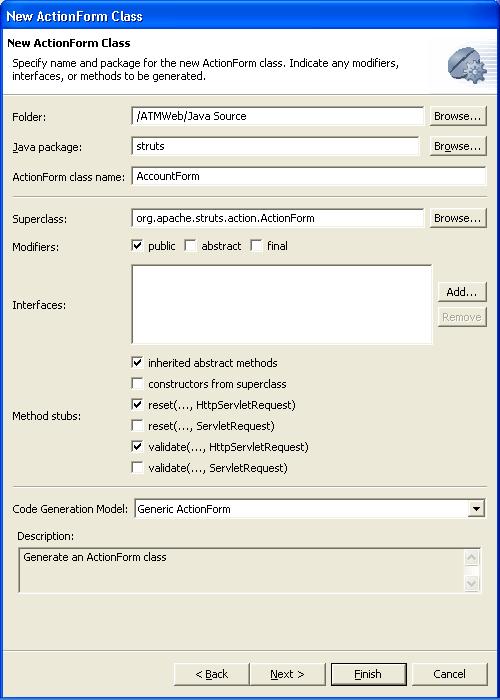
- click Next
- On the New ActionForm class - Choose new accessors... page,
- expand ATMWeb
- expand index.jsp
- check the box for /withdraw (this will select both form fields)

- click Next
- On the New ActionForm class - Create new accessors... page,
- click Add...
- in Name column replace <no name> with balance
- in Type column replace <no type> with double (hint: Tab out of the Type column to make sure double is accepted)
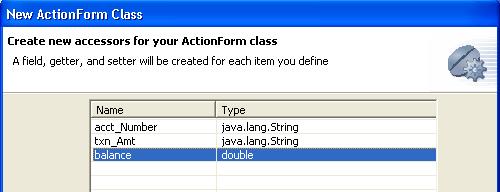
- click Finish
- In the editor for AccountForm, notice that the 3 variables have been defined
as well as there getters and setters.

- Close AccountForm.java editor.
| Enterprise Developer automatically generates all of the Java code that
is required to make the input from index.jsp available to our server program.
If you want to perform edit checks on the input variables, use AccountForm.java. |
Section 3 - Integrating Struts-based client with an EGL server
__ 1. Generate an EGL server program into Java Run-time code
| In Part 1 you created the build descriptors, win-java and wrapper. Now
you will use these build descriptors to control the generation of the EGL
server program into runtime code. The Target System build descriptor, win-java,
will cause a set of Java classes to be created that will implement our
server program. The Java Wrapper build descriptor , wrapper, will cause
a set of Java objects to be created which makes using the EGL server program
easy, no matter where it executes. |
- Switch to the EGL perspective
- In the Navigator view, right-click on the account.eglpgm in the project, ATMServer, and then from the context menu select
Generate EGL with -> Target System and Java Wrapper Build Descriptors.
- The Generate wizard appears. Make sure that account is selected in the list of parts to generate and click Finish. Note: Since the project property, EGL Default Build Descriptors, was
set (done in Part 1), nothing more needs to be done.
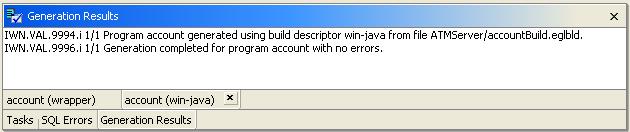
- EGL generation will begin. When finished, check for messages in the Generation Results view for both account(wrapper) and account(win-java) that say that generation completed with no errors.
- Observe that multiple files, such as account.java and accountWrapper.java, have been generated into the ATMWeb/Java Source/egl folder.
__ 2. Create a Struts Action Class that calls the EGL generated Java Wrapper
|
The Struts Action class receives control from the input page. Using the
input data stored in the formBean, the Action class performs navigation
logic, such as when to call to server program and which web page should
be displayed next.
The Struts Action class wizard uses a Generation Model to determine what
code is required in the Action class. You will use the EGL Struts Action
model to create the needed code to call our EGL server program via the
Java wrapper generated earlier.
|
- In the Web diagram editor, double click on withdraw
- The New Action Mapping wizard appears.
- set Configuration File Name to WEB-INF/struts-config.xml
- set Mapping Path to /withdraw
- add an additional Forwards: click Add..., set Name to failure and set Path to /index.jsp (hint: use the horizontal scroll bar to locate Path)
- set Form Bean Nameto accountForm from the drop down list
- set Model to EGL Struts Action from the drop down list
- click
Next.
- On the New Action Mapping - Create an Action class page,
- set Add new Action class checked
- set Folder to /ATMWeb/Java Source
- set Java package to struts (hint: use Browse... to
select it)
- set Action class name to AccountAction
- click
Next.
- In the New Action Mapping - Create a EGL Struts Action class page,
- select EGL Wrapper
- set Wrapper to AccountWrapper (hint: use Browse... button)
- click
Next
- In the New Action Mapping - Define data mappings page,
- next to the Output Mappings table, click Add(reuse form bean)
- in Reuse Form Bean Mapping,
- expand Acctws in Input Mappings and select (double)balance
- expand AccountForm in Output Mappings and select (double)balance
- click Add (entry made in Output Mappings table)
- click Done
- click Finish
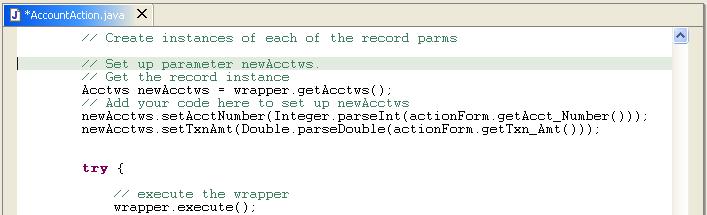
- AccountAction.java is created and opened for editing. In the editor for AccountAction.java,
locate the text:

- after "// Add your code here to set up newAcctws" add these 2 lines (hint: try code Assist or use Copy and Paste with the
text below):
  newAcctws.setAcctNumber(Integer.parseInt(actionForm.getAcct_Number()));
  newAcctws.setTxnAmt(Double.parseDouble(actionForm.getTxn_Amt()));
|
- Type Ctrl+S to save your changes. Your changes to AccountAction.java should
look similar to:
- Check the Tasks view. There should be no errors for AccountAction. Resolve any that exist.
- Close AccountAction.java editor.
Section 4 - Test your web application
___ 1. Configure the WebSphere Test Environment
- Open a Server perspective (hint: from the menu bar select Window, Open Perspective)
- Type Ctrl+N
- The New wizard appears.
- Select Server in the list on the left
- From the list on the right, double click on Server and Server Configuration
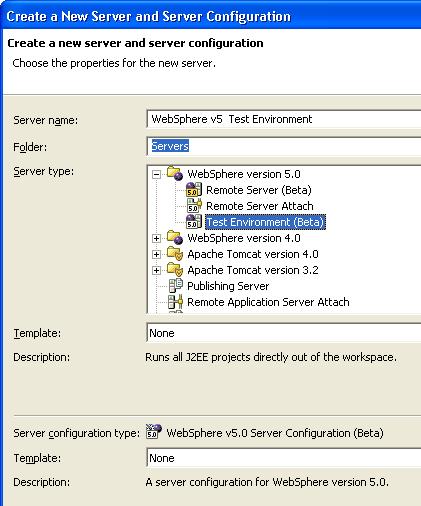
- On the Create a New Server and Server Configuration page,
- set Server Name to WebSphere v5 Test Environment
- set Folderto Servers
- in Server type expand WebSphere version 5.0 and select Test Environment(Beta)
- click Finish.
- On Create Server Project dialog, click Yes. The Servers project is created.
___ 2. Define a Data Source to WebSphere Test Environment
- In the Server Configuration view, expand the Server Configurations folder and double click on WebSphere v5.0 Test Environment
- In the WebSphere v5.0 Test Environment editor, click on the Data Source tab, which is found at the bottom of the editor.
- In the Data sources page, click on Add... next to JDBC provider list
- In Create a JDBC Provider - Select the type...
- set Database type to IBM DB2
- set JDBC provider type to DB2 JDBC Provider
- click Next
- In Create a JDBC Provider - Enter the properties
- set Name to DB2
- click Finish
- In the Data sources page, click on Add... next to Data source defined ... table
- In Create a Data Source - Select the type... window,
- set data source type to Version5.0 data source
- click Next
- In Modify Data Source - Edit the settings... window,
- set the Name to AIS
- set JNDI name to jdbc/AIS
- click Next
- In Create a Data Source - Edit the resource properties... window
- in Resource Properties table, click on databaseName in the Name column
- set Value to AIS
- click Finish
- Your changes should look similar to:

- Save changes and close the WebSphere v5.0 Test Environment editor.
___ 3. Test the Web Application
| Now were ready to run the ATM sample on the local WebSphere Test server. |
- Right-click on the project ATMWeb and then select Run on Server from the context menu.
- In the Server Selection dialog, set Do not show this dialog next time to checked, click Finish.

- The WebSphere Test Server will start (you should see messages scrolling in the Console view). Once the test server is started, the Web Browser view will open and it will automatically load index.jsp.
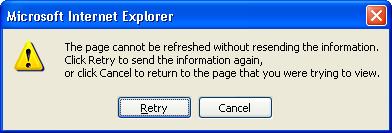
- You can now try your ATM Web application. Enter an account # of 2 and a withdrawal amount of 2. Click on the Submit button.If you get this message, click Retry
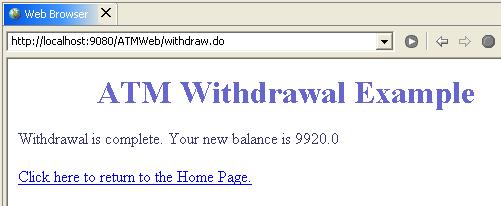
- When the response.jsp page is returned, it should have a dollar amount
displayed (yours will be different).
Congratulations! You have completed building and testing a web application
using WebSphere Studio Enterprise Developer.
WebSphere Studio Enterprise Developer allows you to quickly build well-structured Web applications. Leveraging a Struts-based model-view-controller design model separates important aspects of an application specifically keeping user interface concerns and business logic concerns apart.
Leveraging EGL ensures that little or no Java needs to be written by hand. This approach allows development teams with little or no Java experience to effectively participate in the creation of real-world web application development.