- Introduction and System Requirements
- Contents of the CheckiniPM.zip archive
- Installation (Setup) Notes
- Using CheckiniPM (CheckiniPM up and running)
- Customizing CheckiniPM
- The Usual Disclaimers and Other Legalities (Sorry About That!)
Introduction and System Requirements:
- This document uses the words, "Checkini.exe", "Checkini" and "CheckiniPM". To avoid confusion please note the following clarifications:
- Checkini.exe: An OS/2 executable program, written by Henk Kelder
- Checkini: Basically the same as "Checkini.exe". This document uses "Checkini" to describe any feature or action produced by the Checkini.exe executable
- CheckiniPM: The (freeware) REXX/PMREXX program provided here and described in this document
- CheckiniPM provides a windowed, Presentation Manager (PM) interface to Henk Kelder's Checkini.exe program
- Checkini.exe is a utility program, that helps maintain the functional integrity of the OS/2 OS2.INI file. It does so by deleting references to unused handles, damaged handles and/or orphaned objects from that file
- The OS2.INI file requires periodic maintenance, or cleaning, especially when the user makes a lot changes to his or her system (installing and uninstalling programs, deleting files and folders, etc)
- Checkini.exe provides the user with a set of options for cleaning the OS2.INI file, displaying the results in progress and writing the results to a logfile
- Unfortunately, Checkini.exe can only be executed from the command line. Therefore, the user has to remember the syntax for the desired set of options. One can easily get tired of this, especially if he or she uses several and/or different options on different occasions
- CheckiniPM overcomes the command line limitations of Checkini.exe. It presents the user with a text window listing of the Checkini.exe options and a slightly different syntax for selecting any option. It then provides the user with a prompt to input the desired set of Checkini.exe options
- CheckiniPM uses PMREXX and two (2) REXX scripts to implement the PM interface
- To use CheckiniPM you must have Checkini.exe, REXX and PMREXX installed on your system. You should also have the OS/2 System Editor installed, but it is NOT ABSOLUTELY necessary. If you do not have the OS/2 System Editor, you may be able to use another editor (see "Customizing CheckiniPM", below). If you do not have a suitable editor, you will not be able to view the Checkini logfile (see "Using CheckiniPM (CheckiniPM up and running)"). That should be no problem, however. Except for viewing the logfile, you can use CheckiniPM
- NOTE: The UniMaint and Cleanini.exe utilities should also be used, regularly, to maintain the integrity of your OS2.INI file. A Presentation Manager interface, named CleaniniPM, exists for Cleanini.exe. Please see:
- http://www.filestar.com/ for UniMaint
- http://home.t-online.de/home/C.Arnold/e/ for Cleanini.exe
Contents of the CheckiniPM.zip archive
- CHECKINI1.CMD (the first and primary REXX script)
- CHECKINI2.CMD (the second REXX script; it is called by the first script)
- ReadMe.htm (the file that you are presently reading)
Installation (Setup) Notes:
- There is no installation program, per se. However, the installation, or setup, is simple. It involves three (3) steps, delineated below
- First, unzip the CheckiniPM.zip archive. It was created using WarpZip, which uses compression code from the Info-ZIP group. Info-ZIP compression and decompression executable files and dll's are freely available from the following Internet sources:
- http://www.cdrom.com/pub/infozip/
- ftp://ftp.cdrom.com/pub/infozip/
- Next, place the CHECKINI1.CMD and CHECKINI2.CMD script files in the SAME directory as Checkini.exe. IMPORTANT: CHECKINI1.CMD, CHECKINI2.CMD and Checkini.exe MUST all reside in the same directory, otherwise CheckiniPM will not work
- Finally, create a program object for CheckiniPM and place it on the desktop, or some other favorite place. Complete the "Program" tab of the properties notebook of the program object (see the picture example, below). The "Path and file name" entry is the full path to PMREXX (pmrexx.exe) on your system . The "Parameters" entry is the full path to the CHECKINI1.CMD script file (it must be in quotes). Note, the "/Q" option on the parameter line tells PMREXX to automatically close out everything at the end of the REXX script (instead of giving you that annoying PMREXX message box: "This REXX procedure has ended" and then requiring you to manually dismiss the message and the PMREXX window). Note, however, that if there is a problem with your REXX script, the "/Q" option allows PMREXX to blow right past it. You don't get any error messages; you just know that the script did not work! Also, complete the "Icon" tab of the program object (in the example, below, the "icon" tab has the words "Run Checkini with selected options"

Using CheckiniPM (CheckiniPM up and running)
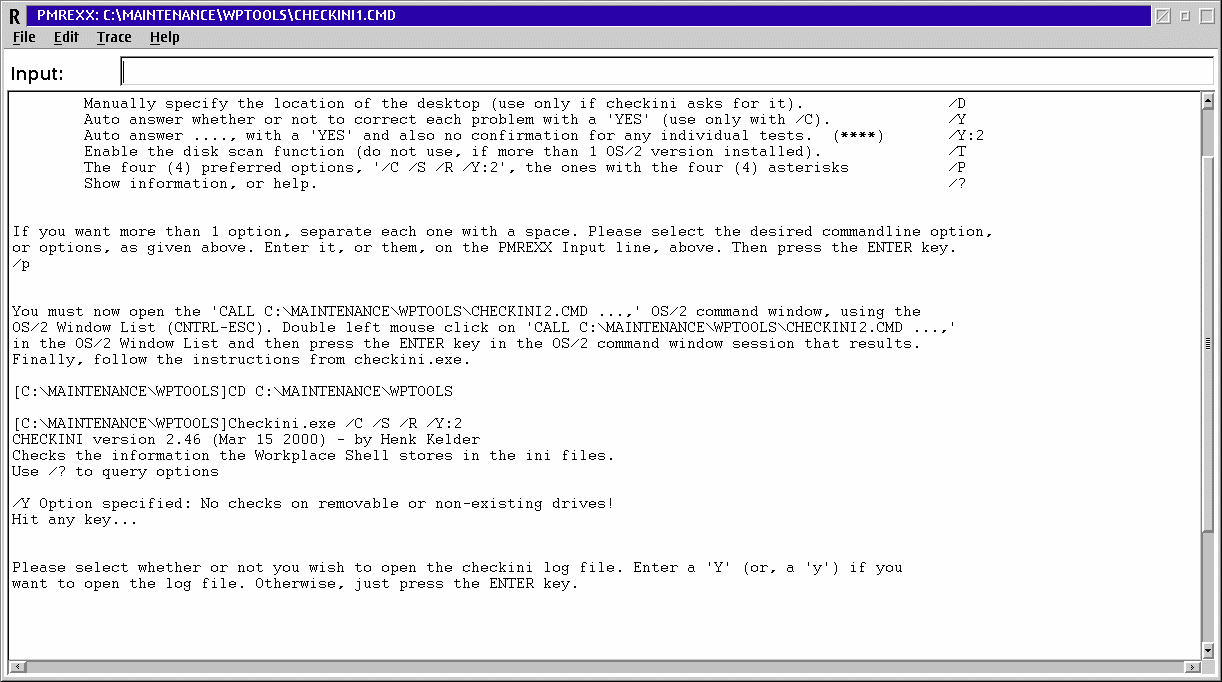
- Shown below is an example of the opening text window for CheckiniPM. At the top left portion of the window is the PMREXX input line for entering user selections. Near the bottom of the window are the instructions for responding to input prompts and/or continuing with the operation of CheckiniPM
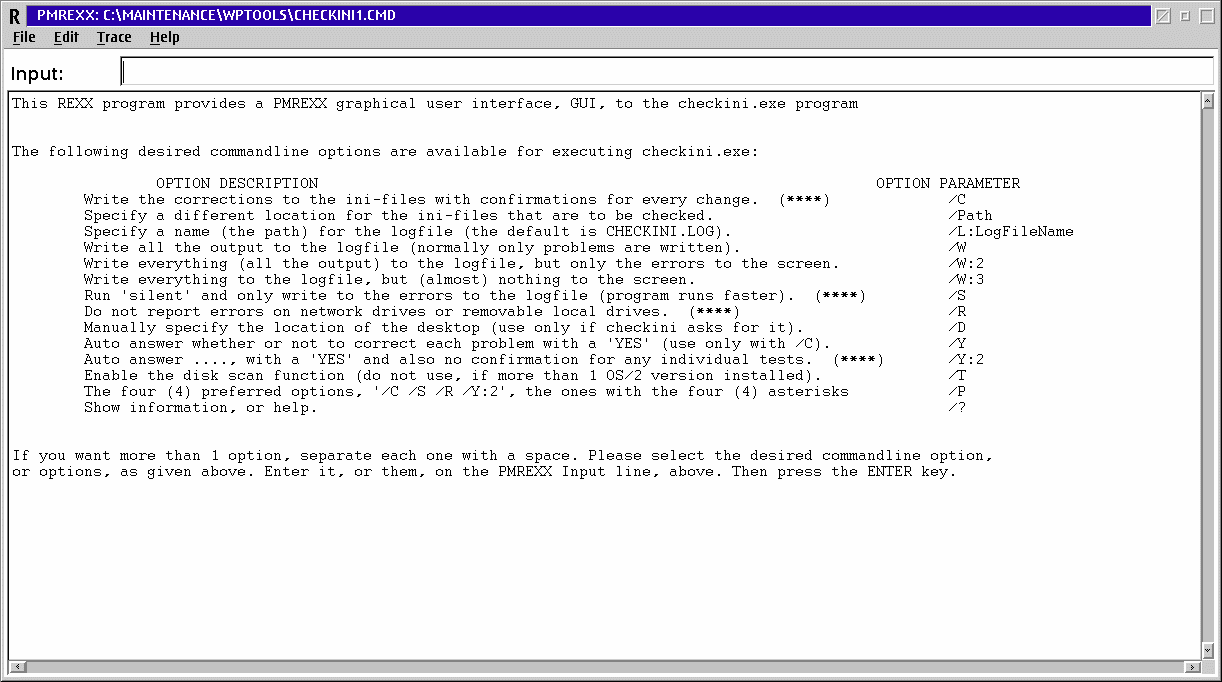
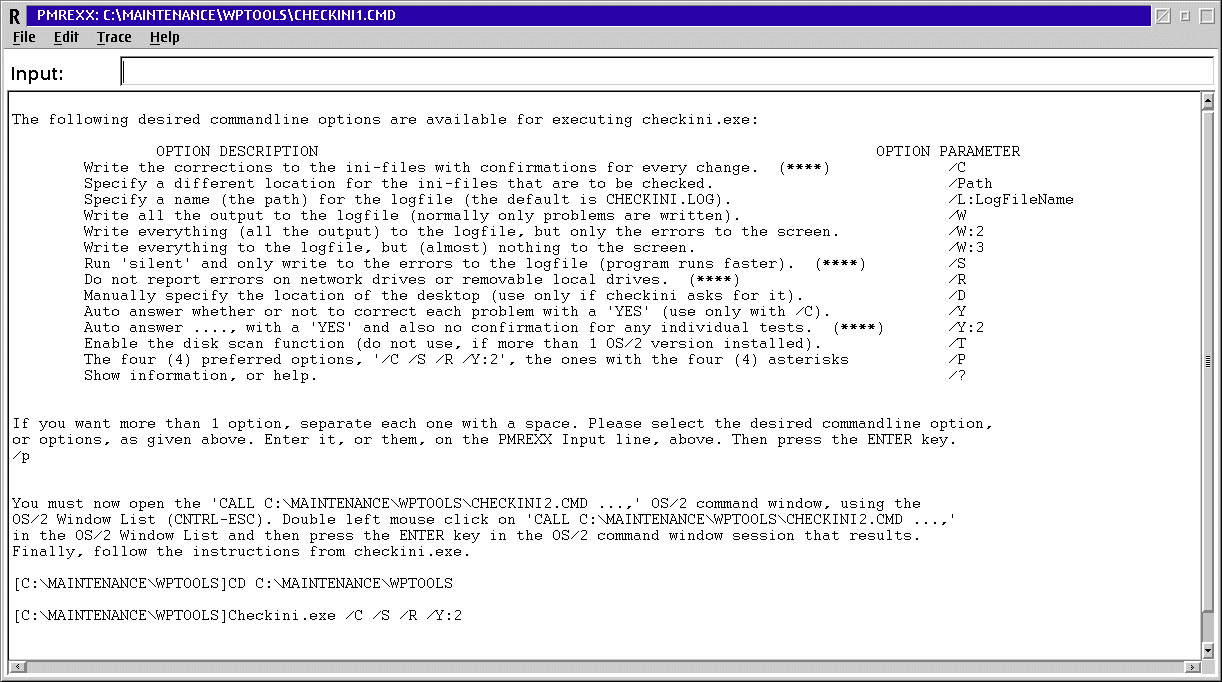
- The opening window shows all of the Checkini.exe options and the (CheckiniPM) syntax for selecting any option
- For example, if you want to "write the corrections to the ini-files with confirmations for every change", write "/C" (without the quotes) on the PMREXX Input line and then press the ENTER key
- On the other hand, if you want to write the corrections to the ini-files and also run 'silent' and only write to the errors to the logfile (program runs faster)", write "/C /S" (without the quotes) on the PMREXX Input line and press the ENTER key
- You can write any option in all upper case, or all lower case, or a mixture. It does not matter
- NOTE: I have a preferred set of four (4) options that I use all the time. I combined them all together in one simplified command, "/P". You can do the same with a preferred set of options that you like (see "Customizing CheckiniPM", below)
- After pressing the ENTER key the REXX script continues with instructions at the bottom of the window (example below)
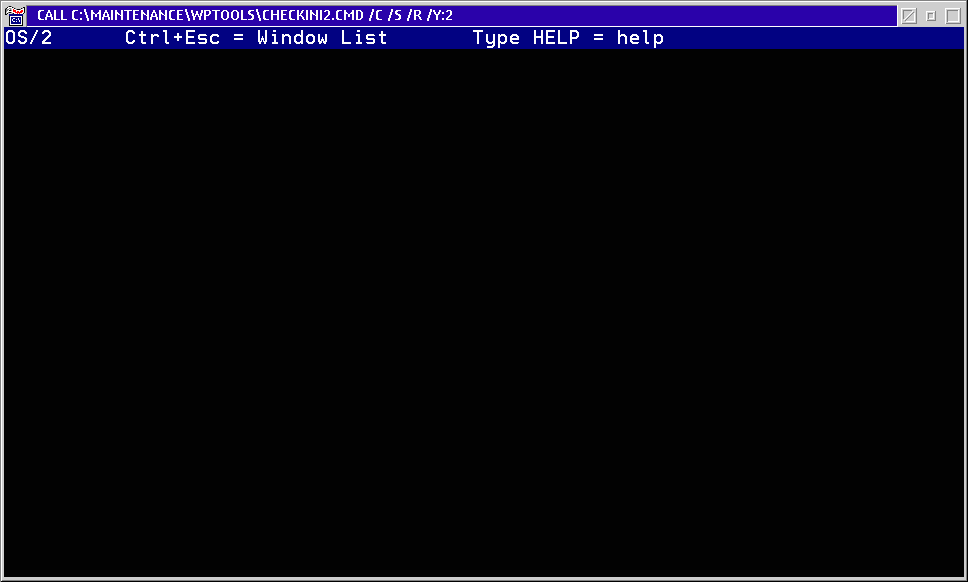
- As stated, open the "'CALL ..., \CHECKINI2.CMD ...,' OS/2 command window" by pressing CONTROL-ESCAPE. That will open the OS/2 Window List. Double left mouse click on 'CALL ..., \CHECKINI2.CMD ...,' in the window list. That will open the O/S-2 command window for Checkini. Press the ENTER key in the command window to activate Checkini.exe. Finally, follow the instructions from Checkini.exe. NOTE: As an alternative to using the OS/2 Window List you can use the "Switch to another application" drawer in the WarpCenter
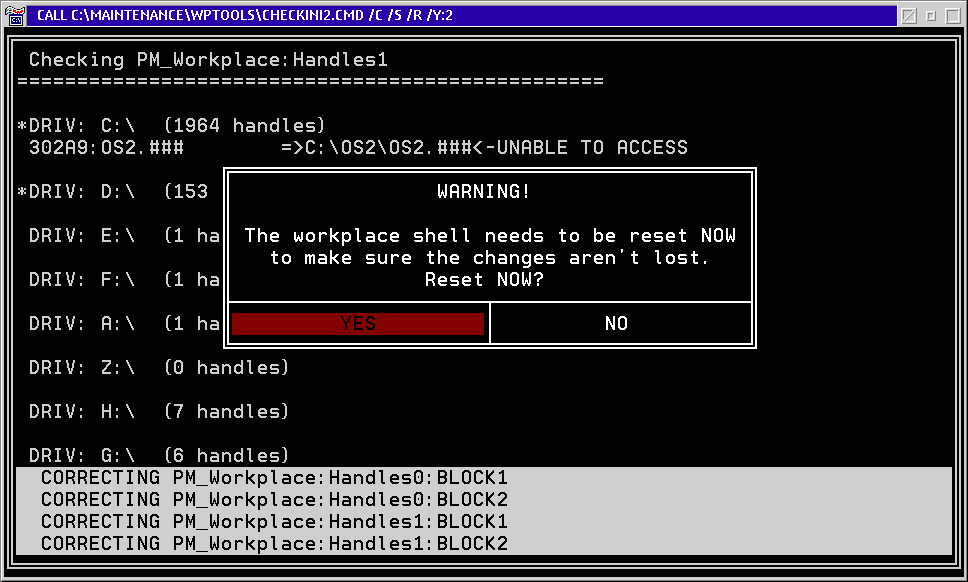
- Shown below is an example of the resulting OS/2 command window just before pressing the ENTER key to activate Checkini.exe. You can see the selected Cleanini options at the top of the window (the "/C /S /R /Y:2" commands, selected from my preferred set of options)
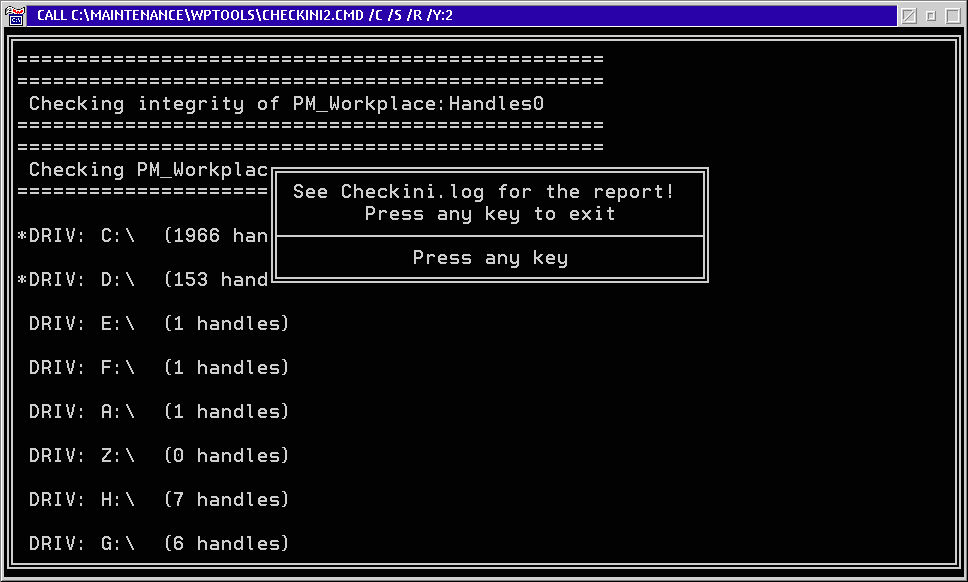
- After pressing the ENTER key Checkini runs to completion, scrolling the OS/2 command window in the process. Below is an example of the command window at the completion of Checkini. You can see the program's instructions for starting the exiting procedure
- After pressing any key Cleanini prompts you concerning resetting the desktop
- After deciding on resetting the desktop Checkini terminates and the REXX script continues. CheckiniPM prompts you concerning opening the
logfile for viewing (see example, below)
- Enter a "Y" on the Input line, if you want to open the logfile. If not, just press the ENTER key, the script will end and PMREXX window will automatically close (assuming you have the "/Q" option on the parameter line in the properties notebook of the program object)
- Shown below is an example of the PMREXX window after selecting the "Y" option for viewing the logfile. As stated in the instructions, press the CONTROL-ESCAPE keys to open the window list. Then, double click on the "E.EXE" choice to view the logfile in the OS/2 System Editor. NOTE: As an alternative you can click on the "OS/2 System Editor" icon in the "Switch to another application" drawer of the WarpCenter
- NOTE: If Checkini has made no corrections, the logfile will open (after entering "Y") without having to use the OS/2 Window List or the WarpCenter
- If you open and view the logfile, the script and PMREXX window will close after you close the logfile (close the OS/2 System Editor)

Customizing CheckiniPM
- You can customize CheckiniPM by:
- Incorporating a different set of preferred options (the "/P" command)
- Using different text editor to view the logfile
- To do so you must use the REXX programming language and modify CHECKINI1.CMD in your favorite text editor (it's a good idea to use one that shows the document line numbers)
- Creating your own set of preferred options:
- Rewrite line 77 of CHECKINI1.CMD. Presently, that line reads: Options = "/C /RESTART /DELALL /MulTIPASS /REMOTE:DELETE /LOGDEL"
- Use lines 35 through 49 to modify line 77
- The basic idea is that you must determine your set of preferred options and then enter the Checkini.exe command syntax for them on line 77:
- Use the verbal descriptions in lines 35 through 49 to select the options that you want
- Next, use lines 35 through 49 to determine the exact Checkini.exe command syntax for each option
- For example, if you wanted to: 1.) write the corrections to the ini-files with confirmations for every change; 2.) write all the output to the logfile; and 3.) Auto answer whether or not to correct each problem with a 'YES' (use only with /C), you would find the corresponding Checkini.exe syntax on lines 35, 38, and 44. Therefore, line 77 would become: Options = "/C /W /Y"
- Lines 35 through 49 show the "exact" Checkini.exe syntax for everything except for lines 36, 37 and 48. Line 48 is the "/P" option, which is what this subject is about. The options on lines 36 and 37 involve variable data. To use them in your preferred set, you have to change the variables to constants and then use the exact Checkini.exe syntax.
- For example, if you want to "specify a different location for the ini-files that are to be checked" (line 36), you have to include the command, "/Path", on line 77 (separated from the other options, if any, with spaces and without the quotes), where "Path" is the actual path to the desired response file
- If you want to "specify a name (the path) for the logfile (the default is CHECKINI.LOG)" (line 37), you have to include the command, "/L:LogFileName" on line 77 (separated by spaces and without the quotes), where "LogFileName" is the path to the desired logfile
- Using a different text editor to view the logfile (this one's easy!):
- Change line 196 of CHECKINI1.CMD (it presently reads: Commandline = 'E.EXE "'LogFilePath'"')
- Change the "E.EXE" portion to instead be the path to your text editor. If you have that path in the PATH statement of the CONFIG.SYS, all you need is the name of the executable file for your editor
- Make sure your editor accepts commandline arguments for loading in text files. If it does not, this will not work and you will have to use some other editor, instead
- The following editors accept the commandline arguments for loading in a text file:
- The OS/2 System Editor (E.EXE)
- The OS/2 Enhanced Editor (EPM.EXE)
- Future Wave Editor (FWE.EXE)
- The PillarSoft Enhanced E Editor (EE.EXE). NOTE: I believe that you first must switch to the directory that contains the EE.EXE executable)
- The PillarSoft Enhanced EE Editor (EEE.EXE). NOTE: I believe that you first must switch to the directory that contains the EEE.EXE executable)
- And there are probably other editors that will work. The above is not an endorsement of any editor. If in doubt, try out your editor in an OS/2 command window. Like the PillarSoft editors you may have to switch to the directory for the editor executable in order for it to work!
The Usual Disclaimers and Other Legalities (Sorry About That!)
- CheckiniPM is freeware:
- You are free to modify it to your heart's content for your own use
- You are free to distribute the original, unmodified version to anyone else (and please do so!)
- You may not distribute this program, in whole or in part, to others and charge a fee for it
- USE THIS PROGRAM AT YOUR OWN RISK! I am not responsible for any damages, problems, etc. resulting from your use of CheckiniPM. You assume all the risks, costs, aggravation, etc. should ANYTHING GO WRONG!
- Hopefully, CheckiniPM is bug free, but I cannot (and do not) guarantee it!
- In summary, CheckiniPM is provided AS IS and without any warranties
- If you have any problems, I will try to help! Please email me at: hmotin@attglobal.net