BriCad User's Manual |
Guided Tour |
Step-by-step instructions for a step-by-step instruction editor ;-)
| Installation-- previous chapter. | Next chapter -- GUI Reference Card. |
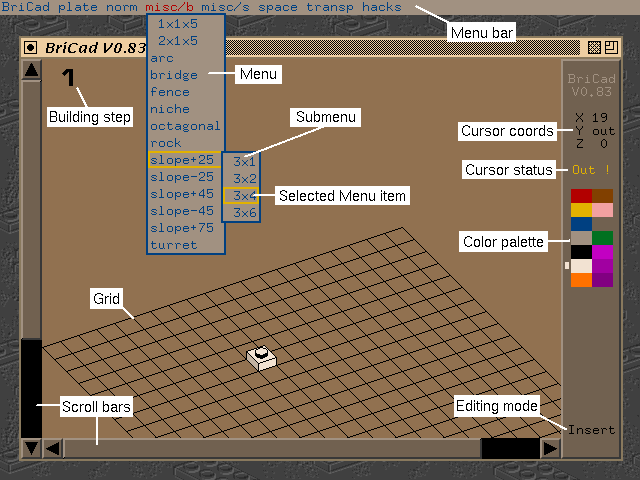
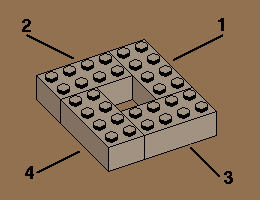
Figure 1 shows and names the components from BriCad's graphical user interface (GUI), just to make sure that we're talking about the same things from now.
Jump back to the beginning of this page / top level page
Jump back to the beginning of this page / top level page
"Insert" mode is the default mode when staring up BriCad. There is also an "Delete" mode and an "Paint" mode in Bricad, but we'll come back at these later.
In Insert mode, the currently selected brick is following your mouse cursor; since you haven't chosen a brick by yourself yet, BriCad is using an 1x1 plate as a default setting.
Move your mouse across the screen, and click the left mouse button a few times.
Hitting the left mouse button places the selected brick at the current position, if possible.
Now, move your mouse again, and watch the output in the Cursor coords and Cursor status fields in the right-sided output field. Note how the Cursor status changes to "Out !" when moving the cursor outside the grid, and changes to "Collis" when you try to drop your 1x1 plate in a place which is already occupied by another brick.
Remember to check these output fields if the BriCad GUI won't let you place at brick at a certain position, because you might just be trying to place the brick at an inadmissible position.Jump back to the beginning of this page / top level page
Since putting white 1x1 plates is getting boring really fast, let's try to generate some variety ;-)
Move the mouse cursor on the red field of the color palette, and click the left mouse button.
If you move the mouse cursor back to the grid, you'll notice that your 1x1 plate has changed its color to red, and all subsequently added bricks will be red, too.Try other colors from the color palette.
Colors on the left half of the color palette resemble the "classic" colors, while the right half has some of the more "modern" LEGO® colors. The flashy colors at the bottom of the color palette are intended for neon-transparent bricks, ans should not be used for opaque bricks.Jump back to the beginning of this page / top level page
If you can not make the menu bar to appear,
Browse the menu system by moving the mouse cursor over the menu bar. Each time you hit a different label in the menu bar, the associated menu will pop down. Moving the mouse pointer down the menu will either highlight one of its menu items, or pop up a submenu, which can be accessed accordingly.
To select a brick from the menu system, move the mouse pointer
onto the desired menu item and release the right mouse button
(see the list of known bugs for
a minor flaw in the current BriCad version also).
As soon as you move the mouse cursor back into the BriCad
window, it should change into the shape of the newly selected
brick.
Jump back to the beginning of this page / top level page
|
|
| Fig. 2: A Circular structure |
First, select the entry '4x2' from the menu 'norm'.
This will give you the well-known '4x2' brick.
Since we want to place the first brick rotated by 90 degrees compared to the actual brick cursor,
click the middle mouse button once.
Clicking the middle mouse button rotates the brick cursor
by 90 degrees clockwise, which is exactly what we want here.
If you are using a 2-button mouse, the middle and right mouse
button are considered to be the same, so just click and release
the menu button in that case.
(Check the installation hints
on how to configure BriCad for a two-button mouse.)
Jump back to the beginning of this page / top level page
We will now look at some pitfalls in the BriCad GUI which result from the need of transforming two-dimensional screen coordinates into the three-dimensional brick world.
|
| Fig. 3: Another building sequence for the circular structure |
Figure 3 shows an alternative building sequence for the circular structure from the previous section. Try building it in the given order.
(You can select 'New' from the 'BriCad' menu if you want to start out with a cleared screen space.)
You'll note that it gets rather uncomfortable (although not impossible) to create the structure using the given brick order:There is no on-the-fly hidden line removal while you're positioning your brick cursor. Hidden line removal would be too costly when done while the user is moving the cursor, and would result in very sloppy response. Therefore, hidden line removal gets delayed until the user places a new brick into the model.
Putting a brick behind another brick is somehow difficult; BriCad tends to signal a brick collision or tries to put it on top of an existing brick in that case.
Those effects result from the general problem of mapping the 2D screen/mouse coordinates to the underlying three-dimensional model space. Since there is normally more than one place in the 3D world corresponding to a particular mouse coordinate, BriCad has to guess the most likely position based on the following heuristics:
It assumes that the user is building his model bottom-up, and that he doesn't hang bricks in mid-air. Therefore, bricks can only placed on top of other bricks (or at the bottom of the grid)
BriCad assumes that the user puts new bricks at places which are visible in the current view, resulting in a bias towards placing bricks in front or beneath existing bricks, but not behind them.
You try to plan ahead, and insert your bricks bottom-up and back-to-front, like in the original example from fig. 2.
You rotate the whole model until the location for the new-to-be-inserted brick becomes accessible from the front.
To rotate the model, use the [<], [>] keys.
Place the first brick from fig. 3 on the screen, then use the rotation keys and add the other bricks.
Jump back to the beginning of this page / top level page
|
| Fig. 4: Adding a 2x2 brick into the circular structure |
Inserting a brick is still difficult if a situation like in fig. 4 arises.
Build the circular structure from fig. 3 first, then try putting in the 2x2 brick.In such cases, use the following keys to move the brick
cursor (instead of using the mouse):
| [x][X] |
decreases/increases the x-coord value by one.
[x] results in moving the brick to the left; [X] moves it to the right. |
| [y][Y] |
decreases/increases the y-coord value by one.
[y] results in moving the brick to the back; [Y] moves it to the front. |
| [z][Z] |
decreases/increases the z-coord value by one.
[z] results in moving the brick down; [Z] moves it up. |
| [Return] | Place the brick at the current position. You can not use the left mouse button instead; that would insert the brick at the current mouse pointer position. |
| [Shift]- [Return] |
Place the brick at the current position, even if BriCad indicates a collision with an existing brick. This is not useful for regular bricks, but there are cases where you'll need it. |
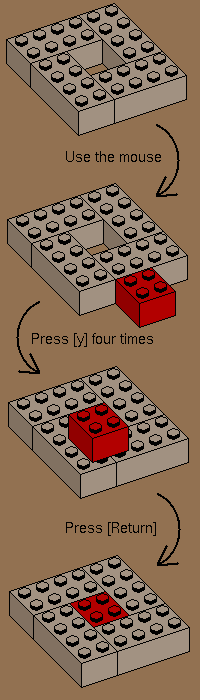
To pull these things together into an example, follow the steps given in fig. 5:
| Start with the circular structure from the previous examples. |
|
| Select the 2x2 brick, and arrange it according to the picture using your mouse (without clicking the left mouse button). | |
| Press [y] four times to move the brick at its final location. | |
| Press [Return] to place the brick into the model. | |
| Fig. 5: Using the keyboard to move bricks |
Jump back to the beginning of this page / top level page
The [Backspace] button serves as an immediate undo function.
Enter some random bricks, then press [Backspace] to undo.
The Undo buffer gets flushed after rotating the model or changing BriCad's editing mode.
You can switch into "Delete" mode by either pressing the [Del] key once, or selecting "Delete" from the "Editing mode" submenu in the "BriCad" menu.
During delete mode, your brick cursor changes into an 1x1 plate, and no new bricks or colors can be selected. To delete a brick from the model, make the brick cursor intersect with the brick you want to remove, then click the left mouse button to perform the deletion.
While in "Delete" mode, the [Backspace] key can be used to undo previous deletions until you rotate the model or change editing modes.
You can switch back to "Insert" mode by either pressing the [Del] keys twice, or by using the menu system as described above.
Try it out by performing the following steps:
Please note: Some braindead Un*x distributions have the [Del] key and the [Backspace] key mapped to the same internal keycodes; which means that one of them won't work as expected. In that case, go into "Delete" mode from the menu system as a workaround.
Jump back to the beginning of this page / top level page
If you want to recolor bricks which have already been placed into the model, use "Paint" mode.
"Paint" mode gets activated by pressing the [Del] button, which does
just cycle from
"Insert" -> "Delete" -> "Paint" and back to "Insert" mode,
as you've probably already found out ;-)
Or use the "Editing mode" submenu from the "BriCad" menu.
"Paint" mode works analogously to "Delete" mode: Select a color from the color palette, then move the brick cursor into the brick whose color you wish to change, and click the left mouse button to change the targetted brick's color.
In contrast to "Insert" and "Delete" mode, the [Backspace] keys has no function in "Paint" mode. Just paint a brick back to its old color if you hit the wrong one ;-)
Jump back to the beginning of this page / top level page
|
| Fig. 6: A simple model |
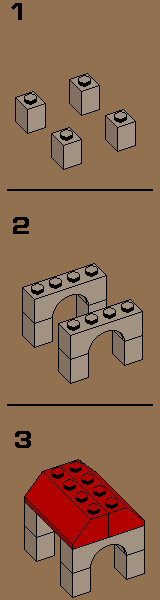
When you're starting with a new model, you'll get into building step no. 1 by default.
Start with a new model by selecting the menu item
"New" from the "BriCad" menu,
then enter the 1x1 bricks shown in building step 1 from the
picture to the right.
Press the [+] ("plus") button once.
Note that BriCad is now displaying a "2" at the upper left corner of the screen.
Add the two bricks shown in step 2.
The bricks you need can be found in the "bridge" submenu, found under "misc/b". Their size is 4x1.
Press the [+] button again, and finish the model by entering the bricks shown in the third step.
This time, look for the 2x4 sized brick in the sub menu "slope+45", again under the "misc/b" label in the menu bar.
You have now created a model containing three building steps.
Use the [-] and [+] keys to view the building steps you have just created.
Please note: It is highly recommended that you restrict yourself
to editing only the highest building step at any time.
It is possible to go back a few building steps, and insert or delete
bricks there, but it is very likely that you do either confuse yourself
(since some bricks are invisible in this stage), or that you confuse
the possible readers of your building instructions by hanging bricks
in mid-air.
Jump back to the beginning of this page / top level page
We have already discussed how to rotate a brick around the z-Axis in 90 degree steps in a previous section.
Support for rotating bricks around other axes (or using different angles) is currently very weak, and will be addressed in later BriCad releases.
As a temporary solution, the menu "Hacks" contains rotated versions of a few common bricks, mainly to be able to add some bells and whistles (and thrusters ;-) to space ship models. Some of them can only be added by overlapping with existing bricks, and using [Shift]+[Return] to force an insert operation. In such cases, the current graphics engine may not be able to suppress all hidden lines correctly.
Some bricks come with different x-offsets, which are meant for sticking them at a bump (suffixes "-a","-b") or sticking them into a cavity (suffix "-i"). The "-a" and "-b" versions are adjusted for different mounting pieces, e.g. the "-a" should mount to the 90deg_stud/3x1 piece, while the "-b" version is for the 90deg_stud/1x1 piece.
In general, the pieces from "Hacks" menu have the status of being unsupported, and will probably be obsoleted in later BriCad versions. Use them at your own risk ;-)
Jump back to the beginning of this page / top level page
| This site is not sponsored, authorized or endorsed by the LEGO group of companies. | |
| Copyright 1996 Carsten Gnörlich. | Last change: 12.07.96 |