Cel Assembler 1.1 User's Guide
Welcome to Cel Assembler 1.1's User's Guide. Hopefully, this document will answer any questions you have about using this product to its fullest. Enjoy!
Basics
Cel Assembler is a tool for building GIF animations. A GIF animation is nothing more than an ordered list of separate GIF
images, much like a slide show, with instructions on how long to delay between images. The original GIF 89a specification
was extended by adding the ability to loop, paving the way for animation on the World Wide Web that is simple to build
and quick to download. The end result is what looks like a plain old GIF file (ie "filename.gif") but actually contains a small
animation.
Terminology
First, some notes on terminology. A cel or a frame (the terms are used interchangeably) is a single image in an animation.
An ordinary bitmap image becomes a cel once it is inserted into an animation. An animation refers to the collection of cels,
complete with all related timing and color instructions. A GIF animation defines a screen size which defines a rectangle in
which the animation is visible. Individual cels are clipped to this screen.
Program Layout
Below is a screen shot of Cel Assembler displaying the gamanim.gif animation. The sample file is located in the help folder
of Cel Assembler's installation location.
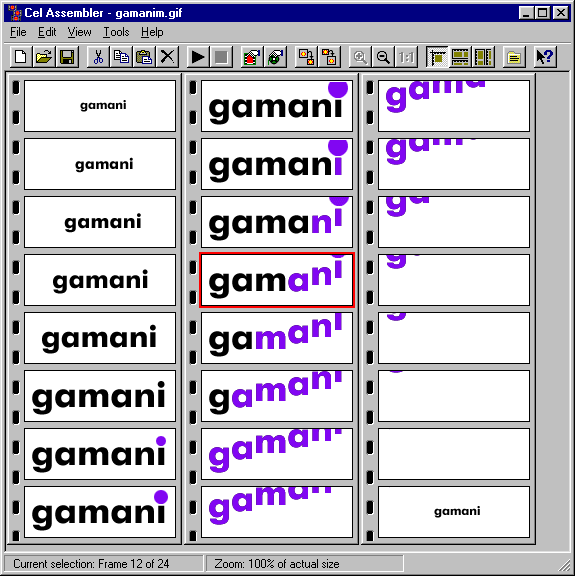
The window contains four main parts: the menu bar, the toolbar, the animation view, and the status bar. The menu bar
contains all of the program's commands. The toolbar contains a subset of those commands in a quickly accessible format.
The status bar displays three pieces of information: the current selection, the total number of frames in the animation, and the
current zoom setting of the view.
![]() The most interesting area, of course, is the main window area. The animation's frames are displayed as a collection of
filmstrips that can be oriented either horizontally or vertically. Each strip is shown as a raised bar with "sprockets" along
one side (on the left for vertical strips and on the top for horizontal strips) and contains as many frames as can fit in that
direction in the window. Multiple strips are then displayed next to each other and scroll to show more strips (in the above
example, if the window was smaller, the strips would scroll horizontally). To frames are ordered starting from the top left of
the window, follow along the current strip, and then continue on the next strip. When viewed in a browser, the animation
displayed above looks like:
The most interesting area, of course, is the main window area. The animation's frames are displayed as a collection of
filmstrips that can be oriented either horizontally or vertically. Each strip is shown as a raised bar with "sprockets" along
one side (on the left for vertical strips and on the top for horizontal strips) and contains as many frames as can fit in that
direction in the window. Multiple strips are then displayed next to each other and scroll to show more strips (in the above
example, if the window was smaller, the strips would scroll horizontally). To frames are ordered starting from the top left of
the window, follow along the current strip, and then continue on the next strip. When viewed in a browser, the animation
displayed above looks like:
![]() Cel Assembler's toolbar contains some nonstandard buttons. Holding the mouse cursor over any one of the buttons will
display a ToolTip window identifying the function of that button. Below is a brief summary of what the buttons do with links
to more information in this document.
Cel Assembler's toolbar contains some nonstandard buttons. Holding the mouse cursor over any one of the buttons will
display a ToolTip window identifying the function of that button. Below is a brief summary of what the buttons do with links
to more information in this document.
![]()
From left to right, the buttons are:
| New Animation | Starts a new animation. | |
| File Open | Open an existing GIF file. | |
| File Save | Save current document; file name is requested if necessary. | |
| Cut | Cut currently selected frame. | |
| Copy | Copy currently selected frame. | |
| Paste | Paste contents of clipboard (clipboard must contain a frame to add to animation). | |
| Delete | Delete the currently selected frame. | |
| Show Animation Preview | Shows animation preview window. | |
| Stop Animation Preview | Closes animatoin preview window (if open). | |
| Frame Property Sheet | Displays current frame's property sheet. | |
| Animation Property Sheet | Displays animation's property sheet. | |
| Optimize Animation | ||
| Unoptimize Animation | ||
| Zoom In | Increase current zoom; cannot exceed 100%. | |
| Zoom Out | Decrease current zoom; cannot zoom below 20% magnification. | |
| View Actual Size | Set zoom to 100%. | |
| Default Orientation | Allow Cel Assember to pick filmstrip orientation. | |
| Horizontal Strips | Use horizontal filmstrips. | |
| Vertical Strips | Use vertical filmstrips. | |
| Edit GIF Internals | Edit internal GIF structures, add comments, etc. | |
| Help | Brings up this document. |
Loading Cels and Animations
Choose Open from the File menu to open a GIF file. The GIF file may contain either a single image or a collection of images
making up an animation. Additionally, more than one file can be opened at once; all of the opened files are automatically
contcatenated into a single animation. Using the multiple-open feature is the quickest way to go from individual GIF images
to an animation. For alternative ways to add cels to an animation, see Adding Cels below.
Previewing the Animation
Choose Animation Preview from the View menu to see a preview of the animation. This brings up a new window that plays
the animation. There are two ways to view the animation: in a continuous loop or a frame at a time. By default, the animation
preview displays in a continuous loop using the delay setting specified in the animation. Clicking on the Stop button stops the
animation; this also causes the button text to change to Loop -- to restart the animation loop, click the button again. Clicking
the Single Step button stops the animation loop (if running) and advances the animation one frame at a time; one click
advances by one frame. To close the animation preview window, either click on the 'x' at the upper right of the window or
select Animation Preview from the View menu.
Editing an Animation
Selecting a Cel
To select a cel, click on it with the mouse using the left mouse button. Clicking on a cel with the right mouse button also
selects the cel and additionally brings up a context menu allowing you to view more information about the cel.
Double-clicking on a cel with the left mouse button selects the cel and automatically invokes the cel's Image Properties
dialog box. The currently selected cel is highlighted with a red rectangle and its frame number is show in the lower left part
of the status bar. For example, in the screen shot show above, the 12th cel is selected.
![]() To deselect a cel, either select another cel or click on the window background where there are no cels (so that no cels
are selected).
To deselect a cel, either select another cel or click on the window background where there are no cels (so that no cels
are selected).
Deleting a Cel
To delete a cel, it must first be selected. Once selected, the cel can either be permanently deleted using the Edit.Delete menu
item or by hitting the Del key on the keyboard. The cel can also be cut and placed in the keyboard using the Edit.Cut menu
item or the Ctrl-X keyboard shortcut. The clipboard can then be used to paste the cel back into Cel Assembler with its
animation information intact or into another application as a single bitmap image.
Adding Cels
Cels may be inserted into an animation using several methods, but first, a note about insertion. The insertion point of an
animation is defined as follows: if a cel is currently selected, the inserted cel(s) is(are) placed before the currently selected
cel. If no cels are selected, the inserted cel(s) is(are) placed at the very end of the animation. The exception to this rule
involves files that are dragged&dropped directly into Cel Assembler; more on that below. Insertions can take several forms:
Insert Frame
The File.Insert Frame menu item can be used to open one or more image files and insert their contents into the current animation. It brings up the standard "File Open" dialog. Select the file or files that you wish to insert and hit OK.
Pasting
Two types of objects can be pasteed into Cel Assembler using the Windows clipboard: 8-bit Device Independent Bitmaps cut or copied from another application and cels that were cut or copied from within Cel Assembler. In either case, the inserted image is placed immediately preceding the currently selected cel or at the end of the animation if no cel is currently selected.
Drag & Drop
GIF files can be dragged from the Windows Explorer and dropped directly into Cel Assembler. The effect is the same as using the File.Insert Frame menu item, the only difference being that using Drag&Drop, the insertion location depends on where exactly the files are dropped. If the files are between two cels, that's where the new cel(s) will be inserted. If the file is dropped in an area beyond the existing cels, the new cel(s) will be inserted at the end of the animation.
Insertion Conflicts
When a cel is inserted into an existing animation, there are a few issues that might need resolving to ensure that the final
animation is displayed optimally. The two issues involve the cel's size and the cel's palette.
Sizing Conflict
There is a sizing conflict if the current animation's dimensions are smaller than those of the cel being inserted. Cancelling at this point cancels the entire insertion. There are two choices presented in the conflict dialog:
- Clip the inserted cel to fit within the animation. Note that the original cel is not physically clipped; instead, it is only effectively clipped by the size of the final animation. To minimize the storage required for the cel, it is recommended that the animation be optimized before saving.
- Enlarge the dimensions of the animation to accomodate the inserted cel. As of version 1.0, the extra space added to the animation by this operation is not "filled in" with anything. In order to keep the animation working nicely, the first image might need to be enlarged to fill in the background for the subsequent cels in the animation.
Palette Conflict
Unfortunately, the GIF file format limits the number of colors that can be used in an image to 256 colors. The actual number of colors that can be displayed on a given display and how those colors are displays vary with the application used to view the image. To make a long story short, it is usally a good idea to make sure that all of the cels in a GIF animation use the same global palette for specifying colors. When a cel is inserted into an animation, one of several situations may occur:
- The cel shares the same palette with the current global palette. This is the ideal situation and means that there is no conflict to resolve.
- The cel's palette can be cleanly merged with the current global palette so that the total number of colors used does not exceed 256. This type of merge does not present a conflict and is performed automatically.
- Neither of the above is true, and there is a need to resolve the palette merge. Cel Assembler offers the user several choices for dealing with this conflict and presents the user with a palette conflict dialog.
Several palette choices are presented, depending on the specifics of the conflict. Some of the choices discussed here may not be available at all times.
Current global palette The new cel(s) will be mapped to the current global palette. Only the inserted cel(s) are affected by this mapping. Merge with global palette The palette of the new image(s) is merged with the current global palette and all the images. Because the global palette is changed with this choice, all of the cels in the animation will be mapped to the new resulting palette. Adaptive Palette Used for pasting images containing more than 256 colors. A palette is generated based on the colors used in in the cel to be inserted. With this type of palette, the number of colors to be used in the adaptive palette can be set using the drop-down list below the palette selection box. More colors means better color accuracy but probably worse compression in the final image. Web "Color Cube" Palette This predefined palette of 216 colors presents a fair representation of the color spectrum. It is the palette used by most browsers to display on 256-color display and therefore essentially guarantees that the animation will be viewed as is during Web browsing. With this as the new global palette, all of the cels in the animation will be remapped. Local Palette The cel's global palette will be used as its local palette in the animation. This means that the inserted cel(s) will have its(their) own palette for display. Using a local palette preserves color information, but it makes the resulting file larger and slower to process.
Moving Cels
Cels can be moved within an animation using a number of techniques. The simplest is to select a cel, and keeping the mouse
button pressed, to drag the cel to its intended position. When a cel is being dragged, the cursor changes to the multi-arrow
move cursor and the "drop spot" for the cel is illustrated with an "insertion bar." You cannot drag a cel outside of the Cel
Assembler application.
![]() The other way to move a cel is to use cut&paste: Select the cel, cut it (see Deleting a Cel) and then pasting it in the
desired position (see Pasting).
The other way to move a cel is to use cut&paste: Select the cel, cut it (see Deleting a Cel) and then pasting it in the
desired position (see Pasting).
Copying Cels to an Image Editor
Once a cel has been inserted into an animation, most image editors can no longer edit that cel from within the GIF file. To
transfer a cel to an image editor, select the cel and copy it to the clipboard using either the Edit.Copy menu item or the
Ctrl-C keyboard shortcut. This places a copy of the image in the clipboard that can then be pasted into an image editor. To
return the cel to the animation, either save it to a GIF file in the image editor and use Insert Frame or copy it to the clipboard
in the image editor and paste it into Cel Assembler.
Frame Properties
A cel's property dialog can be activated in two ways: 1) select the cel and choose the Edit.Frame Properties menu item or
2) right-click on the cel and choose Frame Properties from the context menu. The property dialog tells a lot about the cel
| Name | The source file of the cel. (In version 1.0, this information is not maintained once the animation is saved.) | |
| Width & Height | The size of the image represented by the cel. | |
| Offsets | The offset from the upper left corner of the animation "screen" to the upper left corner of the cel's image. | |
| Transparency | Whether or not the cel has transparency built in. Transparency can be removed, but it cannot be introduced in this version of Cel Assembler. | |
| Interlacing | Is the image to be stored interlaced? Interlacing is a method for storing a GIF image so that it can be displayed progressively as it is downloaded; it does not significanly affect the size of the GIF file and depending on the displaying browser may be ignored for all but the first image in an animation. | |
| Local Palette | The cel has a local palette (or not). If present, the local palette may be viewed using the Show... button. The use of a local palette can be eliminated by unchecking the box; note however that this operation may require handling a palette conflict. A new local palette cannot be introduced at this point. | |
| Delay | The delay (in 1/100ths of a second) following the dispalying of the cel before the next cel is shown. | |
| User Input | This setting is provided for completeness only and is not currently supported by any Web browsers. When enabled, this option indicates that a user input (ie a click on the animation) should interrupt the current delay, resuming the animaton. This option is supported in Cel Assembler's animation preview. | |
| Removal Method | There are four choices for how an image is removed before the next cel is drawn. Today's browsers effectively support only two: do nothing (ie simply draw the next cel on top of the current one, represented by "Leave alone" and "No disposal method") and replace the background behind the current cel before drawing the next one (represented by "Background color" and "Restore previous"). All four choices and presented for completeness with the GIF 89a specification. |
Animation Properties
The "Animation Properties" dialog is invoked by either choosing the Edit.Animation Properties menu item, or by
right-clicking in the Cel Assembler window and choosing Animation Properties from the context menu. At least one cel must
be present for this dialog to be available. These settings affect the animation as a whole.
| Name | The name of the GIF file. This value can be changed by using the File.Save As menu item. | |
| Width & Height | The width and height of the animation. This rectangles defines the size of the animation "screen" (the term used in the GIF specification). All cels are clipped to this rectangle. Changing these values may affect the final look of the animation by either clipping it or by leaving parts of the rectangle undrawn (if is sized larger than the largest cel). | |
| Auto Size | Calculates the size of the animation so that it completely encompasses all of the current cels. | |
| Global Palette | A global palette is present (or not). If one exists (recommended), the Show... button displays the palette. | |
| Number of Cels | Number of cels in the animation. This value is for reference purposes only. | |
| Enable Animation | Adds looping information to the GIF file. When disabled, the animation is played exactly once. See more information below. | |
| Number of Iterations | The number of times that the animation loop should be played. 0 indicates a continuous loop. Interestingly, most browsers handle a value of 1 by playing the animation 2 times. To have an animation play exactly one time, disable the animation. Note: the animation preview plays the animation in a continuous loop regardless of the specified number of iterations. |
Controlling the Animation
There are only a few settings that can be controlled in a GIF animation: the delay between frames, the way a frame is
removed when it's time for the next frame, and the number of times that the animation loop is to be played. The original GIF
89a specification only provided for the first two settings, and Netscape has added an extension to the format to support the
third one. The first two settings are frame-based and are set in the Frame Properties dialog. The loop count affects the entire
animation and is set in the Animation Properties dialog.
![]() And what if there is no loop count specified? (This is equivalent to have Animation turned off in the Animation Properties
dialog.) The current interpretation by today's browsers of this situation is to play the animation exactly one time.
And what if there is no loop count specified? (This is equivalent to have Animation turned off in the Animation Properties
dialog.) The current interpretation by today's browsers of this situation is to play the animation exactly one time.
![]() The GIF 89a format also introduced the concept of "user input" to interrupt a delay between frames. This could be
considered the fourth animation setting, but at the present time it is not supported by any browsers, though it is fully
supported in Cel Assembler.
The GIF 89a format also introduced the concept of "user input" to interrupt a delay between frames. This could be
considered the fourth animation setting, but at the present time it is not supported by any browsers, though it is fully
supported in Cel Assembler.
Setting Defaults
Selecting Preferences from the Edit menu brings up the Preferences dialog box and allows the setting of some default values
that can be useful when building an animation from scratch. The default delay setting is assigned to any frame that does not
already have an associated delay value when it is inserted into the animation. Similarly, a default number of iterations can be
set to be used for any animation being built from scratch.
Optimizing Animations
Often only a small section of an animation changes from cel to cel. In these cases, having each cel contain a full frame of the
animation is just a waste of space. That's where animation optimization comes in. Choose Optimize Animation from the
Tools menu to reduce each cel to the smallest rectangle that is necessary to maintain the animation. The resulting animation
consists of cels smaller than the "screen size" of the animation and offset to line them up properly. Depending on the specifics
of the animation, file size reductions of 50% are easily possible. It's always a good idea to optimize the animation before the
final save.
![]() The sample animation, gamanim.gif, happens to be a very good example of what optimization can do with a simple
animation. The following screen shot is what the animation looks like after optimization. When played in a browser, the
animation still looks the same, but its size has decreased from 15K to 10K (results will vary depending on the animation).
The optimized file, gamopt.gif, can be found in the help folder of Cel Assembler's installation location.
The sample animation, gamanim.gif, happens to be a very good example of what optimization can do with a simple
animation. The following screen shot is what the animation looks like after optimization. When played in a browser, the
animation still looks the same, but its size has decreased from 15K to 10K (results will vary depending on the animation).
The optimized file, gamopt.gif, can be found in the help folder of Cel Assembler's installation location.
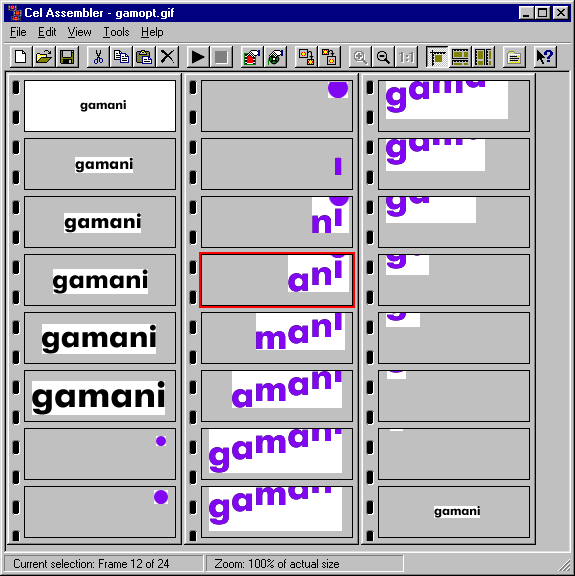
Animation optimization does not affect any cel with a local palette. It is recommended that local palettes be removed for the
best optimization results.
Unoptimizing Animations
Selecting Unoptimize Animation from the Tools menu performs the opposite of the optimization operation: it "fills in" every
cel to show the full view of the animation. This operation is useful for editing a cel after an optimization. Note that
unoptimizing will not restore the animation to its pre-optimized state in cases where the original animation was already partly
optimized.
Changing the View
The way that the animation's cels are displayed on the screen can be altered in several ways. First, the orientation of the
filmstrips can be changed from horizontal to vertical or vice versa using either the appropriate toolbar buttons or the
View.Orientation menu item. The Default orientation uses a vertical filmstrip when the cel size is wider than it is tall;
otherwise, horizontal strips are used.
![]() Changing the zoom setting also alters the way the animation data is viewed. The toolbar offers buttons for zooming in,
zooming out, or viewing at actual size (100% zoom). The View.Zoom menu item presents the zoom choices available. Note
that zooming only affects the viewing of the animation cels and does not actually change the animation. Zooming abilities are
provided to allow all of the cels of animation to be viewed at once in those cases where they cannot fit into the window at
full size.
Changing the zoom setting also alters the way the animation data is viewed. The toolbar offers buttons for zooming in,
zooming out, or viewing at actual size (100% zoom). The View.Zoom menu item presents the zoom choices available. Note
that zooming only affects the viewing of the animation cels and does not actually change the animation. Zooming abilities are
provided to allow all of the cels of animation to be viewed at once in those cases where they cannot fit into the window at
full size.
Other Functions
The GIF89a format allows for several types of data beyond the basics of animation cels. While these are of limited value in
today's Web browsers, Cel Assembler does provide a limited number editing capabilites.
Editing Existing GIF Structures
To view the GIF's internal data structures, choose GIF File Internals from the Edit menu. This brings up a dialog box
containing the list of data items. To view a comment block in detail, double-click a COMMENT data item or select it and
click on the Edit... button. To remove any item other than an IMAGE item, select the item and either hit the Del key or click
on the Remove button.
Adding Comments
To add a comment, click on Add Comment in the above dialog and type the text in the space provided. The comment is
inserted preceding the currently selected item or at the end of the item list if not item is selected. Comment blocks are not
visible in a Web browsers but can be viewed in GIF-editing programs such as Cel Assembler.
Recommendations for Animating on the Web
When creating GIF animations for viewing off of the World Wide Web, there are some issues that should be taken into
consideration. The first and foremost is file size. The smaller the final file, the quicker it will download and the less annoyed
the audience will be. The following recommendations will help minimize the file size:
And a small note on backward compatibility: not all Web browsers support animated GIFs. Older browsers usually display
either the first frame or last frame of an animation, so to be extra safe, it is a good idea to have the first and last cels contain
enough information to be useful by themselves. Setting the last frame's delay to 0 makes it essentially invisible within an
animation.
Copyright, Licensing, Trademarks, Warranty, Etc.
This software product is copyright © 1996 gamani productions. All rights reserved. All title and copyrights in and to the
software product (including but not limited to any images, animations, and text incorporated into the software product) are
owned by gamani productions. The software product is protected by copyright laws and international treaty provisions.
Therefore, you must treat the software product like any other copyrighted material.
![]() GIF is a trademark of CompuServe.
GIF is a trademark of CompuServe.
![]() The compression technology used in the GIF file format is covered by a patent owned by Unisys Corporation. The
registration fee for this application includes a payment to Unisys. Note that the Unisys patent applies to software which
reads and writes GIF files, not to the GIF files themselves.
The compression technology used in the GIF file format is covered by a patent owned by Unisys Corporation. The
registration fee for this application includes a payment to Unisys. Note that the Unisys patent applies to software which
reads and writes GIF files, not to the GIF files themselves.
Disclaimer of Warranty
THIS SOFTWARE AND THE ACCOMPANYING FILES ARE PROVIDED "AS IS" AND WITHOUT
WARRANTIES AS TO PERFORMANCE OF MERCHANTABILITY OR ANY OTHER WARRANTIES
WHETHER EXPRESSED OR IMPLIED. Because of the various hardware and software environments into which this
software may be put, NO WARRANTY OF FITNESS FOR A PARTICULAR PURPOSE IS OFFERED.
![]() Good data processing procedure dictates that any program be thoroughly tested with non-critical data before relying on
it. The user must assume the entire risk of using the program. ANY LIABILITY OF THE SELLER WILL BE LIMITED
EXCLUSIVELY TO PRODUCT REPLACEMENT OR REFUND OF PURCHASE PRICE.
Good data processing procedure dictates that any program be thoroughly tested with non-critical data before relying on
it. The user must assume the entire risk of using the program. ANY LIABILITY OF THE SELLER WILL BE LIMITED
EXCLUSIVELY TO PRODUCT REPLACEMENT OR REFUND OF PURCHASE PRICE.
Registration
Cel Assembler is distributed as a fully-functional demonstration program that expires 30 days after first use. Information
about obtaining a registered, non-expiring copy of CelAssembler can be found by looking at the order.txt file included with
the product.
Contacting Us
Technical Support
Please email technical support issues to gamtech@gamani.com. Include your registration number in the email to ensure a
prompt response. Registered users will get priority.
Feedback
We are always striving to make our products better. If you have any bugs to report or features and improvements to
suggest, please email them to gamtech@gamani.com.
Copyright © 1996 gamani productions. All rights reserved.