CLICK TO DOWNLOAD
spiral1.zip -- 19 Kb
|
|
|
1. Notice that many of the layered elements in the spiral.psd file are in neutral gray. This
Photoshop file has been designed so that you can easily customize the layers to create your own scrolling button animation. The layers named,
"Top Texture" and "background" layers are colored gray. We will talk about how to customize the "Button Texture" layer in this tutorial.
To customize the "Top Texture" and "background" layer to your specifications or needs, use Photoshop's Hue/Saturation feature with the Colorize option on
and/or fill the layers with the desired color or texture using the Preserve Transparency option to preserve the unique
shapes of the layers (Preserve Transparency isn't necessary for the "Background" layer). See the "Changing the
Texture/Color of an Element" tutorial here on NavWorks for more information on customizing Photoshop files from NavWorks. After you
have customized the animation file to suit your design, save the Photoshop file with a new name (we will refer to this Photoshop file as
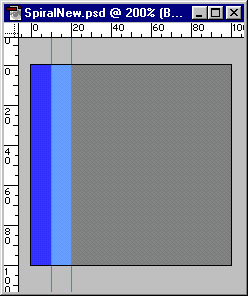
"SpiralNew" in this tutorial), so that you can come back to original file if things get out of hand. 2.Select the background layer in the SpiralNew Photoshop file. Make all of the other layers invisible. Turn on the rulers. Set rulers to pixels (double-click on the rulers to open the Preferences for Units and Rulers). Zoom into the upper left corner of the document and place two vertical guides, one at 10 pixels from the left edge of the document (guide 1) and one at 20 pixels from the left edge of the document (guide 2). Turn on Snap To Guides. 3.Using guide 1, marquee-select a vertical rectangle that spans the height of the document and that goes from guide 1 to the left edge of the document. Fill the selection with a medium blue color (or any color you prefer). Now using guide 2, marquee-select a vertical rectangle that spans the height of the document and that goes from guide 2 to the guide 1. Fill the selection with a light blue color. At this point, your background layer should look similar to this:
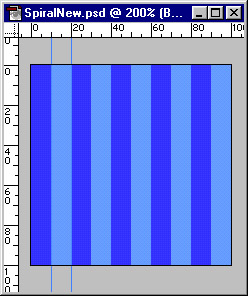
4.Using guide 2, marquee-select a horizontal rectangle that spans the height of the document and that goes from guide 2 to the left side of the document. Select Define Pattern. Deselect and select Fill from the Edit menu. Select Pattern from the Contents: Use pop-up menu and click OK. Now your document should be filled with a medium blue and light blue vertically stripped pattern as shown below. Select all, copy and paste to create a new layer with this pattern.
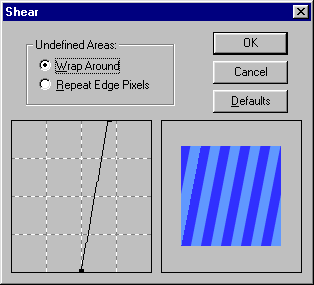
5.With the new layer selected, choose Filter, Distort, Shear. Select the Wrap Around option. Click on the top handle of the shear line and drag it to the right until the diagonal lines appear to be symmetrical, as shown below. Unfortunately, there is no method for precision here, the best way to judge is to eyeball the two triangles at the top left (medium blue in this example) and bottom right (light blue in this example). When they look like they are the same size, click OK to apply the Shear effect. This step is a little tricky to explain, so please look carefully at the screenshot below before attempting this step. If after step 5 you see that you didnít get this step quite right, delete this layer, copy and paste from the background layer, and try again.
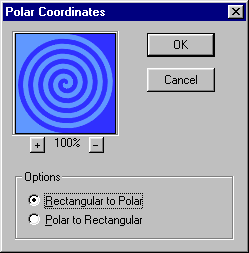
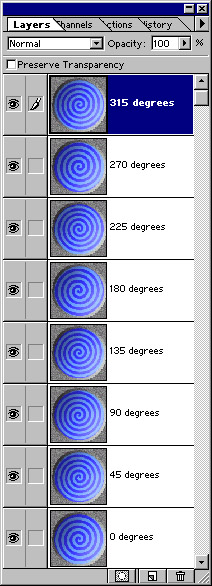
6.Select Rotate 90 Degrees CW from the Edit, Transform. menu. Select Filter, Distort, Polar Coordinates. Apply Polar Coordinates using the Rectangular to Polar Option as shown below. Name this layer "0 degrees".
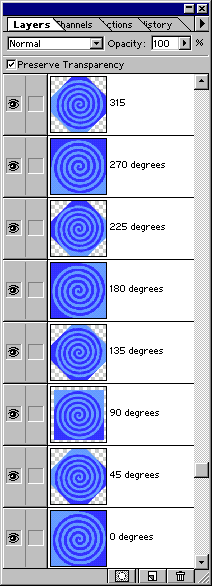
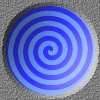
8.Now we're ready to animate! To create the first frame of the animation, turn off or make invisible (click off the eyeball icons in the layers palette) all of the spiral layers except the "0 degrees" layer. In other words, make the layers named "45 degrees, 90 degrees, 135 degrees, 180 degrees, 225 degrees, 270 degrees, and 315 degrees" invisible and leave layer "0" visible. Ensure that the "Bevel Highlights," "Bevel Shadows," "Top Texture," "Inside Shadow," and "Inside Highlight" layers are visible. Click on the "0 degrees" layer to select it. Choose Select All from the Select menu. Now choose Copy Merged from the Edit menu. Choose New from the File menu and create a new RGB document (the document's size will default to the size of frame 1's contents which is in the clipboard. Past the clipboard contents into the new document and merge to the background. Name the background layer "0 degrees." Save and name this new Photoshop file "SpiralAnim.psd". At this point, your new Photoshop file should look something like this:
|
©1998 NavWorks, All Rights Reserved.