CLICK TO DOWNLOAD
scrollbtn1.zip -- 44 Kb
|
|
|
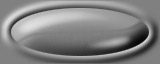
1. Notice that many of the layered elements in the scrollbtn.psd file are in neutral gray. This
Photoshop file has been designed so that you can easily customize the layers to create your own scrolling button animation. The named,
"Button Texture" and "background" layers are colored gray. We will talk about how to customize the "Button Texture" layer in this tutorial.
To customize the "background" layer to your specifications or needs, use Photoshop's Hue/Saturation feature with the Colorize option on
and/or fill the layers with the desired color or texture. See the "Changing the
Texture/Color of an Element" tutorial here on NavWorks for more information on customizing Photoshop files from NavWorks. After you
have customized the animation file to suit your design, save the Photoshop file with a new name (we will refer to this Photoshop file as
"ScrollNew" in this tutorial), so that you can come back to original file if things get out of hand.
2.Open the "lavalamp_riot.jpg" seamless texture file that came with the "scrollbtn.psd" file in the
downloadable zip file. This is a seamless texture from the seamless texture
collection available free here at NavWorks. This particular texture is 200 pixels square. Resize the file to 160 pixels square.
Now create a duplicate copy of the texture on a new layer so that if something goes wrong, you can go back to the original texture.
Name the new layer "Texture Duplicate." At this point you should have the seamless texture file open and the scrollbtn.psd file open. 3.Select the "Texture Duplicate" layer in the seamless texture file. Now select Offset from the Filter, Other menu. Enter 0 for "Horizontal pixels right." Enter -16 for "Vertical pixels down." Click on the "Wrap Around" option. See the screen shot below for the Offset filter settings. Now, with the "Texture Duplicate" layer selected, choose Select All from the Select menu. Now choose Define Pattern from the Edit menu.
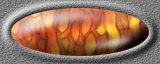
4.Now click on the ScrollNew Photoshop file to make it the active file. Select the "Button Texture" layer and make sure that the Preserve Transparency option is on (turn it on if it is off). Choose Fill from the Edit menu (Shift+Backspace). Select Pattern from the Contents: Use pop up menu and then click OK. Now the texture from the seamless texture file shows up inside of the button. Choose Select All from the Select menu and then choose Copy Merged from the Edit menu. Open a new file. Paste the clipboard contents into the new file and merge to the background. Save this file as a Photoshop file and name it "ScrollAnim." Your "ScrollAnim.psd" file should look similar to the image below. You should now have three Photoshop files open--the seamless texture file, the ScrollNew file, and the ScrollAnim file.
5.Believe it or not, that's pretty much it. From here on out, it's all repitition. Go back to the
seamless texture file and select the "Texture Duplicate" layer. Hit Control+F (PC) or Command+F (Mac) to apply the Offset filter
again. Ensure that the entire file still has a selection on or around it (choose Select All from the Select menu if there isn't)
and then choose Define Pattern from the Edit menu (a good shortcut is to hit Alt+E and then D [PC] or Option+E and then D [Mac]).
Now open the ScrollNew Photoshop file, select the Button Texture layer (ensure that the Preserve Transparency option is still on)
and hit Shift+Delete and then the enter key. Once again, ensure that the entire ScrollNew file still has a selection on or around
it (choose Select All from the Select menu if there isn't). Choose Copy Merged from the Edit menu, open the ScrollAnim Photoshop file,
and Paste. Repeat this process eight more times and you will be finished. Be careful not to lose count.
|
©1998 NavWorks, All Rights Reserved.