Blob1.zip -- 27 Kb
|
|
|
1. First notice that all of the layered elements for this animation in in neutral gray. This
Photoshop file has been designed so that you can easily customize the layers to create your own blob animation. We will discussion how
these blob shapes were created in a moment. The layers named, "Blob 1 Texture," "Blob 2 Texture," "Blob 3 Texture," "Blob 4 Texture,"
and "Background" are all colored gray. To customize
the animation to your specifications or needs, use Photoshop's Hue/Saturation feature with the Colorize option on
and/or fill the layers with the desired color or texture using the Preserve Transparency option to preserve the unique
shapes of the layers (Preserve Transparency isn't necessary for the "Background" layer). See the "Changing the
Texture/Color of an Element" tutorial here on NavWorks for more information on customizing Photoshop files from NavWorks. After you
have customized the animation file to suit your design, save the Photoshop file with a new name (we will refer to this Photoshop file as
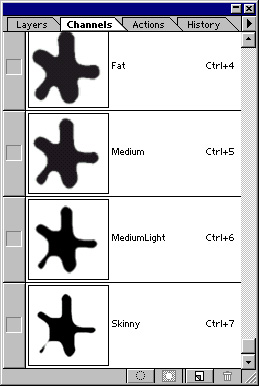
"DissolveNew" in this tutorial), so that you can come back to original file if things get out of hand. 2. Open the Channels Palette in Photoshop. Notice that there are already 4 channels. Delete the channels with the names "Medium," "MediumLight," and "Skinny." We will recreate these channels in the following steps. 3.To create an animation with the Maximum and Minimum filters, start with a basic black and white shape such as the blob shape in the channel labelled "1". This blob shape was created in CorelDRAW and then imported into Photoshop. For this technique to work correctly, the shape should be black surrounded by or positioned over a white background. Make 3 copies of the "Fat" layer layer by selecting it in the Layer palette and then choosing Duplicate Layer from the Layer menu. Create three duplicates of the Fat layer. Rename one of each of the layers, you guessed it, "Medium," "MediumLight," and "Skinny."
4.Now apply the Maximum filter to each of the "new" channels with an increasing radius. That is,
leave the Fat alone and apply the Maximum filter to the "Medium" channel with a radius setting of 1. Then select the "MediumLight"
layer and apply the Maximum filter with a radius of 2 and next apply the Maximum filter to the "Skinny" channel with a radius of 3.
Each application of the Maximimum filter serves to progressively compress the blob shape. As the radius of the Maximum filter
increases, the shape gets progressively thinner. These shapes can now serve as the basis for a throbbing or pulsating animation.
Your resulting channels should look similar to those shown below:
5. With these channels you can create animations like the blob animation shown at the top of the page.
The emboss techniques are a subject for another tutorial, but here's a quick down and dirty description of the process: copy and paste
each channel to the Layers Palette. Apply a Guassian Blur to each of the new layers and apply the Emboss filter. Then load the
corresponding channels and delete. Change the layer mode to Hard Light. Now make a copy of the Hard Light layer, place the copy
below the Hard Light Layer turn on Preserve Transparency and fill with any color or texture you prefer. This is how the layers in the
Blob Photoshop file were created.
|