

liquid1.zip -- 12 Kb
|
|
|
1. First notice that all of the layered elements for this animation in in neutral gray. This
Photoshop file has been designed so that you can easily customize the layers to create your own blob animation. The layers named,
"Inside Texture" and "Top Texture are colored gray. To customize
the animation to your specifications or needs, use Photoshop's Hue/Saturation feature with the Colorize option on
and/or fill the layers with the desired color or texture using the Preserve Transparency option to preserve the unique
shapes of the layers (Preserve Transparency isn't necessary for the "Background" layer). See the "Changing the
Texture/Color of an Element" tutorial here on NavWorks for more information on customizing Photoshop files from NavWorks. After you
have customized the animation file to suit your design, save the Photoshop file with a new name (we will refer to this Photoshop file as
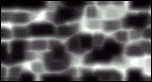
"LiquidNew" in this tutorial), so that you can come back to original file if things get out of hand. 2. First we need a sort of watery texture. Open the the Layers palette for the LiquidNew Photoshop document and select the black background layer. Select Mezzotint from the Filter, Pixelate menu and choose Medium strokes from the drop down menu and apply. Reapply 2-3 times. Next apply the Maximum filter with a 1-pixel radius. At this point the results should look to this:
3.Now Apply a Gaussian Blur with a 3-4 pixel radius. Then apply the Minimum filter with a 2-3 radius. At this point it helps to add a little contrast, so open Levels from the Image, Adjust menu and change the far right input value from 255 to 175. Now your document should look similar to this:
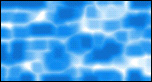
4.For a nice watery look, select the Hue/Saturation filter from the Image, Adjust menu and select the
Colorize option. Since there a wide range of watery looks, we're not going to give you specific numbers for the Hue/Saturation/Lightness
fields. However, you will probably want to pump up the Saturation to somewhere from 70-100 and use a Lightness value of anywhere from 25-40.
Then adjust the Hue slider until you find a watery color you like. Your results should look similar to those below:
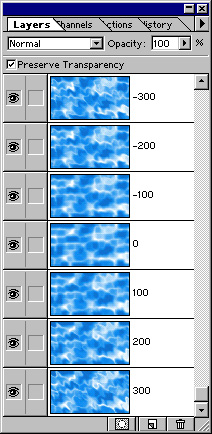
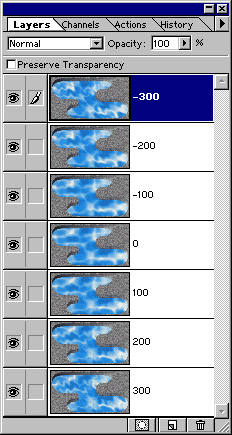
5.Now that we have a liquid texture, animating it is very simple with the Ripple filter. Make six duplicate layers of the texture. Rename the background layer "300." Name the next layer up from the bottom layer "200." Continue renaming each layer up from the background layer with the following names: "100", "0", "-100", "-200", and "-300". In other words, rename the second layer up from the background as "100", the third layer up form the background as "0", and so on. 6.Select the "300" layer and apply the Ripple filter using the Medium setting with an amount of 300. Repeat this process on all of the layers using the layerís name as the setting for the Ripple filter. For example, select the "200" layer and apply the Ripple filter using the Medium setting with an amount of 200. Next select a "100" layer and apply the Ripple filter using the Medium setting an amount of 100. Continue this process on the remaining layers only skip the "0" layer since applying the Ripple filter with a setting of 0 will have no effect. When you finish, your Layers palette should look similar to this:
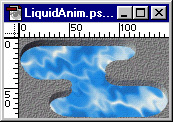
7.Now we're ready to animate! To create the first frame of the animation, turn off or make invisible (click off the eyeball icons in the layers palette) all of the water texture layers except the "300" layer. Ensure that the "Highlight 1," "Shadows1," "Inside Texture," "Shadows," and "Top Texture" layers are visible. Click on the 300 layer to select it. Choose Select All from the Select menu. Now choose Copy Merged from the Edit menu. Choose New from the File menu and create a new RGB document (the document's size will default to the size of frame 1's contents which is in the clipboard. Past the clipboard contents into the new document and merge to the background. Name the background layer "300." Save and name this new Photoshop file "LiquidAnim.psd". At this point, your new Photoshop file should look something like this:
8. Each layer in the LiquidAnim document is essentially a frame in the animation. However, if we just used these layers/frames for the animation, it wouldd look like this:
Notice that the animation jumps when it loops back to the beginning--which completely ruins the liquid effect. This looping order
of the above example can be represented like this: Each number corresponds to the name of the layer in the LiquidAnim file. So, the first arrangement starts with the layer/frame named "300" then continues on through the layer/frame named "-300" and then the animation loops back to the layer/frame named "300." To make the animation loop seamlessly we need a looping arrangement like this: Each number corresponds to the name of the layer in the LiquidAnim file. So, the first arrangement starts with the layer named "300" then continues on through the layer/frame named "-300." At that point it goes back through the layer frames "-200" through "200" in reverse order. So, to use this looping arrangement, you would have to make copies of the layer/frames named "-200" through "200" and place them in reverse order above or after the "-300" frame. Then your animation will look more like this:
9. What you need to do from here depends on the GIF animation utility that you use. If you use
one of the older, less capable GIF animation utilities like GIF Construction Set, you will have to save each layer of the
LiquidNew Photoshop file out as a separate GIF and then import the GIF files into your GIF animation utility to create the
animation. If you have one of the newer, more capable, GIF animation utilities such as GIF Movie Gear, GIFmation, or GIFBuilder,
you can import the layered Photoshop file and the animation utility will create the frames of the animation from each layer.
Finally if you have SPG Web Tools or WebVise Totality you can generate your animation from each layer directly from within Photoshop.
|

©1998 NavWorks, All Rights Reserved.