Dissolve1.zip -- 21 Kb
|
|
|
1. First notice that all of the layered elements for this animation in in neutral gray. The layers
named, "Widget 1 Texture," "Widget 2 Texture," "Bar Texture," "Screen backdrop," and "Background" are all colored gray. To customize
the animation to your specifications or needs, use Photoshop's Hue/Saturation feature with the Colorize option on
and/or fill the layers with the desired color or texture using the Preserve Transparency option to preserve the unique
shapes of the layers (Preserve Transparency isn't necessary for the "Background" layer). See the "Changing the
Texture/Color of an Element" tutorial here on NavWorks for more information on customizing Photoshop files from NavWorks. After you
have customized the animation file to suit your design, save the Photoshop file with a new name (we will refer to this Photoshop file as
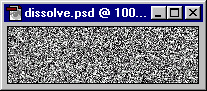
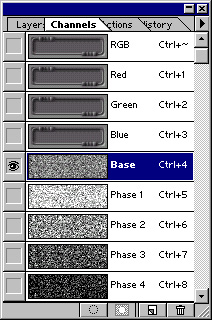
"DissolveNew" in this tutorial), so that you can come back to original file if things get out of hand. 2. Open the Channels Palette in Photoshop. Notice the Channel named "Base" and the channels named "Phase1-4". These are provided for your convenience. As we will see channels such as these can be used to create the Dissolve effect. Delete these channels, we will recreate similar channels in following steps. 3.First we need to create channels for the different stages of the dissolve effect. Open a new Channel in the document. Choose Fill from the Edit menu, select 50% Gray from the "Use" pop up menu, and hit OK to fill the channel with a neutral gray. Apply the Add Noise filter with an Amount of 100, a Gaussian Distribution, and with Monochromatic checked. Name this Channel "Base". Your results should look similar to the figure below:
Make four copies of the Base channel (or however many copies are appropriate for the number of dissolve steps you want for your animation) by dragging them down to the "Create New Channel" icon at the lower left of the channels palette. Name the new channels "Phase 1-4." Note that it is very important that the channels for each phase come from the same base channel. If you just apply the Add Noise filter to each channel separately, the dissolve effect will not work. Now select the Threshold feature from the Image, Adjust menu and apply a Threshold Level of approximately 50 to the Phase 1 channel. Repeat this process for the "Phase 2-3" channels, applying Threshold levels of approximately 115, 175, and 225 respectively. At this point you should have 5 new channels: the Base Channel and 4 Channels named "Phase 1-4." The Phase "1-4" channels should look similar to the channels shown below:
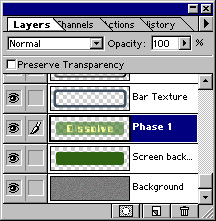
6. Now make a copy of the "Screen backdrop" layer and place the copy below your new text layer. Make all of the other layers in the document invisible except the text layer and the "Screen backdrop copy" layer and select Merge Visible from the Layer Palette's pop up menu. Rename this layer Phase 1 (see below) and make all of the layers visible again.
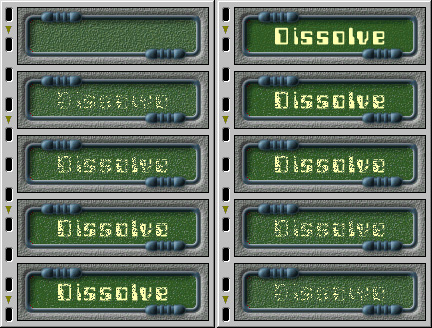
8. Now we're ready to animate! To create the first frame of the animation, turn off or make invisible (click off the eyeball icons in the layers palette) all of the "Phase" layers (the layers labelled "Phase 1-5") but leave the "Screen backdrop" layer on or visible. Make sure the "Screen backdrop" layer is selected and choose Select All from the Select menu. Now choose Copy Merged from the Edit menu. Choose New from the File menu and create a new RGB document (the document's size will default to the size of frame 1's contents which is in the clipboard. Past the clipboard contents into the new document and merge to the background. Save and name this new Photoshop file "DissolveAnim.psd". At this point, your new Photoshop file should look something like this:
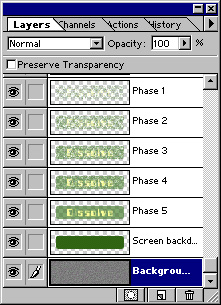
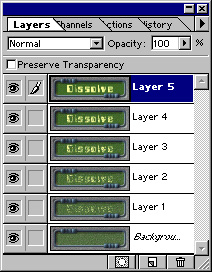
To create the second frame, go back to the "DissolveNew" Photoshop file. Make the "Phase 1" layer visible and select it. Select Copy Merged again and past into the "DissolveAnim" Photoshop file. Repeat this process for all of the Phase layers. Always off or make invisible the previous "Phase" layer but leave the "Screen backdrop" layer on. For instance, to create the third frame, turn off or make the "Phase 1" layer invisible and turn on or make the "Phase 2" layer visible. Select the Phase 2 layer, choose Copy Merged (remember: Copy Merged will only work if you have an active selection for the entire document), and paste into the DissolveAnim document. Save the DissolveAnim document after you have copied the last frame (using the Phase 5 layer from the "DissolveNew" Photoshop document). The layers in your "DissolveNew" Photoshop document should look similar to those below:
9. What you need to do from here depends on the GIF animation utility that you use. If you use
one of the older, less capable GIF animation utilities like GIF Construction Set, you will have to save each layer of the
DissolveNew Photoshop file out as a separate GIF and then import the GIF files into your GIF animation utility to create the
animation. If you have one of the newer, more capable, GIF animation utilities such as GIF Movie Gear, GIFmation, or GIFBuilder,
you can import the layered Photoshop file and the animation utility will create the frames of the animation from each layer.
Finally if you have SPG Web Tools or WebVise Totality you can generate your animation from each layer directly from within Photoshop.
|