|
1. The bulgepipe.psd Photoshop file has been designed so that you can easily customize the layers to
create your own bulging pipe animation. The background layer is named is colored gray. To customize the "background" layer
to your specifications or needs fill the "background" layer with
the desired color or texture. To customize the "Frame" layer, use the Hue/Saturation feature with the Colorize option on. Be sure to
have the Preserve Transparency option on to preserve the unique
shape of the layer. Bulging pipe layers have been included for your convenience. After you have customized the animation file to
suit your design, save the Photoshop file with the new name "BulgeNew," so that you can come back to original file if things
get out of hand.
2.First delete all of the layers named "Bulge 1-5." We will recreate these layers in a moment.
However, before we go any further we need to talk about how Photoshop's Displace filter works:
Photoshopís Displace filter utilizes "displacement maps" to generate distortions. Any non-layered Photoshop file can be used as
a displacement map, which means that the possibilities are nearly endless. The key to using the Displace filter is to
understand how it responds to displacement maps. Essentially, Displace responds to the brightness values within
displacement maps. A value of white (or 255) corresponds to the maximum positive displacement which translates
to up vertically and/or left horizontally. A value of black (or 0) corresponds to the maximum negative
displacement which translates to down vertically and/or to the right horizontally. So, brightness values
that are 129 or higher result in displacement up and/or to the left and brightness values of 127 or less
result in displacement down and/or to the right Values that are 128 result in no displacement.
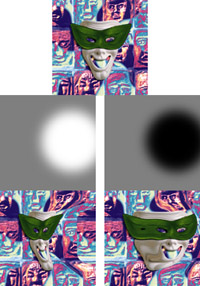
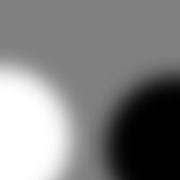
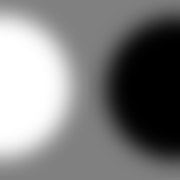
The image below demonstrates how displacement maps work. The top image is an original, undistorted version. Each copy of the
image at the bottom has been distorted using the displacement maps above them. In both examples, the Displace filter was
set to Horizontal 70% and Vertical 0%. Since the example on the left used the displacement map with white that
gradiates into medium gray, the image was displaced to the left. Conversely, the example on the right gradiates
from black to gray so the image has been distorted to the right. Had I set the Displace filter to Horizontal 0%
and Vertical 70% the image that used the white to gray displacement map (on the left) would have been distorted
upward and the image that used the black to gray displacement map (on the right) would have been distorted downward.
Since displacement maps only use brightness information, itís a good idea to create them using black, white, and
grayscale tones in RGB mode. Itís usually preferable to stay in RGB mode because most of Photoshopís filters donít
work in grayscale mode. If the displacement map is colored, it will be converted to grayscale on the fly. Since itís
difficult to judge how colored images will convert to grayscale, itís usually best to work with grayscale colors.
The Displace filter allows you to either Stretch a Displacement Map to fit your image or tile it to fit. Using a Displacement map
that is the same size as the image renders either of the options inconsequential. To create the bulging animation or
any other distortion animated effect with the Displace filter, you want to create the displacement at the same size
as the image on which you will use it. Now letís put this info to use and make an animation.
3.First we need to make a dislacement map to use with the Displace filter. It's almost always best to
make your displacement map the same size as the image you intend to use the displacement map on. Our BulgeNew file is 180 pixels
square. So, create a new 180 pixel square RGB document (72 ppi). Now create an empty new layer above the background.
Now click and hold on the Marquee tool and select the circle marquee. Click roughly in the center of the document and hold
down the Shift and Alt (Mac: Shift-Option key) and draw a circular marquee. The exact size is up to you and precision isn't
important, but make it fairly large. Now choose feather from the select menu. Apply an aggressive feather setting. A feather
setting of anywhere from 10-25 is usually fine for low resolution images. Apply the feather setting, fill with white, and deselect.
Again, the exact setting will be subject to the size of your circular marquee selection and the size of your document, but
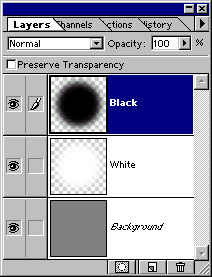
what we are shooting for here is a big fluffy ball as shown below. Name this layer "White." Create a
duplicate of this layer, invert, and name the new layer "Black." Now click on the background layer and select Fill from the Edit menu and choose 50% Gray from the
Contents: Use pop up menu. Save this file as a Photoshop (PSD) file and call it "Bulgedmap.psd".
At this point you should have 3 layers in your document: the background layer filled with solid gray,
the white fluffy ball layer, and the black fluffy ball layer as shown below:
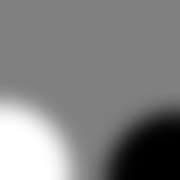
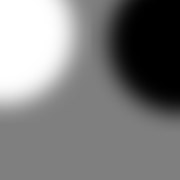
4.Select the Black layer. Now select the Move Tool and drag the black
fluffy ball to the bottom right so that only the upper left quarter of it is visible (the rest being cut off by the edges
of the document). Select the White layer and drag it to the bottom left so that the upper right quarter of it is visible.
(See below). Select all,
choose Copy Merged from the Edit menu, open a new document (the size will document to the size of the image in the
clipboard), paste and merge the pasted image to the background. Save this file as a Photoshop (PSD) file and call it
"dismapfile1.psd". Now we have our displacement map, letís see what we can do with it.
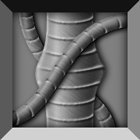
5.Select the BulgeNew Photoshop file. Make a copy of the Pipe layer and rename the copy "Bulge 1".
Select Displace from the Effect, Distort menu. Set the Horizontal Scale to 20% and the Vertical scale to 0% (see below)
As long as your displacement map is the same size as your image, it doesnít matter whether you choose "Stretch To Fit" or
"Tile" from the displacement map options and the choice of "Wrap Around" or "Repeat Edge Pixels" for the Undefined areas
depends on your image, but again, as long as the displacement map is the same size as the image--it usually won't
matter which option you choose. Now click on OK and you will get the "choose a displacement map" dialog box. Select the
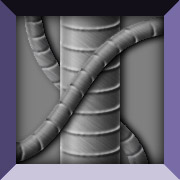
"dismapfile1.psd" that you created in step 4 and click the Open button. The results on the "Bulge 1" layer should look
similar to this (note: all other layers have been made invisible for the screen capture below to make it easier to see
the resutls):
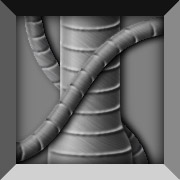
"dismapfile1.psd" |
6.That's pretty much it. Now all we need to do is generate a series of displacement maps that move
up incrementally and apply them to a few more copies of the Pipe layer in the "BulgeNew" Photoshop file to generate art that we need to
complete the animated bulge effect. To do this, select the "Bulgedmap.psd" Photoshop file, remove the selection (deselect), and
select the Black layer. Press "V" on
your keyboard to select the Move tool and then nudge the black layer up 45 pixels. Next click on the White layer and nudge it up 45
points. Now select all, choose copy merged from the Edit menu, open a new file, paste, merge to the background and then save as
"dismapfile2.psd". Repeat this process one more time (remove the selection before you move the layers) and save the file as
"dismapfile3.psd". To create the "dismapfile4.psd" file, open the "dismapfile2.psd", choose 180 degrees from the Image,
Rotate Canvas menu, and then choose Invert from the Image, Adjust menu. Save this file as "dismapfile4.psd". To
create the "dismapfile5.psd" file, open the "dismapfile1.psd", choose 180 degrees from the Image,
Rotate Canvas menu, and then choose Invert from the Image, Adjust menu. Save this file as "dismapfile5.psd".
The displacement maps that you generate in this step should look similar to those shown below. The images below are to scale,
so if you wish, you can download these (along with the figure above that goes with step 5) and use them as your displacement maps. To use them as your displacement maps, you will have
to open them in Photoshop and then save them out as Photoshop files.
"dismapfile2.psd" |
"dismapfile3.psd" |
"dismapfile4.psd" |
"dismapfile5.psd" |
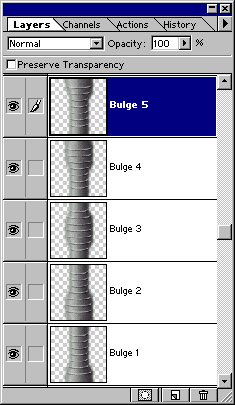
7.Now close everything except for the BulgeNew document. Make four more copies of the Pipe layer, place
them above the "Bulge 1" layer, and rename them, in ascending order, "Bulge 2-4". Now click on the "Bulge 2" layer and apply the
Displace filter using the settings from step 5 except use the "dismapfile2.psd" file as the displacement mape. Repeat with the
"Bulge3-5" layers using the "dismapfile3-5.psd files for each layer respectively. When you are finished, your bulge layers should look
similar to this:
8.Now we're ready to create the animation. To create the first frame of the animation, turn off
or make invisible
(click off the eyeball icons in the layers palette) all of the "Bulge" but leave the "Pipe" layer and all other layers visible.
In other words, make the
layers named "Bulge 1-4" invisible and leave layer "Pipe" visible. Ensure that the
"Frame," "Frame Shadow," "Top Pipe," "Top Pipe Drop Shadow," "Bottom Pipe," and "Bottom Pipe Drop Shadow" layers are visible.
Click on the "Pipe" layer to select it.
Choose Select All from the Select menu. Now choose Copy Merged from the Edit menu. Choose New from the File menu and create a new RGB document (the document's size will
default to the size of frame 1's contents which is in the clipboard. Past the clipboard contents into the new document and merge
to the background. Save and name this new Photoshop file "BulgeAnim.psd". At this point, your new Photoshop file should look
something like this:
To create the second frame, go back to the "BulgeNew" Photoshop file. Make the "Pipe" layer invisible and make the "Bulge 1" layer
visible and select the "Bulge 1" layer.
Select Copy Merged again and paste into the "BulgeAnim" Photoshop file. Repeat this process for all of the Bulge layers.
For instance, to create the
third frame, turn off or make the "Bulge 1" layer invisible and turn on or make the "Bulge 2" layer visible.
Select the "Bulge 2" layer, choose Copy Merged (remember: Copy Merged will only work if you have an active selection for the
entire document), and paste into the BulgeAnim document. Save the BulgeAnim document after you have copied the last
frame (using the "Bulge 5" layer
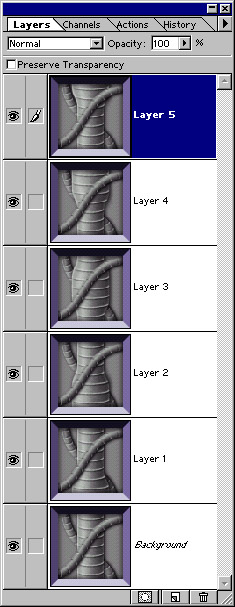
from the "BulgeNew" Photoshop document). The layers in your "BulgeAnim" Photoshop document should look similar to those below:
9. What you need to do from here depends on the GIF animation utility that you use. If you use
one of the older, less capable GIF animation utilities like GIF Construction Set, you will have to save each layer of the
BulgeNew Photoshop file out as a separate GIF and then import the GIF files into your GIF animation utility to create the
animation. If you have one of the newer, more capable, GIF animation utilities such as GIF Movie Gear, GIFmation, or GIFBuilder,
you can import the layered Photoshop file and the animation utility will create the frames of the animation from each layer.
Finally if you have SPG Web Tools or WebVise Totality you can generate your animation from each layer directly from within Photoshop.
|