 |
Bibliographix ManualWelcome
to the manual of Bibliographix. This manual has been last updated Mar.
27. 2001
|
|
|
1 |
First Steps with Bibliographix
As a new user you may not be familiar with the terminology of Bibliographix. Read the glossary for details. |
|
1.1.
Installing the Program
|
Bibliographix is small enough to completly install.
For this reason, you don't meet any "minimum install" options like in Word
or Excel. If you want to remove Bibliographix from your system later you
can use the uninstall program from the control panel (section "Software").
|
1.2
Run the Program for the first Time
|
When you start Bibliographix for the first time, the database sample evolution will be opened and the style American Economic Review will be used. You can change these settings. Bibliographix comes with a lot of predefined styles. Unfortunately there are literally thousands of styles so that it is not possible to provide a complete set of bibliography styles. Don't worry if your favourite style is not among the preset styles. With Bibliographix you can easily define your own style. How to do this is described in detail in Chapter 4: Bibliography Styles.
Opening this database, all records of this database
are displayed in Bibliographix. Your Bibliographix windows should look
like this:

If your Bibliographix window does not look like this, click at the search icon.
If you click at a record in the list, it will
be displayed formatted according to the currently selected bibliography
style in the display on top of the list.
|
1.3
Search Record
|
Assume you want to search the database for the article The Market for 'Lemons': Quality Uncertainty and the Market Mechanism by George A. Akerlof. Frankly, the sample database is small enough so that you will either view this record at first sight or you may just scroll down to find it. In very small databases, scrolling is the fastest access to your data. This will change rather quickly. With larger databases, you need some support to quickly access your data. This support is described below.
The search dialog is located above the table of records and looks like this:
Select the first field to search (author is set as default), enter the fragment (try "ak") and hit the return key or click the go! button.The matching records will be displayed now.
Bibliographix has a layout preview. If you click at a record listed, it will be displayed formatted according to the current bibliography style.
|
1.4
Add a New Record
|
George A. Akerlof and Hajime Miyazaki (1980) "The implicit contract theory of unemployment meets the wage billargument", Review of Economic Studies 1980, 321-338 |
| To do so, select New Record from the menu Edit or click the New icon. The input form will pop up. Now select one of the supported publication types from the tab list. In this case, journal article applies. |
Since not all database fields are needed for every publication type, those needed have a white background. Fields not needed are grey. They are accessible though. You can write or cut/copy/paste data.
For a journal article there are nine important fields. Other publication types may have more or less fields. You can fill out all fields but don't need to. Using the data listed above, you can fill out the fields
- Author (Akerlof, George A.; Miyazaki; Hajime),
- Title (The implicit contract theory of unemploymentmeets the wage bill argument),
- Journal (Review of Economic Studies),
- Pages (321-338) and
- Year (1980)
Please make sure that you enter the names in the
correct syntax:
| Family Name, First Name Initial; Family Name, First Name Initial. |
It is important that you stick to this syntax. Otherwise Bibliographix will not be able to reformat a person's name. This is a very important issue since many bibliography styles differ in the way they handle names.
If you click the Save icon now, the new
record will be added to your database. You can check out this new record
by clicking the Search icon and browse to the Akerlof-Records. The
new record should be displayed now.
|
1.5
Cite a Reference in a Manuscript
|
Assume you want to cite the "lemons-article" by
Akerlof in the manuscript Social Sciences and Biology.rtf that comes
with Bibliographix and is located in the /sample database subdirectory
of Bibliographix. To do so, open the file with your word processor. This
file is a small dummy text that already contains several temporary citations.
| [1 - Akerlof 1970 The Market for 'Lemo...] |
should appear in your manuscript. The square brackets include the record ID, the author's name, the publication year and a fragment of the title. This is a so called temporary citation. This "ugly" citation will be replaced by a "pretty" citation in your final manuscript. This tag stores the information, that the Akerlof article is used in the manuscript. When you later compile a bibliography for this manuscript this tag is formatted according to your settings and a fully formatted reference is appended to the manuscript.
Thus inserting a citation takes three steps
- select the record in Bibliographix
- copy the temporary in-text-citation from Bibliographix into the clipboard
- paste the temporary in-text-citation from the clipboard into your word processor.
Should you later decide that the citation you've inserted previously is superfluous, simply remove the temporary citation in square brackets, including the brackets. That is all you have to do.
|
1.6
Compile an Appendix-Bibliography
|
Please also make sure that the manuscript is not used by another application when you compile. Since every file can only be opened once, this would give an error message.
Having saved and closed your manuscript in your word processor, switch to Bibliographix and perform the following steps
- select Compile Bibliography from the menu Bibliography or click the Compile-Icon.
- A dialog will pop up that gives you the option to select between Stand-Alone Bibliography and Appendix Bibliography. The latter is what you want.
- Now click the Select Manuscript button. This will pop up a file select box where you can select the manuscript.
- If you now click the Start button, Bibliographix will compile the manuscript according to the current settings.
It may be the case that the program was not able to identify all sources cited in the manuscript. In this case it will give a warning message telling you which record ID's could not be processed. The error message is Error in citation(s) followed by the record IDs. There are two major reasons why this message pops up:
- The database currently opened by Bibliographix is not the one that has been used by you writing the manuscript. For instance you have cited record ID 1234 in your manuscript while this ID does not exist in the currently opened database. In this case, the ID cannot be identified because it does not exist. For this reason make sure that the currently opened database is the one used writing the manuscript.
- A temporary citation got messed up. The typical syntax is [1234 - Doe 2000 An interesting paper]. If you for instance accidentally remove the closing bracket, the record will not be identified correctly.
You can edit this compiled manuscript like any other file. Please note though that Bibliographix cannot link citations in this manuscript to database records anymore. If you apply major changes to this manuscript and cite new items, you should always do this with your original file and not with the compiled result. Recompiling is just a matter of seconds.
Please note that this feature is restricted to
10 records in the Basic and Light version. Manuscripts containing more
than 10 in-text-citations will be processed but only the first 10 records
will be appended to the manuscript. If your manuscript contains more than
these 10 in-text-citations, you need the Pro version..
|
1.7
Output Stand-Alone Bibliographies
|

This feature is only available in the Light and Pro Version of Bibliographix. With the Basic version you can output the database as a whole.
|
1.8
Summary
|
|
|
2 |
Search Records
|
|
2.1
Searching the Database
|
The second most easy way to search a database is to click at the table of records and enter a character from the keyboard. Bibliographix will then display all records that have an author with a family name starting with this character. This way of browsing your database works with medium size databases. Please note that the table of records needs to have the focus.
If you need more powerful search functions, you can use the search dialog.
The search dialog is located above the table of records and looks like
this:

Select the first field to search (author is set as default), enter
the fragment (try "ak") and hit the return key or click the go!
button.The matching records will be displayed now.
You can direct a search to a single field, to a combination of fields or to the full text of a record. If you select full text for one search item, all other items will be set to full text also. Please note that a full text search takes about 5-10 times longer than a search directed at single fields. A full text search is helpful to get a broad overview or if you want to cover the abstract field. This field does not have a length restriction and for this reason cannot be accessed as single field.
You can combine up to five items in a search. This is more than sufficient
for databases that use to be much smaller than 100.000 records. To add
a second field, click at the pull down menu in the second row, select the
boolean operator (AND/OR/NOT), the second field and enter the second fragment.
To access the other items, scroll down in the search dialog.
- Query 1: (a. author = Akerlof) AND (b. title =lemon) OR (g. year = 2000)
- Query 2: (a. author = Akerlof) OR (g. year = 2000)AND (b. title = lemon)
The search dialog has a back-forward function that you can use to access previous queries. Click at an arrow button to recall a query. The display will show the current result. This means that not the old result is displayed, but the old query definition is recalled and the query is started again. Changes applied meanwhile will then be displayed.
|
2.2
Taglist
|
You can handle these tagged records in the search dialog. If you select the option display tagged only only the tagged records will be displayed. To dispose previous tags, you may click the button labeled untag all. Use these functions to create very special manually collected bibliographies.
These taglist features are not available in Bibliographix
Basic but only in the more powerful Light and Pro versions of Bibliographix.
|
2.3
Invert Query
|
|
2.4
Search the Internet
|
|
In addition you may forward your query to an internet search engine. Click the button labeled WWW to do so. The result will be displayed in the Bibliographix built-in internet browser. Of course you need to be connected to the internet to contact the search engine. To select a search engine, go to Tools-Options in the Bibliographix menu and click the WWW tab. |
|
2.5
Case Sensitive Queries
|
- If you enter a fragment with a leading lowercase character, the uppercase alternative will also be considered a match. If you enter "ak" as fragment in the author field, Akerlof will be a match as well as Brubaker.
- If you enter a fragment with a leading uppercase character, the lowercase alternative will not be included in the search. Thus "Ak" will only yield Akerlof but not Brubaker.
|
2.6
Duplicates
|
|
|
3 |
|
| Click the icon New or select Edit-New Record from the menu. A form in which you can enter all relevant information will pop up. |
To add a record that is almost similar to an existing record in the database, typewriting can be reduced by using the command Edit ñ Clone Record. This command will create a duplicate entry window of the selected record and can be edited arrordingly.
When you type in the author, journal, publisher
and keyword field, Bibliographix will look for similar entries in the database
and will display suggestions. To accept them, hit return. This feature
is not available in the Basic version.
|
3.2
Select Publication Type
|
Some remarks regarding edited volumes as publication types. This type refers not to a chapter in an edited book with many different authors of chapters but rather to the entire collection. This edited volume does not have an author but rather editors only. As the presence of an author is vital to Bibliographix, the input into the editor field is copied to the author field but not regarded in future formatting.
|
3.3
Enter Person's Names
|
| Akerlof, George A. |
| Akerlof, George A.; Yellen, Janet M.. |
| Akerlof, George A.; Yellen, Janet M.; ... |
We strongly recommend though to enter at least three authors since in many cases co-authors starting with no. four are abbreviated.
If you enter the name of an organisation as an author's name you can enter it in the original syntax. Please note though that ";" and "," are interpreted as separators between authors and first/family name respectively and must be omitted.
Multi word family names are entered like this:
| von Neumann, John |
If you enter a person's name, Bibliographix searches
the database for matching authors and displays a suggestion. To accept
it, hit return. This feature is not available in the Basic version.
|
3.4
Mixed Formatting of Titles
|
| Tasty Recepies for Melanochromis Auratus. Try them out before they are extinct. |
This is a good solution as long as you never have to use a bibliography
style that is all italic. For this reason, Bibliographix uses a different,
more flexible solution: If a word starts with an underscore, it is formatted
in italic - except if the entire field is italic. In this case, italic
is switched off for this word. You would then enter the title like this:
| Tasty Recepies for _Melanochromis _Auratus. Try them out before they are extinct. |
and the output would look like
|
In addition you can set parts of strings as sub- or superscript. This
is important for chemical formulas for instance. As the database fields
are plain texts, sub- or superscript are only available by a workaround.You
can format sub- or superscript by directly entering the RTF control codes.
To receive H20 enter H{\sub 2}O. To receive r2 enter
r{\super 2. Of course you can sub- or superscript strings of any length.
|
3.5
Link Files
|
To use this feature, the only contents of the notes field has to be the filename and -path or the www-adress respectively.
Examples:
| c:\data\results.xls | executes the excel file at your harddsik |
| http://www.bibliographix.com | surfs to the Bibliographix homepage |
You execute the link by clicking at the file name in the "Appendix" column in the search dialog.
|
3.6
Apply Changes to a Record
|
|
3.7
Remove a Record
|
|
3.8
Spelling Checker
|
- Spell check after entering will spell check the current record in the input form if you click the Save icon. If you uncheck this option, the spell checker is inactive
- Spell Check whole database will spell check every record if you click the Start button. The text that is currently spellchecked will be displayed in the text field of the tab.
If you spell check the entire database this may take a while. To cancel, click the cancel button in the spell check dialog. In this case only the spell check of the last record will be cancelled. Changes already applied are saved.
The spell check dialog offers a variety of options. You may skip certain strings in spell checking like WWW-pages. Even more important is the dictionary. You can select a main dictionary and additional user dictionaries. Words unknown hitherto will be saved in a user dictionary.
Please note that this function is only available in the Pro-Version.
|
|
4 |
Bibliography Styles
|
|
4.1
What is a Bibliography Style?
|
| Akerlof (1970),
(Akerlof 1970), Akerlof 1970 or numeric as [a number]. |
| Akerlof,George A., "The Market for 'Lemons': Quality Uncertainty and the Market Mechanism," Quarterly Journal of Economics, 1970, 488-500. |
The bottom line of Bibliographix displays the
name of the currently selected bibliography style.
|
4.2
Select an Existing Bibliography Style
|
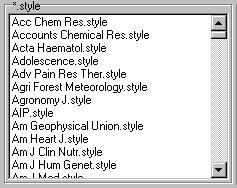 |
Installing Bibliographix only stalls a small fraction of all available bibliography styles. The reason is, that probably 99% of the styles are not interesting to your and would only fill your harddisk. If you clic a the button Load Style from WWW homepage the Internet style archive will be displayed. It contains all currently available styles. Click at an item in the list to download it to your computer. Of course you need to be connected to the internet to do so. |
|
4.3
Creating a New Bibliography Style
|
4.3.1 Format of In-Text-Citations
- Name Year
- Name (Year)
In the next step you need to define the separating character or phrase between authors. You may enter "and" and add comma, a semicolon, a slash or whatever you like. Please note that you also need to add blanks if you need them.
Finally you can define characters or words in before of and after each in-text-citation. This may be interesting for example in numerical formats. If you leave these fields empty, the first citation will be numbered
1which is probably not what you want. If you want
[1]
Please note that the separating, opening and closing characters in in-text-citations and references can be different. Thus it is possible to have an in-text citation
Smith/Wesson (1999)and a reference:
Smith, A. and Wesson B (1999).......
Option Pricing: A Simplified Approach by John C. Cox, Stephen A. Ross und Mark Rubinstein from 1979as
Cox, Ross, Rubinstein (1979)How do you do this?
- As you want the years in brackets, select Doe (1990) as general format.
- As authors are separated by a comma and a blank enter these characters in the "authors separated by" field
- There are no characters in in front of and after the citation. Clear these fields.
- In addition, Bibliographix offers to format the first citation of a reference as full formatted reference. This is called Turabian style. You don't want this, so uncheck the option.
4.3.2 Format of Reference Lists
A, B, C and DIn this example, B and C are "middle" authors and D is the last author, not separated by a comma but by an "and". If you need the format
A, B, C, Dsimply also enter a comma for the last author's separator. In addition you may choose to switch first and family name of any middle or last author. The following example shows the flexibility of this approach:
Cox, John C., Stephen A. Ross & Mark RubinsteinCox comes in the "regular" format "family name first, first names not abbreviated". The separator between first and middle author is ",". Middle authors have switched names, so the rule for middle authors is "first names first and not abbreviated". The separator in front of the last author is an "&". So middle and last authors also have different separators.
Please note that the "&" as separator of the last author "overrules" the setting for middle authors. Thus a publication by just two authors would be formatted as
Cox, John C. & Mark RubinsteinYou may also define an "et al. rule" how to handle co authors if the total number of authors exceeds a given number. If you always want all co-authors to be mentioned, set the number to 999. We suppose this is a safe number. Should you meet a publication with more than 999 authors, please notify us, so we may nominate them for the "Ig Nobel" price.
The middle part off the tab displays the various publication types you can define. You may remember that there are a lot more than the types displayed here (book, book chapter, journal article and edited volume). While the first three types are obvious, the last one may not. Edited volume refers to a whole book issued by an editor with chapters written by different authors. So an edited volume is one hierarchical level above the book chapter. In some sciences, only chapters are cited while other sciences also refer to the entire volume.
Bibliographix takes advantage of the fact that in most cases only these three styles matter. For instance, only few styles already have a rule how to handle web sites. If they do, you will find out that they are handled like books. So there is little need to set the formatting for web sites as you can use the book formatting commands for web sites too.
|
Format
|
is also applied to
|
|
article
|
newspaper article
|
|
book chapter
|
conference proceedings
|
|
book
|
discussion paper, www site
|
| edited volume | edited volume |
The major part of the work is located in the lower half of the dialog. You need to click your way through the different fields. For each publication type you can define a sequence of up to 12 fields. You can enter characters to be placed before and after each field (if the field is not empty) and define the format of a field (bold, italic or underscore). Please note that you explicitly need to enter blanks when you need them. When you enter information here, the display is updated. Twelve fields are sufficient to display even the most complex publication types.

4.3.3 An Example
| Cox,John C. / Ross, Stephen A. / Rubinstein, Mark: Option Pricing: A Simplified Approach, Journal of Financial Economics, 7, 1979, 229-263. |
- First enter all formatting options that are identical to all publication types:
- Authors are formatted like Doe, John E
- Middle-authors are separated by "Blank Slash Blank"
- The final author is also separated by "Blank Slash Blank"
- As there are no editors, clear this field
- The "et al. rule" is set to 999 since all authors should be printed out.
- The last name is formatted like all other names. Thus leave "switch last name" unchecked.
- Now select the publication type "journal article" and work your way through the table. It should look like this (replacing blanks by underscores in the example below)
|
No.
|
Text
|
Field
|
Format
|
Text
|
|
1
|
|
a.Author
|
c.italic
|
:_
|
|
2
|
|
b.Title
|
a.normal
|
,_
|
|
3
|
|
e.Journal
|
a.normal
|
,_
|
|
4
|
|
l.No.
|
a.normal
|
,_
|
|
5
|
|
n.Year
|
a.normal
|
,_
|
|
6
|
|
m.Pages
|
a.normal
|
.
|
If
you skip a row it will also be skipped in formatting the output. You can
use this to leave some space for later additions.
| Cox, John C. / Ross, Stephen A. / Rubinstein, Mark: Option Pricing: A Simplified Approach, Journal of Financial Economics, 7, 1979, 229-263. |
| Cox, John C. / Ross, Stephen A. / Rubinstein, Mark: Option Pricing: A Simplified Approach, Journal of Financial Economics,, 1979, 229-263. |
BTW: In case you forget a terminal fullstop or the final field is empty and your fullstop is not printed, Bibliographix will automatically append a fullstop to the output.
Now the entire bibliography style has been defined and is ready to be saved under a user selectable name with a click on the Save Style button.
|
|
5 |
Compile Stand-Alone Bibliographies
This chapter describes
how to compile (generate) such bibliographies. It starts with the stand-alone
bibliography, because they are easier to compile since they don't link
to any manuscript you have written.
|
5.1.2 Output Query
Please note that this feature is only available
in the Light and Pro version of Bibliographix and not in the Basic version.
|
5.2
Output Tagged Records
|
|
5.3
Pasting Single Formatted References
|
|
5.4
Creating Web-Files
|
|
5.5
Creating LaTeX-Files
|
|
|
6 |
Compile Appendix Bibliographies
The most comfortable
way to compile a bibliography is to simply write a manuscript and let the
software do all the work later by scanning the manuscript, identifying
the references used and appending them to the text. Bibliographix is able
to perform this very powerful task. Please note that the Basic and Light
version work with manuscripts containing up to 10 different sources while
the Pro version does not have a restriction in the number of sources cited.
|
|
6.1
Create an RTF File in Your Word Processor
|

Bibliographix enables you to link your literature database to your manuscripts. You cite a reference in your manuscript and Bibliographix later formats your in-text-citations according to your settings and appends an item in the list of references in the appendix, also according to the selected bibliography style. In order to do so, Bibliographix needs to scan your manuscripts.
Unfortunately, almost every word processor favours its own format. Microsoft Word uses *.DOC, WordPerfect *.WPR etc. Fortunately there is one standard all major word processors support: Rich Text Format (RTF). This format has been developed by Microsoft to make migration of documents from one word processor to the other easier. Bibliographix can read RTF files and thus supports all major word processors under windows. This means that you need to save your manuscripts as RTF files when you work with Word, WordPerfect etc. To do so (in Word), use the command File - Save As and select RTF as file format. You don't need to be afraid to loose any formatting information using RTF. If you reload a Word Document saved as RTF file it will just look the same. Formulas and graphics will work as usual. You will not even notice that you are using a different file format. When you use Bibliographix a lot, we suggest that you select RTF as default format for saving. To do so, select Tools - Options - Save and select RTF as default format. Every file you create from scratch will then be saved automatically as RTF. The disadvantage of RTF is that files grow a bit larger compared to the DOC format as charts and formulas are not saved as efficiently under RTF.
A recommendation: Before you start a larger
project with a word processor other than Word you should definitely try
out if the support of the RTF format is as good as the word processor claims.
Word never gave us problems with the RTF format and we have not heard of
bad WordPerfect experiences but for example StarWriter has a flaw in the
RTF format support. Using RTF with Star Writer swallows formulas and charts.
Everything else works perfectly. Just not formulas and charts. We talked
to the developers at Sun and they try to fix the problem but obviously
were not successful at least with version 5.2.
|
6.2
Insert Temporary In-Text-Citations into Your Manuscript
|
A temporary in-text-citation can be inserted anywhere in a text. You can insert it in the main text body, in a foot- or endnote.
This temporary citation may look like this:
| [1 - Akerlof 1970 The Market for Lemo...] |
If you find this temporary citation too longish, you can vote for a shorter format under Tools - Options at the tab Miscellaneous if you check the short temporary citation option. You can mix both formats in one manuscript.
In most cases, temporary in-text-citations are part of a sentence. Thus you probably want a trailing blank. If you use Microsoft Word, this trailing blank may be swallowed. Here is what to do to save it from beeing swallowed.
- Select Tools - Options in Microsoft Word
- Click at the Edit tab
- The option Smart Copy and Paste is checked. Uncheck it.
If you use several databases, you need to make
sure that you only cite from one database ina certain manuscript. Why is
this? Even when you cite from various databases in a single manuscript,
Bibliographix only draws back on the currently opened database. Temporary
in-text-citations that relate do a different database are linked to the
record with the same ID in the current database. The result will be incorrect.
|
6.3
Underline Temporary In-Text-Citations
|
|
6.4
Skip Names in In-Text-Citations
|
| (...) the groundbreaking work of Akerlof (1970) for the first time analyses (...) |
| (...) the groundbreaking work of Akerlof dating back to 1970 for the first time analyses (...) |
| [17 - Akerlof 1970 The Market for 'Lemo...]. |
| (...) the groundbreaking work of Akerlof dating back to [17 _N- Akerlof 1970 The Market for 'Lemo...] for the first time analyses (...) |
| (...) the groundbreaking work of Smith and Wesson dating back to [17 _N- Akerlof 1970 The Market for 'Lemo...] for the first time analyses (...) |
|
6.5
Multiple In-Text-Citations
|
|
You can yield this result following these steps:
- Always separate in-text-citations identically, for instance by "comma bland"
- Compile the manuscript
- Replace all "], [" by ", " in your word processor.
|
6.6
Compile Manuscript
|
opus magnum.rtf
opus magnum compiled.rtf
|
6.7
Problems and Solutions
|
|
Problem
|
Solution
|
|
There are lots
of error messages about unidentified records
|
Did you accidentally
select a different database?
|
| Several in-text-citations could not be identified in scanning | Make a note of the "problem citation's" numbers, go back to your original manuscript, remove the old temporary citations and re-insert them. |
|
Upon compiling
the error message pops up that the file is in use
|
Close the file
in your word processor
|
|
The RTF file is
a lot bigger than the old DOC file
|
This is
a known "feature" of RTF. Files can even exceed 10 MB in size if you use
a lot of graphics with many colours. Size doesn't matter to Bibliographix.
Compiling is still very fast. If size matters to you (in terms of portability
of the data) you may either compress the RTF file (they compress like US-American
bread) or save the RTF file as DOC file.
|
|
6.8
Reformatting a Manuscript
|
|
|
7 |
Save and Exchange Data
|
|
7.1
Create a New Database
|
|
7.2
Open an Existing Database
|
|
7.3
Copy/Move Records
|
Please note that IDs of records are not copied.
A new ID is assigned every time you copy or move a record to its new location.
Moving a record and then moving it back does not give the old ID. Please
also note that this feature is not available in the Basic version but only
in the Light and Pro version of Bibliographix
|
7.4
Create a Backup of Your Database
|
If you select File-Create Database Backup from the menu a copy of the database with an additional "backup" in the file name is stored in the current directory. If you have not backuped your data for a while, Bibliographix will remind you.
To transfer a database from one computer to another,
it is not sufficient to copy the your_file_name.db file. You also need
to copy all files with the respective file name, like your_file_name.px
and so forth. These files are all found in the same directory A Bibliographix
database consists of several files. If you copy only part of the files,
the database will not run.
|
7.5
Recover Database
|
In addition to make backups of your database, Bibliographix gives you the option to recover corrupt databases, if possible. Use Recover on the File - Data Exchange tab.
In many cases, corrupt databases are still readable but you cannot add new records to it. A typical error message for this is "invalid key".
You can now select a second (preferrably new and empty) database in which to copy all records of the corrupted database. What is the difference to the copy all command described previously?
If you use copy all the records will simply be appended to the second database. This is the method of choice with the Light version. Things are a bit different. If you already have inserted temporary in-text-citations into your manuscripts, certain records are linked to certain ID-numbers. If you now simply append records, chances are close to unity that the new database will assign different ID-numbers to the records. This is not what you want. Preserving the old ID-numbers is exactly what recover does.
First the program retrieves the highes ID-number in the damaged database and creates as many new records. Then step by step all records in the damaged database are copied to the matching record in the new database that has the same ID-number. Records deleted previously in the damaged database are skipped. These records show up with the author "dummy" in the new database and can be removed later.
This means that if there are already records in the second database, these records are overwritten if there is a record in the damaged database with the same ID-number. For this reason Bibliographix pops up a warning and gives you the option to cancel.
This command is intended to be the last chance to recover your data.
Don't rely on it but frequently backup your data. As this command is only
of added value in the Pro version, it is not available in the Light and
Basic version.
|
7.6
Importing Data
|
Converting Bibliographica Databases: Bibliographix it the next generation of Bibliographica. It introduced a new database engine and a new database format. If you have a Bibliographica database and want to switch to Bibliographix, you need to convert your database to the new format. Use File - Exchange Data from the menu and click Import Database in the Bibliographica section. A fileselect box will pop up asking you for the old database to import the data into the currently opened database. This dialog will only display the *.aua file of an old Bibliographix database but will of course import the entire database. Keyword files from Bibliographica can be imported the same way, clicking import keywords.
- Online Databases and other Bibliography Software: Bibliographix has a separate very powerful import module for other formats. Details are described in the appendix.
|
7.7
Exporting Data
|
"will development be continued in 5 years?"
"do I get my data transferred from this program to another in 5 minutes?"
The advantage of professional bibliographical software is, that you can format the data in a very flexible way. To do so, the program needs to know where to find what data and what the internal structure of a field looks like. For instance if one program delivers author's names as "George Akerlof" and the other expects "Akerlof, George" a mere transfer of the data is not enough. The internal structure of the field needs to be modified. So technical compatiblity is the minor problem. You need a conversion program to reformat the fields internally. The structure of a record and the syntax of recordfields need to be synchronized. An export filter does exactly this. Luckily there are a few standards that are supported by every decent Bibliographix program. Bibliographix offers export filters for the following formats:
- BibTeX
- Endnote (RIS)
- ProCite (RIS)
- Refer
- Reference Manager (RIS)
To convert a database into one of these formats, select File - Data Exchange from the Bibliographix menu. Go to the export section and select the format. If you click the Start button, you will be asked for the file name and the program will then create an ASCII file in the format selected.
Bibliographix can read and write BibTeX files. Some users mistook this
ability to assume that the program is some sort of BibTeX-management shell.
This is not the case. The importing and exporting of BibTeX data is intended
to move your data to or from a different system if you migrate there. It
is not intended to reformat your data every fortnight. We strongly recommend
to our LaTeX users to either keep their data in BibTeX or use Bibliographix
instead of BibTeX, not beside it. If you use the LaTeX output formatting
option, you can substitute BibTeX. The problem is that the LaTeX packages
are very powerful but not very standardised. There are voluminous books
about the syntax but our impression it that nobody sticks to the rules.
For instance, some implementations swallow german umlauts, some don't and
so forth. For this reason it might be the case that the BibTeX export does
not exactyl deliver what you need. In this case you may need to manually
edit the data.
|
|
8 |
Options
|
|
8.1
Language
|
|
8.2
Word Processor
|
Some remarks on the supported word processors
| Microsoft Word | Does not yield problems. Microsoft sticks to its own RTF-Format |
| StarWriter | RTF-support is imperfect. StarWriter swallows formulas after saving a document in RTF format and opening it again |
| WordPro | WordPro slightly deviates from the RTF standards. An RTF file created with WordPro will only compile correctly if WordPro is selected as word processor. The "insert citation" command does not automatically empty the clipboard into the document. |
| Word Perfect | WordPerfect slightly deviates from the RTF standards. An RTF file created with WordPerfect will only compile correctly if WordPerfect is selected as word processor. The "insert citation" command does not automatically empty the clipboard into the document. |
| other | The "insert citation" command does not automatically empty the clipboard into the document. |
|
8.3
Font
|
|
8.4
Spelling Checker
|
|
8.5
WWW Search Engines
|
|
8.6
Keywords
|
We would like to recommend another technique to quickly find records, which is defined here as personal key-wording and is described below. In the short run this means extra work but our experience is that it pays off quickly.
Bibliographix supports you with respect to a major problem in key-wording: spelling. You can freely enter keywords in the keyword fields in the edit mask or in the search display. If your input is incorrect, the quality of your key-wording decreases. There are two kinds of incorrect input:
- Key-wording is of little use if your keywords have typos. One of my (O. Winkelhake) favourite typos in English is to type in "Englisch" instead of "English", since "Englisch" is the German spelling of "English" and German is my mother's tongue so the additional "c" is some kind of "hardwired" in my fingers. If "English" is a keyword and you have 40% "Englisch" typos, you have a problem.
- Freely entering keywords will probably quickly yield synonyms. Did you use "hospital" or "stationary delivery" instead? If this is what you ask yourself, you probably used both. If you need to combine all possible synonyms of a keyword in a search, you may as well dump the whole act of keywording, since the publication should have at least one of the items in the title.
|
8.7
Journals
|
 |
A frequent nuisance is a different wording of journal names. Part of the records referring to articles published in the American Economic Review are labeled ÑAmerican Economic Reviewì, some ÑAmEconRevì, some ÑAERì and so forth. This diversity is unwanted as you want a unique label in your bibliographies and not a mixture of different labels. Bibliographix supports you by offering a function to unify journal names. Select the Journal tab under Tools ñ Options to define a ìsearch ñ replaceî command. |
You can find an even more powerful function in the lower part of the
tab. You can enter different wordings of a journal name in a table. If
Bibliographix finds a journal name in the table, you can select, which
column to use. This function does not alter the contents of your database
but rather translates the data for formatting.
|
8.8
Register Program
|
|
|
9 |
Miscellaneous
|
|
9.1
Context Sensitive Help
|
|
9.2
Online-Help
|
|
9.3
Printed Manual
|
For this reason Bibliographix is only distributed
via internet. This means that the manual comes as file and not in print.
Of course you may print out the manual. Upon installing Bibliographix,
the manual will appear as icons in the startup group. Double clicking a
manual icon, your internet browser will be started and the text displayed.
Print it out via your browser.
|
9.4
Older Program Versions
|
9.4.1 Databases
Find details in the chapter Converting Bibliographica Databases .9.4.2 Manuscripts
With Bibliographix the format of temporary in-text-citation has changed. Manuscripts that contain temporary citations in the old format need to be converted. Select File - Data exchange from the menu. Click the button Convert Manuscript. This will display a fileselect box where you can enter your old manuscript. The program will browse the manuscript for old citations and try to identify them in the currently opened database in Bibliographix. If the record can be identified, the temporary citation is updated, if not, the old temporary citation is preserved. Changes are not applied to your original manuscript but rather to a backup copy, that has a "(converted)" attached to the file name. Somymanuscript.rtfturns into
mymanuscript (converted).rtf
You still need to check this file for not
converted citations. There are two major reasons for non-converting:
- The temporary citation refers to a record that is not part of your database. Add it to your database and insert a fresh temporary citation.
- The temporary citation refers to a record that is part of your database. Bibliographix is a bit conservative in converting. If in doubt, a temporary citation is skipped and not converted. Replace the temporary citation manually.
|
9.5
Database Structure
|
| Field | Field Length |
| author | 254 |
| title | 254 |
| editor | 254 |
| title of edited volume | 254 |
| journal | 254 |
| publisher | 100 |
| city | 100 |
| series title | 254 |
| series editor | 100 |
| volume | 20 |
| number | 20 |
| year | 20 |
| pages | 20 |
| edition | 254 |
| abstract | unlimited |
| keywords | 254 |
| user field 1 | 254 |
| user field 2 | 254 |
The restriction to 254 characters length has technical reasons. Unlimited fields, like the abstract field, are much slower to process in a query. For this reason Bibliographix omits this field type if possible.
All fields are alphanumeric fields. You can enter
any character there. This also applies to the page and year field. So you
are able to enter "1998-9" as publication year, which would not be possible
in a numerical field.
|
9.6
Sharing Databases with Multiple Users
|
The safety concept of Bibliographix is very precise and powerful. Both users can pop up the input form of the same record and view the details. As soon as a user (A) applies changes to the record, the record is blocked to the other user (B). If B also tries to edit one of the fields, he will receive a message telling him that A is currently editing this record. This blocking only takes place until A stores his changes. If he does so, the block is removed so that B can now edit the record. If he presses a key to edit a field, the record is automatically updated and the most recent changes by A will be displayed to B. This way, no information can get lost and every user can be sure that if he is able to edit a record this will be the currently valid version of the record.
Please note that the multi-user access to a database is only available
in the Light Pro-version. Opening a database in the Basic version blocks
the entire database to other users.
|
9.7
E-Mail Contact
|
- general info: info@Bibliographix.com
- bug reports: bug@Bibliographix.com
- import filters: import@Bibliographix.com
- bibliography styles: styles@Bibliographix.com
|
9.8
Web Integration
|
- The context sensitive help function is fully web-based. The internal browser uses files on your harddisk though and not files from the internet. So you donít need to be connected to the internet to use the help function.
- With Help - WWW News you can read the Bibliographix newsletter and check if you are using the most recent version of Bibliographix or if there is an update available.
- Web pages become more and more important as scientific sources although they still lack the quality of ìrealî publications. Maybe due to the temporary character of the media this may never change. Nevertheless you can use Bibliographix to manage and cite relevant web pages. A record in your database that relates to a web page is just one mouseclick away from this page displayed in your browser.
- If you define a query for your database it may make sense to also forward this query to an internet search engine. For this reason, most query definition have an additiona WWW button that passes the query to your favourite search engine. You donít need to enter the search engine syntax. Just click the button and view the result.
- Web pages are written in HTML (Hypertext Markup Language). Bibliographix can create HTML pages. This means that Bibliographix can compile internet-ready web pages. It is not necessary to define a new bibliographic style for this purpose because the HTML format can be used
|
|
10 |
Program Versions and Prices
|
|
10.1
Bibliographix Basic
|
If you are a "low-end" user, you will find, that
Bibliographix Basic covers your needs and maybe a little more - and all
this is free of charge.
If you use the Basic version and find out, that
your needs actually are not that basic, you are welcome to update to amore
powerful version. If you already know that your needs exceed the Basic
version, it is still a good idea to play around with the Basic version
to check out if the more powerful versions are useful to you. This might
also be important to you as our method
of distribution does not allow for a "money-back-guarantee".
- unlimited database size
- unlimited bibliography style editor
- output of the whole database as formatted list of references
- compiling appendix-bibliographies for manuscripts with up to 10 in-text-citations. This might already be sufficient for minor seminal papers.
|
10.2
Bibliographix Light
|
| Basic version features |
|
| Additional light version features |
|
You will proably notice that the major enhancement compared to the Basic version is, that the creation of bibliographies is much more flexible. You can output queries or create lists of tagged records to create a bibliography. This way of creating bibliographies works nicely with smaller projects like a master thesis. The limitation of it however is that you have to take care yourself that the bibliography is complete. If you have a manuscript with just a dozend referenes, this is not much of a deal. Therefore with larger bibliographies you may want to go for the Pro version. To try out the nice features of Bibliographix Pro, you may compile appendix bibliographies if your manuscript cites up to 10 different sources. Sources exceeding this number will not be appended to your manuscript.
When you order Bibliographix
Light you will receive a user code to turn the Basic version you can download
from www.Bibliographix.com into the Light version. You don't need to re-install.
In order to keep the price as low as possible, you will not receive a printed
manual or a CD..
| Basic version features |
|
| Additional Light version features |
|
| Additional Pro version features |
|
The features of
Bibliographix Pro provide high-end features. In addition to "stand alone"
bibliographies, you can compile "appendix" bibliographies to your manuscripts.
This means that Bibliographix is already of use to you when you write your
manuscript. If you use the program writing your publications, you will
be able to automatically generate matching lists of references to these
manuscripts. Reformatting in-text-citations and references due to a different
style is just a matter of a few mouse clicks.
When you order Bibliographix
Pro you will receive a user code to turn the Basic version you can download
from www.Bibliographix.net into the Pro version. You don't need to re-install
Bibliographix. In order to keep the price as low as possible, you will
not receive a printed manual or a CD.
|
10.4
Some Remarks on Pay-In-Advance-Schemes
|
There are good reasons though, why this scheme makes sense for you and for us and why we use this scheme:
- There is little incentive for us to cheat.When you purchase Bibliographix, the only thing you will receive is an Email with the registration code. You will not receive disks or printed manuals. So there is not much meat in there, tempting to cheat you, since there is no physical good delivered to you.
- There is no additional effort to control and enforce payment: This does not mean that you are expected to cheat, hoping to get away with not paying, but rather means that some administrations tend to be quite slow in transferring money and even slower if nobody nags them to proceed. This is maybe true for your administration too. To control payments implies costs that are not generated in a pay-in-advance scheme.
- Once you have received the registration code, there is nothing you could physically return. Once you know the registration code you cannot "undo" this knowledge. Thus a 30-day-money-back-guarantee like on television does not make sense in this setting. For this reason it is important for you, to get a good impression of what you are buying since you cannot return the software. For this reason, we offer the free Basic verion that is only restricted in database size and incompletedata export. It is a good idea to test the software before you buy it, since the both of us want to have happy customers.
|
|
11 | Glossary |
| term | explanation | example |
| in-text-citation | a tag in your text that links to an item in your bibliography | ... as Akerlof (1970) pointed out ... |
| temporary in-text-citation | a temporary tag used by Bibliographix to take a note of cited records. Is replaced later by a "regular" in-text-citation | ... as [2 - Akerlof 1970 The Market for 'Lemo...] pointed out |
| bibliography style | formatting rules to be applied to items in your bibliography. | Akerlof GA; The Market for 'Lemons': Quality Uncertainty and the Market Mechanism. Quarterly Journal of Economics 1970;222: 488-500. |
| reference | a formatted item in your bibliography | Akerlof GA; The Market for 'Lemons': Quality Uncertainty and the Market Mechanism. Quarterly Journal of Economics 1970;222: 488-500. |
| bibliography | a list of references | |
| appendix bibliography | a bibliography that consits of a complete list of all items cited in a paper | |
| stand alone bibliography | a bibliography that consists of manually collected items |
|
|
12 | Index |