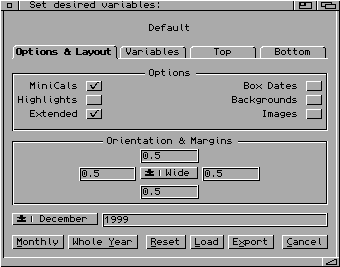
 Several
options are available on the first ("Options & Layout") tab of the variable
editor. Checking one of the checkboxes is equivalent to setting the
corresponding variable to 1:
The variable editor is included in the opening requester for FWCalendar. Changes made in the variable editor are stored for future use, but are not saved to the preferences file and will therefore be lost any time a preferences file is loaded. To incorporate the changes into a preferences file, select the "Export" button; this will save any variables that differ from FWCalendar's defaults to the desired file (note: the export filename cannot be the same as the preferences filename, even if they are in different directories). The contents of the export file can then be added to a preferences file with a text editor. The preferences files are never changed by FWCalendar.
Should you change any values in your preferences file, you will need to select the "Load" button in the variable editor to re-load the preferences for the changes to be read. Note that this will cause any previous changes made with the variable editor to be lost, so it is always best to keep your preferred default values set in the preferences file.
To speed up rendering, not all variables are included in the variable editor. Those that are expected to change from time to time are included, those that are not likely to be changed or that should not be changed casually are not included (these can be changed by including them in the preferences file). The variable editor itself does not allow the addition of unlisted variables; if you want to add a variable to the cycle gadget of the variable editor, first add the variable to the preferences file using a text editor and then click the "Load" button on the variable requester to re-load the preferences file.
Both FWCalendar and FWCAddEvent use the same user-chosen preference file for initializing variables, so you should not change the preferences file between using FWCalendar and FWCAddEvent.
 Several
options are available on the first ("Options & Layout") tab of the variable
editor. Checking one of the checkboxes is equivalent to setting the
corresponding variable to 1:
| Checkbox | Variable |
| MiniCals = | DoMiniCals |
| Highlights = | DoHighlights |
| Extended = | DoExtended |
| Box Dates = | DoDateBox |
| Backgrounds = | DoBackgrounds |
| Images = | DoImages |
Note that the "Images" checkbox will be ghosted if FWCalendar can't
find Visage; check the value of the GfxAppPath variable to make
sure you have properly set the path only to Visage.
The center of the first tab allows setting the page orientation and margins. The center cycle gadget alternates between "Tall" (portrait) and "Wide" (landscape) settings. The text boxes surrounding the cycle gadget correspond to the (going clockwise from the top) top, right, bottom, and left margins.
The bottom of the first tab (which shows up on all the tabs) allows you to set the month and year of the desired calendar.
Clicking on the "Monthly" button will begin generation of a monthly calendar, while clicking on the "Yearly" button will begin generation of a yearly calendar (the month will be ignored in this case).
The "Reset" button causes the default settings (the settings coded into
FWCalendar) to be loaded, while clicking on "Load" will allow you to load a
preferences file. The full path and file name of the loaded preferences file
will be displayed at the top of the requester; if the PrefsName
variable is set in the preferences file, that name will be displayed in place of
the preferences file's path and file name.
The "Export" button will save variables that differ from the defaults to a file (note: the export filename cannot be the same as the preferences filename, even if they are in different directories). The contents of the export file can then be added to a preferences file with a text editor.
Obviously, the "Cancel" button cancels the operation.
If one of the margin gadgets is active, the <TAB> key will
cycle through the margin settings.
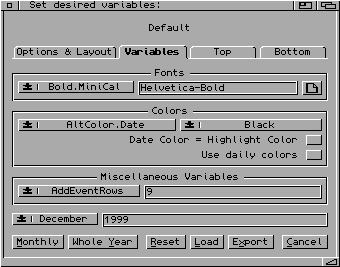
 The "Variables"
tab of the variable requestor allows various variables, including fonts and
colors, to be changed.
To change a font, first select the name of the desired variable (eg,
Font.Date or Bold.MiniCal), then click on the file
requester gadget at the end of the line. The file requester gadget must be
used to change the font; direct changes to the font in the text gadget will
not be accepted. When Final Writer is being used, a standard file requestor will
appear from which you can locate and select the desired font; when PageStream is
being used, a list of all installed fonts will appear.
Colors are changed by first selecting the name of the desired variable (eg,
Color.Date or Line.Extended), then selecting the desired
color from the cycle gadget. The colors present in the cycle gadget are those
read from the preferences for either Final Writer or PageStream. Only the various
background colors (those variables begining with "Background.") can be set to
"<Clear>" (or your translation for "Clear"). This setting will cause the various
boxes to be transparent, allowing, for example, a background picture to be visible
through the boxes.
If the "Date Color = Highlight Color" checkbox is checked, the date (and date box, if this option is selected) will be printed in the same color as the highlight text. If the checkbox is cleared, the date color will be determined by Color.Date. This corresponds to the DoMatchColors variable.
If the "Use Daily Colors" checkbox is checked, the date (and date box, if this option is selected) will be printed in a color determined by the variables Color.Sunday through Color.Saturday. If the checkbox is cleared, the date color will be determined by Color.Date. This corresponds to the DoDailyColors variable.
Miscellaneous variables can be set in the lower section of this tab. Quotes
will automatically be added for variables requiring non-numeric values. The
<TAB> key will cycle through the variable list (forward only),
and the <RETURN> key will activate the variable-value text box.
 The options for adding extras (moon phases, julian dates, week numbers, etc.)
are found in the third and fourth tabs. The radio buttons in the third tab ("Top") will
locate the extras in the two available top positions, while the radio buttons in
the last tab ("Bottom") locate the extras in the three available bottom positions.
Each of the extras is mutually exclusive (ie, each extra can be used in one location
only). Extras can be added at the top or bottom of any date; if any extras are added
at the top of a date, highlights for that date will begin down one line.
The "Sunrise," "Sunset," and "Rise/Set" options will be ghosted if
FWCalendar can't find SunCalc; check the value of the SunCalcPath
variable to make sure you have properly set the path only to SunCalc.