


AudioWorks
The complete manual...
The Sample Menu
Click Menu over the sample window to display the sample menu.
File
This menu gives information on the sample, or lets you save the sample in different formats.
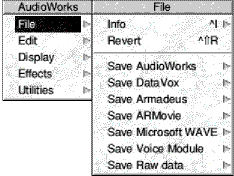
Info
This displays the name of the sample file, the original (when loaded) type of the file, the sample format (for example, Mono, 8 bit LinSigned).
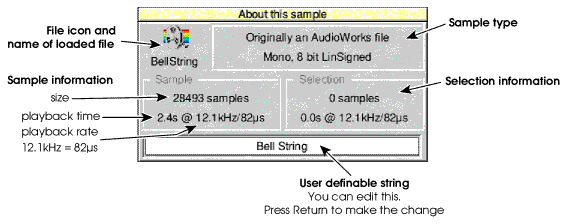
The user definable comment string displays any comment saved in the file (if available) or from AudioWorks as to sample's origin (for example, Extracted from the Acorn Replay Movie file 'Movie'). You can edit this field; press Return to set the new comment.
Save sample
These menu options allow saving/exporting of samples in different formats:
- AudioWorks The native AudioWorks file format.
- DataVox and Armadeus Two popular file formats on Acorn computers. Note that these file formats are limited (DataVox cannot represent 12 bit samples, Armadeus cannot store anything other than mono 8 bit Linear Signed samples), so they are not recommended unless you specifically wish to export in these formats.
Some formats cannot save stereo samples that can be played in the background. - Microsoft WAVE The most common format on PCs.
- Voice Module Saves a relocatable module that can be used by Audio Manager (supplied with AudioWorks). Samples are saved in 16-bit mono format. You require technical knowledge of Acorn computers to make full use of Audio Manager.
- Raw Data This saves the sample data without any header information at all. Stereo samples are stored as two separate chunks of data - left channel then right channel.
When saving stereo samples AudioWorks uses the computer's memory to process the data before writing to disc. If your computer has little free memory (less than 32KB), processing can be slow.
Edit
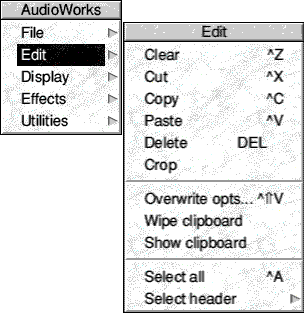
Clear
This deselects any selected region.
Cut/Copy/Paste/Delete
AudioWorks provides you with a very powerful clipboard-based cut/copy/paste editing system. The clipboard in AudioWorks is similar to a conventional clipboard. That is, you place items on it for temporary storage. The clipboard can only store one item; placing a new item on it overwrites any existing contents.
The selected region of a sample can be:
Once you have some data on the clipboard, you can Paste from the clipboard. The clipboard contents are preserved so you can paste several times if wished.
Paste either
- inserts the data from the clipboard into the current sample/channel at the cursor
- overwrites the selected region.
Crop
This discards all of the sample outside of the selected region. This has a keyboard short cut of Shift-Delete.
Overwrite options
These control the precise action of pasting.
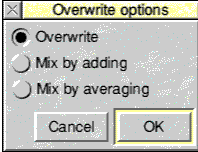
Options set in this dialogue affect future paste operations that overwrite the selection. They have no effect when pasting at the cursor.
- Overwrite The data from the clipboard overwrites (replaces) the selected region.
- Mix by adding This mixes the clipboard and selected region sound-samples by adding the two samples.
This increases the volume of the resultant sample. With large amplitude samples, this can result in overflow (or clipping) which reduces the quality of output. If this may happen, we recommend using Mix by averaging. - Mix by averaging This mixes the clipboard and selected region sound-samples by averaging the two samples.
The mix is quieter than with adding, but ensures that no overflow occurs and usually gives much better quality results. To maximum (in Effects, Amplify) can be applied after this type of paste operation to improve the volume levels.
Wipe clipboard
This erases the current contents of the clipboard. This is useful if you want to release more memory for use by AudioWorks or other applications.
Show clipboard
This displays the clipboard. You can then treat its contents as a normal sample. (Click on the clipboard window's Close icon to hide the clipboard again. The clipboard's contents remain unchanged.)
Select all
This provides a quick way of selecting the entire current sample. This is useful if you want to copy or overwrite the sample. (Select all has a short cut of Shift- click.)
Select header
This selects the header information at the start of the sample. You can then strip headers from samples of a type unknown to AudioWorks. An editable field lets you specify the number of bytes in the header. (The default is 32 bytes.)
Display
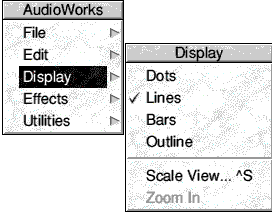
This lets you display the sample in Dots, Lines, Bars, or Outline modes. Using different display modes can sometimes show features of a sample that are otherwise obscured.
Scale View
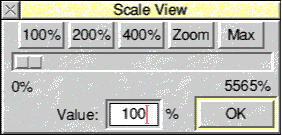
This dialogue box offers a quick method of changing the magnification at which the sample is displayed. The icons along the top of the window allow you to
- set the display scale to 100%, 200% and 400%
- zoom in on the selected region
- zoom to the maximum level possible. (You should be able to select individual samples. This depends on the setting of Mouse Speed - refer to the User Guide supplied with the computer. )
You can also use the slider to change the scale factor. This has immediate effect.
You can also type a new value into the editable field and click OK .
Zoom in
This duplicates Zoom on the Scale view dialogue box. That is, it zooms in on the selected region.
Effects

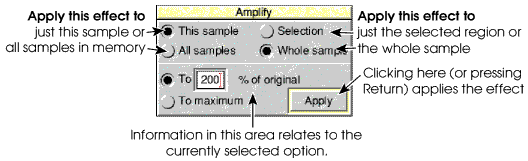
This offers the main editing functions of AudioWorks. Most options share a common layout, with three parts:
Amplify
This amplifies the sample (increases the volume). Two options are available:
- Amplify by a percentage. (For example, 50% halves the overall volume level, 100% leaves it unchanged, and 200% doubles it)
- Amplify to maximum (in which case AudioWorks amplifies the sample as much as possible without introducing distortion).
Centre
This allows you to shift the sample up or down in the sample display window. This is usually used to correct badly sampled data. Three options are available:
- Move to Marker This moves the sample so that the portion currently lying on the centre-line shifts to the position indicated by the red marker line.
- Auto-centre This takes the average sample value as the new centre value and shifts the sample up or down as necessary.
- Add This allows you to add or subtract any constant value to/from the sample (which shifts it up/down respectively). The value entered should be between -1.0 and +1.0.
Echo
This adds an echo. Delay is a time in seconds between each successive echo. Attenuation is how much quieter the echo is than the original. 0% is no attenuation; 99% the greatest attenuation.
As the echoes carry on beyond the original end of the sample, there is an option to automatically extend the sample so that the echoes are not 'chopped off' at the end of the sample. This is optional to allow you to extend the sample if/as you see fit before applying the echo.
Envelope
This is a somewhat more complex option. It brings up an envelope editor window, which applies to the current sample. You can change to a different sample by clicking over the sample name in the top left of the window. Up to eight envelopes may be loaded and edited at any time.
Clicking Menu on the window displays a submenu:
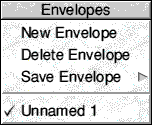
Use this to Create, Delete or Save envelopes and select which envelope to display in the window.
The window displays the normal level lines and a grey display of the current sample. On top of this is the envelope, represented by red handles and black lines.
Click Select to add a point to the envelope.
Hold down Shift and click on a point to delete it.
Adjust-drag a point to move it.
The envelope represents scaling factors, with zero at the bottom and x2 at the top. The centre line (x1) represents no change.
To apply the envelope click on Apply. This displays a small dialogue box:
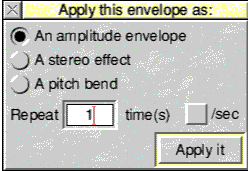
Select the required option and then click on Apply it.
- Amplitude envelope This scales the amplitude (volume) of the sample. The following envelope shape would make the sample 'fade in' from silence, and then 'fade out' again to silence.

- Pitch envelope This scales the pitch (by resampling) according to the envelope shape. The example envelope shown above starts the sample off at a low pitch, gradually increasing past its current pitch, until it is playing faster than normal, then decreasing in speed until it is once again playing slowly.
Values less than x1 increase the size of the sample and so require more memory. (Values greater than x1 require less memory.) AudioWorks uses a minimum value of x0.1 - this prevents samples becoming excessively large. You can set values down to x0 but AudioWorks rounds these up to x0.1.
Extend
This allows you to extend a sample, specifying the amount to extend by or the new size to which the sample should be increased, in terms of either number of samples or number of seconds playtime.
Filter
AudioWorks has two filters -- Low pass and High pass. Low pass removes all frequencies above the specified value. (That is, it 'passes' frequencies lower than the value.)
High pass removes frequencies below the specified value.
Ramp
This provides a quick and easy method of 'fading in' and 'fading out' parts of a sample. Four different ramp shapes are provided, in both ramp up (start at silence and fade in) and ramp down (start at full volume and fade out). For more control of the ramp shape, use an Amplitude envelope (described above).
Note that cross-fades (fading one sound out as you fade another one in) can be achieved by using Ramp/Envelope, and then mixing using the copy/paste mechanism.
Resample
This allows you to change the size of a sampled sound while keeping it playing at the same apparent pitch. The new size of the sample can be entered in terms of number of samples, a multiplier of the current size, or a hertz playspeed.
Reverse
This effect reverses the sample or selection so that it plays backwards.
Silence
(Only available when there is a selection)
This overwrites the selected region with silence. AudioWorks will ask for confirmation before overwriting.
Utilities
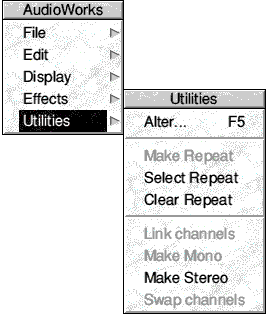
Alter
This opens the Alter dialogue box. This option is similar to Alter on the icon bar menu, except that this option lets you open the dialogue box for any sample in memory. Alter on the Icon Bar Menu opens the dialogue box for the current sample.
Make Repeat
(Only available when there is a selected region.)
This replaces any existing repeat loop with a new loop based on the selected region. The auto-repeat button is also turned on for convenience. There is more information on repeat loops in Tutorial.
Select Repeat
This sets the selected region to the repeat loop region, making it easier to adjust. You can use Adjust to alter the start or end point of the region.
After adjusting the selected region click on Make Repeat to create a new repeat loop,
Clear Repeat
This clears any repeat loop from the sample.
Link channels
(Only available with a stereo sample.)
This treats both channels as a single entity. (That is, selecting a region applies to both channels, effects apply to both channels, and so on.) However, by deselecting Link Channels , the two channels are generally treated as two separate mono samples.
You can make linked or unlinked the default setting using Link channels in the Miscellaneous preferences dialogue box. (See Preference options for more details.)
Make mono
(Only available with a stereo sample.)
This converts a stereo sample (two channel) into a mono sample by mixing (averaging) the two channels.
Make stereo
(Only available with a mono sample.)
This converts a mono sample into a two channel stereo sample by duplicating it to produce identical left and right channels.
RISCWorld