

AudioWorks
The complete manual...
Creating and Recording samples
Creating sound samples
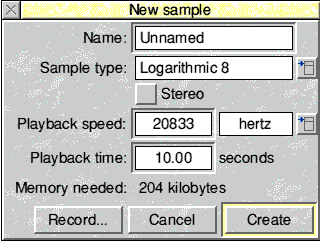
After creating a new, blank sample, you can either record into it or merge parts of existing samples. Choose New sample on the Icon Bar Menu. This opens a dialogue box:

You can change any of these parameters after creating the sample. Refer to Alter in The Icon Bar Menu.
- Name is a file name. If you wish, you can specify the name later when using the Save options.
- Sample type. Click on the menu icon to choose from the four types (Logarithmic, Linear unsigned, Linear signed, µLaw logarithmic). These are described in Digital sound samples.
Set the Stereo button if you want to create a stereo (two channel) sample. - Playback speed. Type in the required speed. The higher the frequency (or the shorter the sampling rate for µs delay), the higher the recorded quality but the greater the memory requirements. The menu on the right lets you choose the units (hertz, kilohertz, µs delay).
- Playback time. This is the sample length in seconds.
- Memory needed. This is the memory needed to store the sample. It is a function of Playback speed and Playback time. AudioWorks warns you if you try to create a sample that requires more memory than is currently available. You can release extra memory by closing unwanted sample windows and quitting any applications not currently required.
Click on Create to create a new empty sample.
Click on Record to create a new sample and open the Record dialogue box (described below).
Recording a sample
You can only record samples if you have suitable hardware in your computer (such as a Computer Concepts Eagle M2 multi-media card or a Wild Vision Lark card).
To record a sample either
- click on Record in the Create sample dialogue box (described above).
- click on the Record button on a sample window. The current parameters for the sample may not match those available from the recording source. AudioWorks then uses the closest available parameters.
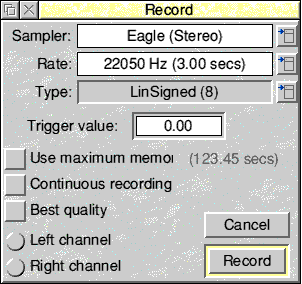
Either option displays the Record dialogue box:

- Sampler is the currently selected recording source. Click on the menu icon for a menu of sources available in your computer.
- Rate. Click on the menu icon for a menu of available rates. These depend on the recording source. This also shows the recording time available with the sample and recording source.
- Type tells you the sample data format. You cannot change it in this dialogue box. To change it, use the Alter sample parameters dialogue box. (See The Icon Bar Menu for more details.)
- Trigger value (range 0 to 1) lets you delay recording until the amplitude exceeds the trigger value. A value of 0 starts recording immediately.
An example of its use is recording your own voice. If you click on Record you might not speak immediately. There is therefore an initial period of silence or just background noise. Setting a suitable Trigger value lets AudioWorks ignore this initial period. It only starts recording when you start speaking and the amplitude exceeds the Trigger value. - Use maximum memory tells AudioWorks to use all the available memory in the computer. (This overrides the value set in Playback time in the Create sample dialogue box.) The value to the right shows how many seconds of recording will fit in the available memory.
- Continuous recording. With this option deselected, recording stops when the sample window is filled.
With this option selected, recording is continuous. When the sample window is full, recording starts overwriting the start of the sample. Click on the Stop button to stop recording. - Best quality. With this option deselected, the sample, oscilloscope and spectrum windows (if displayed) show the incoming data. AudioWorks continues to multitask.
Some types of hardware require uninterrupted access to the processor in the computer or they lose data. (This is more critical at high sampling rates, such as 44kHz.) If AudioWorks warns you that recording has lost data, retry with Best quality selected. During recording an information box is displayed and multi-tasking is disabled. Press Esc to abort recording. - Left channel/Right channel. These are greyed unless you have selected a stereo (two channel) source and a mono (single channel) sample window. They let you select which channel of the source to record.
If you want to record both channels and produce a mono output and your sampler does not have a mono option, you should- Record a stereo image
- Merge the two channels using Make mono in the Utilities menu.>
- Click on Record to start recording.
RISCWorld