To create categories by add existing folders to the Categories palette:
Open the desired catalog, then open the Categories palette (Window > Show Categories).
On the workstation [Finder (Mac OS) or Explorer (Windows)], locate the folder and sub-folders that you wish to add to the Category.
Drag the top-level folder from the Finder/Explorer and drop it onto the Categories palette in Portfolio, or onto another folder on the palette.
Tip for Mac OS: Before you can drag and drop folders from the Finder onto the Categories palette in Portfolio, you will need to arrange your desktop so that you can see both the Categories palette and the window that you want to drag from. To do so, hide all windows except Portfolio. In the Finder (Desktop), open the folder containing the items that you want to drag to Portfolio. Arrange your folder window so that it is visible when Portfolio is active (you may have to close some or all Gallery windows in Portfolio). You will now be able to drag from one to the other.

The folder hierarchy will be recreated on the Categories palette, and folder contents will be cataloged and linked to the appropriate folders on the palette.
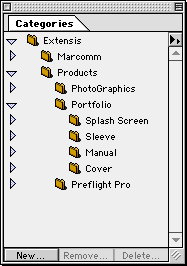
Double-click a folder to display the cataloged contents in a Gallery window.
To create a new category using the Categories palette:
Tip: New folders are created at the same level as the selected folder. To create folders at the root (top) level of the hierarchy, click anywhere in the white space of the palette to deselect all folders. To place a folder at a lower level, drag and drop it into the desired folder on the palette.
Open the desired catalog, then open the Categories palette (Window > Show Categories).
Click the “New...” button or choose “New...” from the palette fly-out menu.
You will be prompted to enter a name for the folder.
Enter the folder name, then click “OK.”
The folder will be created at the selected level (below the currently selected folder) on the Categories palette.
Continue creating folders (steps 2 and 3) until all the folders have been created.
Drag the folders up and down as necessary until the folder hierarchy is as you like it.

Use the insertion bar to gauge exactly where to drop each folder.
If you don’t care about the hierarchy of submenus, simply drag and drop sub-folders into the appropriate folder.
To link cataloged items to an existing folder:
Open the desired catalog, then open the Categories palette (Window > Show Categories).
Locate the item(s) that you want to add to a folder on the palette.
Select the items, then drag and drop them into the desired folder on the Categories palette.

The selected Gallery items will be linked to the folder.
— or —
Select the items in the Gallery.
On the Categories palette, select the target folder.
From the Categories palette fly-out menu, choose “Apply Records to Category.”
The selected Gallery items will be linked to the folder.
To display cataloged items in a Categories folder:
Open the desired catalog, then open the Categories palette (Window > Show Categories).
Double-click the desired folder.
Items in the selected folder will be displayed in the Gallery.
To display items in a Category and all sub-categories:
Open the desired catalog, then open the Categories palette (Window > Show Categories).
Select the desired category (by highlighting the folder).
Choose “Show Records in Sub-categories” from the palette fly-out menu.
Items in the selected folder and all sub-folders will be displayed in the Gallery.
To remove cataloged items from a Categories folder:
Open the desired catalog, then open the Categories palette (Window > Show Categories).
Open a Gallery and select the items that you want to remove from the folder.
Click the “Remove” button on the Categories palette, , or choose “Remove Records from Category” from the fly-out menu.
The selected catalog items will be removed from the folder, but not from the Gallery or Catalog.
To remove a Category:
Open the desired catalog, then open the Categories palette (Window > Show Categories).
Select the Category that you want to delete, then click the Delete button at the bottom of the palette, or choose “Delete Category” from the fly-out menu.
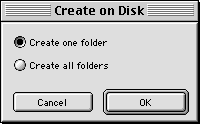
To create a job on disk from your Categories:
Open the desired catalog, then open the Categories palette (Window > Show Categories).
Select the top-level folder that you want to create the Category from.
Drag the folder to the Finder (Mac OS) or Explorer (Windows).
A dialog will be displayed asking if you want to create one folder for all the items, or if you prefer to maintain the folder hierarchy.
— or —
Choose “Create on Disk...” from the palette fly-out menu, then choose a folder where you want the items to be stored.
Click “Create one folder” to have all items placed in a single folder, or “Create all folders” to maintain folder hierarchy.
A copy of each source file will be placed in the appropriate folder on the disk.