Portfolio Catalogs consist of a number of predefined fields. These system fields, such as Filename, Path, Created and so on, categorize the file information for each item in a catalog, allowing you to search for specific items based on that information.
In addition to the predefined system fields, you can define Custom Fields to hold specialized information about catalog items. For instance, you might want to add a field for Web site URLs to a catalog of GIF files, or a “Photographer” field to a catalog of photographic images.
There are six Custom Field types from from which to choose:
Date/Time: Enter date and/or time values. You could use this field type to create a Custom Field for image publication dates, for example.
Decimal: Enter decimal point numeric values. This field type would be useful for custom fields containing stock image prices.
Integer: Enter regular numeric values. This field type is ideal for custom fields containing catalog part or stock numbers (as long as they contain only numeric values).
String: Enter text values. This field type can be used for any number of custom fields, including photographer or artist names.
Text Block: Enter multiple lines of text with line breaks. This field type can be used for mulitple lines and paragraphs of text.
URL: This field type is used for Web and other URL addresses. It creates an active hyperlink on Windows and on Mac OS systems with Internet Config properly set up. You can enter any reference in URL format including: http, ftp, telnet, gopher, even local files or applications. This field can be used to allow users to click on a web address to go directly to a specific site; or using a mailto:username@site.com entry, automatically create a mail message addressed to the username@site that you enter.
|
Field Type |
Data Example |
|
Date/Time |
8/20/98 1:15 pm |
|
Decimal |
50.00 |
|
Integer |
100 |
|
String |
Text |
|
Text Block |
Multiple lines of text |
|
URL |
http://www.extensis.com |
Tip: Macintosh: Portfolio uses Internet Config (installed with QuickTime 4.0) to determine what application handles the URL type. Refer to your Internet Config documentation for details.
You add data to Custom Fields either by typing it into the item record (Item > Item Properties: Fields tab, editing in place in Record view, Master palettes if pre-defined list), by extracting data from the source file and mapping it to the appropriate Custom Field (Catalog > Cataloging Options: Mappings tab), or by importing them (File > Import > Field Values).
Note: When you copy records from one catalog to another, if the catalogs have matching Custom Fields, field data will be copied along with other record data. In other words, if you want to copy Custom Field data from one catalog to another, you must create identical Custom Fields in each one.
To add Custom Fields to a catalog:
Note: Once a Custom Field has been created and added to the catalog’s Custom Fields list, only the field Name, Display Time (Date/Time fields only), Multiline Display (String fields only), and Predefined List options can be changed.
Choose Catalog > Administration... [Command+H (Mac OS) or Ctrl+H (Windows)].
Select the Custom Fields tab.
Click “Add..."
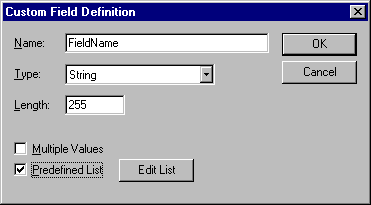
The “Custom Field Definition” dialog box is displayed.

Enter a name for the field in the “Name:” text box.
Choose the field type from the “Type:” pop-up menu.
The field type determines the values that can be entered into this field. Field types cannot be changed once they are defined.
Select the appropriate remaining options for the field type you selected, then click “OK” to return to the Custom Fields tab.
When you have finished adding Custom Fields, click “OK” to close the Catalog Administration dialog and save changes made on any of the tabs.
Custom Field Restrictions
URL fields cannot be set up with a predefined list.
URL fields cannot have multiple values.
URL fields cannot be indexed.