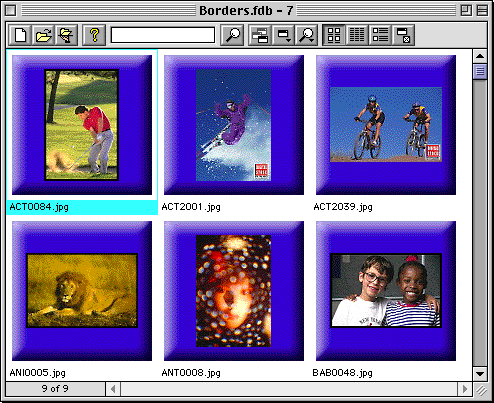
You can highlight your catalog thumbnails by displaying them in the Gallery window with Thumbnail Borders. Portfolio provides a few sample borders for you to use, and you can create unlimited effects using your own border designs.
Any bitmapped image (PICT, BMP) can be used—all you need to do is create your border design, copy it to the system clipboard, paste it into the Edit Borders dialog, then select it in the Thumbnail or Record tab of the Customize Gallery dialog.
All thumbnails in the Gallery window will be displayed with the selected border. Using the Save Galleries feature you can set up special Galleries of items with borders, and others without, or specify different borders for different Galleries.
Tip: You can create stunning borders almost effortlessly with Extensis PhotoTools, an exciting collection of Photoshop plug-ins that allows you to create custom bevels, drop shadows, embosses, glows, and more! A Demo version of PhotoTools is available on the Extensis CD.
When adding borders, you specify which thumbnail size you want your border to apply to. The Border Box that Portfolio provides for each thumbnail size is 25% larger than the thumbnail, so your borders should be 25% larger than the thumbnail size you intend to use them with. If your border is larger than the Border Box, it will be scaled down to the proper size. If it is too small it will be hidden by the thumbnail; it may be visible if the item displays as an icon.
To select a thumbnail border:
Choose View > Customize, or press Command+D (Mac OS) or Ctrl+D (Windows), or click the Customize button.
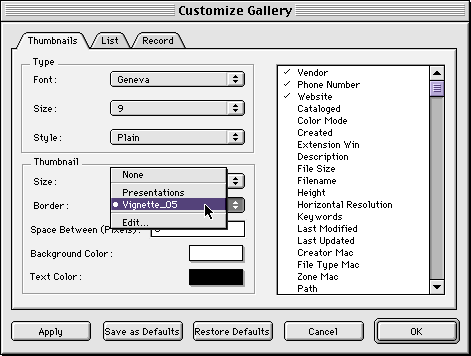
Click the Thumbnails tab or Record tab to select it.
Borders are not available in List view.
Choose the desired thumbnail Border from the Border pop-up menu.
Click “OK” to close the dialog and apply the border to the items in the active Gallery.
To add a thumbnail border to the catalog:
From your image editing application, copy your border to the system clipboard.
From Portfolio, choose View >
Customize, or press Command+D (Mac OS) or Ctrl+D (Windows), or
click the Customize button ![]() on the Toolbar.
on the Toolbar.
Click the Thumbnails tab or Record tab to select it.
Borders are not available in List view.
Choose “Edit” from the Border pop-up menu.
The Edit Borders dialog will be displayed.
Click “New,” then enter a name for the border.
Select the thumbnail size to which you wish to add the border.
|
Thumbnail Size |
Border Size |
|
32 x 32 |
40 x 40 |
|
64 x 64 |
80 x 80 |
|
112 x 112 |
140 x 140 |
|
256 x 256 |
320 x 320 |
Paste the border—it will be pasted into the selected size Border Box. When you have finished in the Edit Borders dialog, click “Save.”
You can paste the same or a different border for each thumbnail size.
When you have finished in the Customize dialog, click “OK.”
How Borders Work / Border Transparency
Border images are displayed behind the thumbnails. This means that thumbnails and icons will always be displayed in their entirety, at whatever size and orientation they are, “overlapping” the border image.
Portfolio looks at the center pixel of the selected border image and sets that as the designated transparency color. This allows you to create borders that behave like a transparency mask, allowing the background to show through certain areas of the border design. Wherever the transparency color appears in the border image, the background is allowed to show through. So you can designate areas of the border image as transparent by coloring them the same color as the center pixels of the border image.
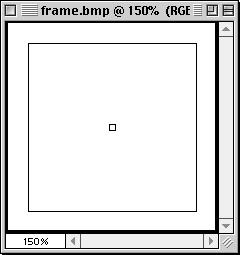
Portfolio always sets a transparency color using the center pixel of the border image, whether you intend to create transparency in your border or not. For example: Suppose you have a border image that is a white box with a black border, and your Gallery background color is blue. Portfolio will set the transparency color to white because the center pixel of the border image is white. If the thumbnails completely cover the white area of the border image, you will not see the blue background. If the thumbnails do not completely cover the white area of the border design, some blue will show through. This may or may not be what you want. To eliminate potential problems and ensure that you can change backgrounds without being concerned about transparency, it’s good practice to add a color in the center of your border image (using a 4 x 4 pixel square works well) that does not appear anywhere else in the border image.
To set the transparency color of a Border image:
Choose a color that is not used anywhere in the Border design.
This will be your designated transparency color.
Color a 4 x 4 pixel area in the center of the image with the transparency color you selected in step 1.
|
|
Center pixels define transparency color |
You could color a larger area with the transparency (mask) color, but a 4 x 4 pixel area is large enough to see, yet small enough to be completely covered by the item thumbnail or icon.
Using the transparency color, color in the areas that you want to mask.
Everywhere on the Border image that the transparency color appears will become transparent, allowing the Gallery background to show through.
Note: Thumbnails (and icons) cannot be made transparent. Thumbnails and icons are displayed on top of the Border image and will cover the Border design in that area whether the Border is transparent or not.
Copy and paste the Border image into the Border Edit dialog.
See also: