 Noise (GMS)DescriptionThe noise shader can be used to change the way ligtht reflect and refracts in an material. In a normal softimage reflection an incomming lightbeam is reflected perfectly around the surfacenormal and this makes a clean reflection. With this shader you can make a noise reflection where an incomming cone of light is reflected in your material, which makes the reflection look blurred. Likewise you can choose to let a material refract a cone instead of a ray. The size of the cone can be set by a noise-parameter - If you set the noise to zero, you get a normal refraction/reflection. In the picture above the noiseshader is used to give the lamps reflection in the table a blurry look. The noisefactor is set rather high.TutorialLoad the scene Noise_tut1 from the GMS_Tutorial database (Get->Scene). The scene consist of 3 balls and a checkerboard. The balls all have a reflection of 0.5 (Render the picture if you wanna see how this looks). Now we are gonna put diffrent noisefactors on the 3 balls to se the effect of the noiseshader:
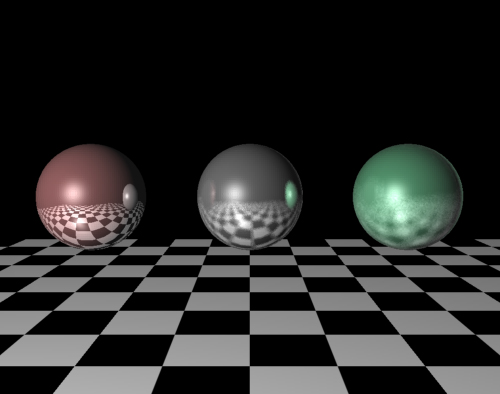 Now lets take a look at the rendered picture. The refletion in the first ball is a normal reflection. The reflection in the second is little noisy. Notice how the reflection is blurred when the checkerbord switches from black to white and compare the gray balls reflection in the red by the green balls reflection in the grey. The noiseshader takes 2 parameters: Noise and Number of samples. The noisevalue decides how big the reflected/refracted cone is and the effect of this parameter is easily seen on the picture above where the noisefactor increases from the left to the right. To calculate the incomming light of the cone some samplerays is cast inside the cone. The number of rays is decided by the Number of samples - parameter. This is kind of a critical parameter - The higher you set this parameter the better results you get, but the rendertime also increases. If you set it too low the reflection will not look like a reflecton but as random noise. The green ball is for example a little undersampled.
The pictures you have made is one with no noise, one with little noise
and one with alot of noise in the reflection and they should look like
this:
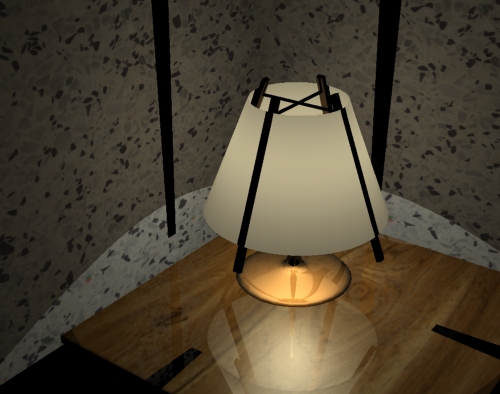
  (To make the shadows look like the ones in the top picture activate softshadows in the lights edit-dialog) |