


|
Volume Number: 21 (2005)
Issue Number: 8
Column Tag: Programming
Securing Mail with GPG
by Emmanuel Stein
A Graphical Tutorial
Why Use Encryption at All?
Some people think that if they are not doing anything wrong or illegal, they do not need to encrypt their messages. The problem with this argument is that it assumes that one is trying to protect a message from some government authority or law enforcement apparatus and ignores the very real risks associated with theft of intellectual property via corporate espionage. The fact is, that almost anyone with a bit of networking knowledge can easily “sniff” your message off the network and not only read it, but re-write it and send it along to the intended recipient without you ever being aware (this is called the “man in the middle attack”). Using GPG, you can thwart these would-be crackers and do so transparently by using GPG to encrypt your mail messages.
GPG in a Nutshell:
GPG employs public key, as well as symmetric key cryptography, to perform its magic. When setting up GPG you have several options for generating your keys. The default option uses DSA to generate your primary keypair for signing, and then generates a second (also called subordinate) keypair that uses ElGamal for encryption.
Although we are using the more sophisticated primary and subordinate designations to explain what gets generated in GPG, both the primary and subordinate keychains are usually, for practical purposes, thought of as a single keychain. In this scheme, you have a public and a private key. Your private key is secret and should be treated as such. Take precautions, and do not lose it as you will have to regenerate the key and will not be able to read mail encrypted with your original public key. You do, however, have the ability to revoke a key that is compromised. Unlike your private key, your public key should be widely distributed, allowing others to send you an encrypted message that only you can decrypt with your private key.
GPG uses the same approach to key management as PGP, which is to say via a “web of trust.” Rather than employing a centralized certification authority such as Verisign, GPG allows individual users to act as their own certification authority. There is an infrastructure in place for the GPG community of well-maintained keyservers that facilitate exchange of public keys among users.
GPG and Apple Mail: Two Great Tastes That Go Great Together!
For this tutorial, we will focus on enabling GPG in Apple Mail 2.0 using the GPGMail plug-in. Links to sites where one can obtain GPG mail extensions for other popular mail clients will also be included.
How GPG-Enabled Mail Works?
Before we dive into setting up mail for GPG, I will take a moment to review how GPG works in the context of email communications. When you want to send an encrypted message to a colleague or friend, you encrypt the message using their public key, which may be obtained directly from that individual or via a keyserver. The recipient then will decrypt your message using their private key. Signing is also an important part of GPG-enabled mail communications, and involves using your private key to create a digital signature that guarantees to your recipient that the message came from you and has not been tampered with.
GPG Install How-To
What you need:
Go to http://macgpg.sourceforge.net/ and download the following required applications:
- Gnu Privacy Guard (aka GPG)
- GPG Keychain Access
We will not be covering the excellent suite of file utilities also available at this site. Nonetheless, you are encouraged to explore these binaries at your leisure, as they may prove extremely useful for non-mail GPG operations.
In order to enable GPG in Apple Mail, you will also need to obtain the GPGMail application at http://www.sente.ch/software/GPGMail/English.lproj/GPGMail.html">.
If you are a security conscious person, and are deploying this package for a mission critical application, then you may want to check each packages authenticity via its MD5 checksum using the openssl command in the terminal.
Installing Gnu Privacy Guard
Double click on the GnuPG .dmg file in order to mount the contents of the archive. To install GPG, double click on the GPG .mpkg file to invoke the installer.
Once GPG has installed successfully, we will need to generate our keypair. To simplify the process, we will use the GPG Keychain Access application rather than the terminal. This application is modeled after the intuitive Keychain application in OS X and is very easy to use. Simply unzip the folder called GPG Keychain Access and drag it into the Applications folder.
To generate your keypair, open the GPG Keychain Access application. The application will notify you that you do not yet have a keypair and offers you the option to generate one (Figure 1). Also, this dialog gives you the option to import your secret key. This is useful when you want to configure a second computer with GPG. Your private or secret key will be created in your home folder under the hidden .gnupg directory.
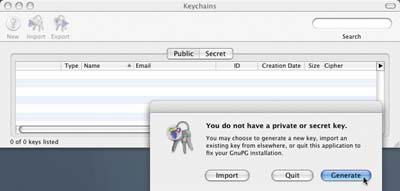
Figure 1. Keypair
Generation and Import Dialog
To create a new keypair, select the Generate option in the dialog (Figure 1) to invoke the install wizard. You will be given several options for generating a key (Figure 2). It is recommended that you select the default option, DSA and ElGamal as it offers the most flexibility and is required for use with mail since the other options only allow for signing and not encrypting.

Figure 2. Key Generation
Wizard: Algorithm Selection
Once you have selected your algorithms (basically the functions used to scramble and de-scramble your data), you will be asked to choose a key-length. The general rule is, the longer the better. Without getting into the details of encryption math, the security of your key increases exponentially with key length. The only potential down side to a longer key is the additional time it takes to generate and to perform its encryption operations. Nevertheless, with a Mac of recent vintage you should not notice more than a minimal lag when performing any GPG operations like encryption and decryption, even using the longest available key.
Following the selection of a key length, you will be presented with the option of specifying an expiration date. While this may be useful in some environments, it is rather limiting and therefore not recommended unless you have a specific need.
Next you will be asked to provide your identification data such as Name, Email Address and an optional comment. It is good form to use your real name as you are taking the responsibility of a self-certifying authority. So be honest.
You will then be prompted for the passphrase to protect your private key. Check over your configuration options, and correct them via the Go Back button, or simply press Continue to generate your keypair. A lengthy keypair may take 30 minutes or more to generate, so a coffee break may be in order.
When your keypair generation has completed, you will see you new public key in the GPG Keychain Access Application (Figure 3). You can see the sub-key we spoke of earlier, by clicking on the disclosure triangle.
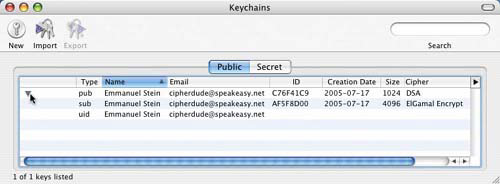
Figure 3. View of
Sub-Keys Using the Disclosure Triangle
To install the GPG Preference Pane, select the Preferences option in the Application Menu. Click yes in the dialog box that pops up (Figure 4).

Figure 4. “GPG
Preference Pane Not Installed” Dialog
The GPG Preferences installer will then walk you through the installation of the GPG System preference pane (Figure 5).

Figure 5. GnuPG
Preferences Installer Invoked via the GPG Keychain Access Application
Once the GPG preference pane has successfully installed, fire up the System Preferences application and click on the GPG Preference pane to explore the various configuration options. When you first open the GPG preference pane, you will be asked to choose UTF-8 for string encoding (Figure 6). Select the default Please Do option to ensure proper GPG operations.
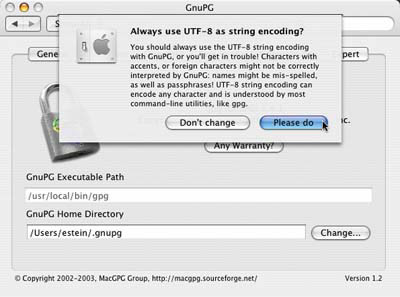
Figure 6. GnuPG
Preferences Pane and UTF String Encoding Dialog
You may use this preference pane to customize GPG. Don’t let all these available options overwhelm you, though, and keep in mind that the defaults are fine for most folks.
Managing your GPG Keychain
GPG relies on a centralized key management system of keyservers. Upload your public key to a GPG keyserver (private key not accepted!) to enable others to send you encrypted messages.
In the GPG Keychain Access application, click on your public key to highlight it and then select Key > Send to keyserver (Figure 7).
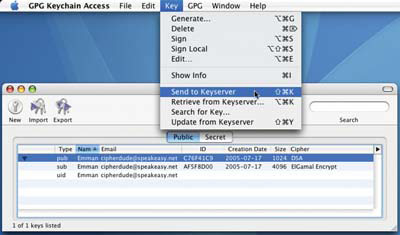
Figure 7. Send To Key
Server Menu Option
Upon selection of this option, a terminal window will pop up and automatically run the terminal commands for sending the key to a keyserver for you (Figure 8).

Figure 8. Invoked
Terminal Session: Sending Public Key to a Keyserver
Now that you have made you public key available to others, you will need to download your correspondent’s public keys using the GPG Keychain Access application. You can also download public keys via the mail interface, which will be covered in the next section.
Click Key > Search for Key (Figure 9).

Figure 9. Search For
Public Key Menu Option
You will be prompted to enter a search parameter (Figure 10), which is typically your friend’s email address.
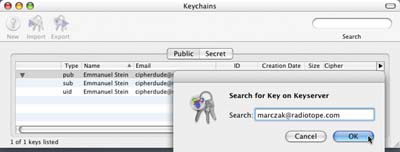
Figure 10. Search For
Public Key Dialog
Once you have entered the email address and clicked on the OK button, a new terminal will appear and automatically execute the required GPG command. If your search turns up a public key, you will be prompted to download it to your GPG keychain. This step will require you to select the public key(s) for download, from within the terminal. In the illustrated example (Figure 11), we see Ed Marczak’s public key associated with the email address we used in the search field. Once you make your selection, you will see output in the terminal confirming the download (Figure 11).
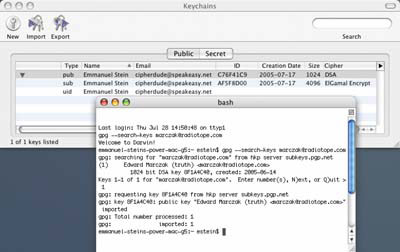
Figure 11. Invoked
terminal Session: Downloading Ed’s Public Key
To view the newly imported public key in the GPG Keychain Access application, go to Window > Refresh.
Once you have uploaded you public key to the GPG keyservers and downloaded your correspondent’s public key(s), you are ready to install GPGmail plug-in for Apple Mail.
Apple Mail With a Side of GPG(Mail)
Double-Click on the GPGMail .dmg file to reveal the mail bundle and install script. If Apple Mail is open, be sure to quit the application before continuing. Proceed by double-clicking on the Install GPGMail AppleScript and click Run in the dialog that pops up. Once the installer finishes, a dialog box will appear. Click on the Launch Mail to start the Apple Mail.
To configure your GPG mail preferences simply go to Mail > preferences > PGP (PGP and GPG are often used interchangeably by the application’s developer) shown in Figure 12.

Figure 12. GPGMail
Preference Pane
The default configuration should get you started, although, as you use the GPG mail bundle you may want to change several parameters to suit your use of encryption.
Changes to the Mail Interface
Once you install GPGMail for Apple Mail, you will notice three new menu items. These include GPG Keys under the View menu, which control the display of GPG attributes in Mail. (Figure 13)
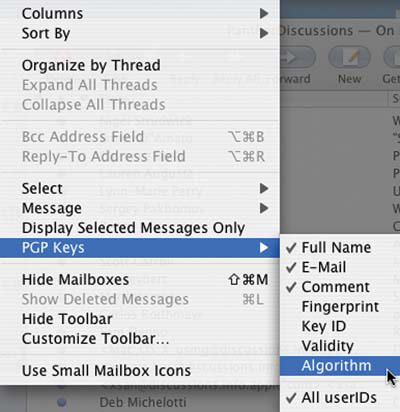
Figure 13. PGP Keys
submenu in the View Menu
The second menu addition, PGP is located in the Message menu. This submenu can be used to access common GPG operations as detailed in Figure 14.
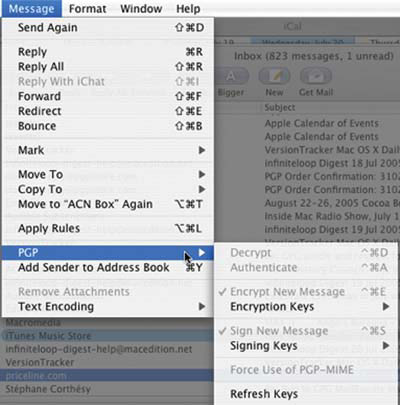
Figure 14. PGP Submenu
in the Message Menu
A final added menu items is the PGP Key Search function in the Window menu, which lets you search and download public keys. This tool also pops up when you attempt to encrypt a message and send it to a recipient for whom you have not yet downloaded a public key (Figure 15).

Figure 15. PGP Key
Search Menu Option and Accompanying Dialog
The results will be returned in a PGP Key Search dialog box, from which you will be able to download the required key (Figure 16).

Figure 16. Downloading
a Public Key in the PGP Key Search Dialog
The public keys that you download using PGP Key Search will be available globally to all GPG key management interfaces, such as the GPG Keychain Access application.
One of the most obvious changes to the mail interface is the addition of checkboxes (Figure 17) for signing and encrypting that appear in each new message window.

Figure 17. Check Boxes
for Signing and Encrypting in an Apple Mail Message Window
When sending an encrypted mail, by default, the message will be encrypted with the public key of the recipient. However, you can explore the encryption options in the Keys drop down menu next to the Encrypted checkbox to generate, for instance, a message password, which uses symmetric key encryption to scramble the message and for which the recipient must know the password.
Although, I encourage you to explore all the available options, you can effectively use GPG without ever having to touch the drop-down menu or GPGMail preference pane. Just use the checkboxes, to sign and/or encrypt your communications as needed. By default, GPGMail automatically turns on the signing and also turns on encryption when it detects a recipient whose public key is in your keychain.
When you send an encrypted mail, you will be prompted for your passphrase, created during the generation of your keypair. Once it is entered, (Figure 18) your message will be encrypted and then sent.
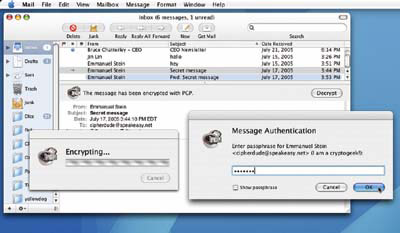
Figure 18. Message
Encryption
When you receive an encrypted message, press the decrypt button in the message window (Figure 19). You will be prompted to enter your passphrase in order to decipher the message contents.
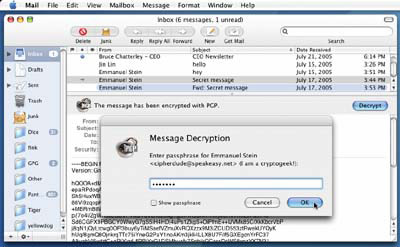
Figure 19. Message
Decryption
Notice that in Figure 20, the disclosure triangle has been expanded to display the time and date when the message was either signed or both signed and encrypted. You may use the signing information to verify the authenticity of the message.
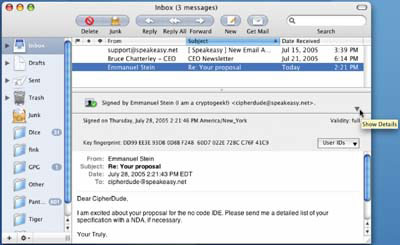
Figure 20. Decrypted
Message Contents
GPGing Other Mail Clients
Although we have focused on Apple Mail 2.0 for Tiger, there are several good mail client extensions available for popular Mac mail clients. Please find the URLs listed below:
- Mozilla/Netscape Communicator/Thunderbird uses enigmail, which may be obtained at http://enigmail.mozdev.org/index.html.
- For MailSmith Users, Alex, has some great tools for encrypting and decrypting in this program; see http://alex.primafila.net/Mailsmith-GPG
- Eudora fans will find a host of useful AppleScripts for encryption and decryption at http://mywebpages.comcast.net/chang/EudoraGPG/
- Finally, for those using Entourage X or 2004, a plug-in is available at http://entouragegpg.sourceforge.net/
Final Thoughts
The right to privacy has come a long way since 1991, when PGP was first released. With the nation in the midst of the first Gulf War, government attempts to curtail privacy and free speech threatened to suppress emerging mass encryption technologies like PGP. In fact, the Senate passed the omnibus anti crime bill (S.266) in 1991, which effectively banned the use of high-grade public key cryptography altogether!
Only through the efforts of the brave few who leaked PGP onto the Internet in 1991, partly in protest of the Senate bill banning the use of strong cryptography, did government attempts to stifle innovation and invade personal privacy become moot. So, next time you send an encrypted message (or use Apple’s FileVault for that matter), tip your hat “to the crazy ones, the misfits, the rebels, the trouble makers, the round pegs in the square holes, the ones who see things different. They are not fond of rules and have no respect for the status quo, because the people who are crazy enough to think they can change the world are the ones who actually do.” -Apple Corp., 1999
Emmanuel Stein has been an avid Mac user since 1984. He honed his cross-platform
skills while working at France Telecom, Time Magazine and Reed-Elsevier. He recently started his own
Mac-centric consulting company, MacVerse, which offers secure network deployments, system
administration, and development services for the enterprise. A diehard Linux fan from the early
days, Emmanuel enjoys hacking open source software on the Macintosh and giving lectures on the use
of open source technologies on OS X. You can reach him at macverse@mac.com.
Warning: include(/home/cust10011/www/site001/includes-mactech/includefiles/mt_footer.inc) [function.include]: failed to open stream: No such file or directory in /home/cust10011/www/site001_files/staticcontent/articles/mactech/Vol.21/21.08/GPGAndMail/index.html on line 348
Warning: include() [function.include]: Failed opening '/home/cust10011/www/site001/includes-mactech/includefiles/mt_footer.inc' for inclusion (include_path='.:/usr/share/php:/usr/share/pear') in /home/cust10011/www/site001_files/staticcontent/articles/mactech/Vol.21/21.08/GPGAndMail/index.html on line 348