| Help topics | |||||||||||||||||||||||||||||||||||||||||||||||||||||||||||||||||||||||||||||||||||||||
|
|||||||||||||||||||||||||||||||||||||||||||||||||||||||||||||||||||||||||||||||||||||||
| Introduction | |||||||||||||||||||||||||||||||||||||||||||||||||||||||||||||||||||||||||||||||||||||||
| New Atlas of the Solar System contains 3D maps of 43 planets, moons and asteroids, detailed information about these objects, plus information about many other objects in the Solar System. This help file will explain how to select maps and other pages, how to navigate around the maps, and how to use other features of the software. | |||||||||||||||||||||||||||||||||||||||||||||||||||||||||||||||||||||||||||||||||||||||
| Use the list at the top of this page to choose topics within the help file. | |||||||||||||||||||||||||||||||||||||||||||||||||||||||||||||||||||||||||||||||||||||||
| Selecting planets, moons and other objects | |||||||||||||||||||||||||||||||||||||||||||||||||||||||||||||||||||||||||||||||||||||||
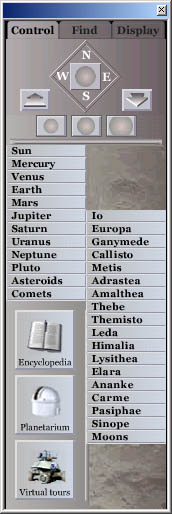
| Use the menu in the Control panel to select a new planet or moon. Click a button to display a new map. If no map is available, an encyclopedia entry about the object is displayed. As you move the mouse over a button, a list of its moons or other topics is displayed in a sub-menu. | |||||||||||||||||||||||||||||||||||||||||||||||||||||||||||||||||||||||||||||||||||||||
 |
|||||||||||||||||||||||||||||||||||||||||||||||||||||||||||||||||||||||||||||||||||||||
| Encyclopedia pages | |||||||||||||||||||||||||||||||||||||||||||||||||||||||||||||||||||||||||||||||||||||||
| To display an encyclopedia entry about an object, click the Encyclopedia button below the objects menu. Where there is no map available for an object, the encyclopedia entry for the selected object is automatically displayed. | |||||||||||||||||||||||||||||||||||||||||||||||||||||||||||||||||||||||||||||||||||||||
| Click the headings on the encyclopedia pages to read other entries related to the planet or moon. Click the images in the encyclopedia pages to display large versions of the images in a separate window. Encyclopedia pages also contain cross references (highlighted in red), links to glossary entries (highlighted in green). On some pages there are also links to features on maps (indicated by a globe icon). | |||||||||||||||||||||||||||||||||||||||||||||||||||||||||||||||||||||||||||||||||||||||
| Encyclopedia page headings contain a link to a table of contents for the encyclopedia. Using the table of contents lets you display any topic within the encyclopedia (including information about space missions, such as the Voyager missions, that have explored multiple planets and moons). | |||||||||||||||||||||||||||||||||||||||||||||||||||||||||||||||||||||||||||||||||||||||
| Navigating maps | |||||||||||||||||||||||||||||||||||||||||||||||||||||||||||||||||||||||||||||||||||||||
| All the maps in New Atlas of the Solar System are rendered
as 3D globes (or in the case of some smaller objects, as irregular shapes).
Drag the mouse (with the left button pressed) over the surface of a planet,
moon or asteroid to rotate it. Alternatively press the N, S, E, W buttons
in the Control panel. Note: the software prevents maps being turned upside down. |
|||||||||||||||||||||||||||||||||||||||||||||||||||||||||||||||||||||||||||||||||||||||
| To view maps at increased zoom levels, click the globe icons in the Control panel. The right-most globe icon displays the current map at its largest scale. The maximum scale of the maps varies depending on the scale of source mapping data (click here for a list of map scales). | |||||||||||||||||||||||||||||||||||||||||||||||||||||||||||||||||||||||||||||||||||||||
| Maps can also be zoomed either by holding down the Ctrl button on the keyboard (to zoom in) or the Alt button (to zoom out) at the same time as dragging with the mouse. Alternatively, use the zoom in and zoom out arrows on the control panel. | |||||||||||||||||||||||||||||||||||||||||||||||||||||||||||||||||||||||||||||||||||||||
|
Note: Map labels appear as you zoom in. The density of labels increases
the further the maps are zoom in. |
|||||||||||||||||||||||||||||||||||||||||||||||||||||||||||||||||||||||||||||||||||||||
| Finding features on maps | |||||||||||||||||||||||||||||||||||||||||||||||||||||||||||||||||||||||||||||||||||||||
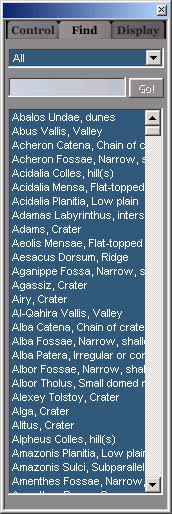
| Most maps are labeled, using names given to features by the International Astronomical Union. To search for a label feature, click the Find tab. | |||||||||||||||||||||||||||||||||||||||||||||||||||||||||||||||||||||||||||||||||||||||
 |
|||||||||||||||||||||||||||||||||||||||||||||||||||||||||||||||||||||||||||||||||||||||
| Type the first few letters of a feature name to find it in the scrolling list of feature names. Click a feature name to select it, then click the Go button to center the map on the feature. Alternatively, double click the name in the find list. | |||||||||||||||||||||||||||||||||||||||||||||||||||||||||||||||||||||||||||||||||||||||
| Feature names are categorized by the class of feature they belong to. Click the drop down menu at the top of the Find panel, to select a category (e.g. craters). Select All in the drop down list to display all feature names. | |||||||||||||||||||||||||||||||||||||||||||||||||||||||||||||||||||||||||||||||||||||||
| Information about features | |||||||||||||||||||||||||||||||||||||||||||||||||||||||||||||||||||||||||||||||||||||||
| Clicking anywhere on a map displays a small "info" window. The info window displays information about the feature and contains links to related encyclopedia pages (indicated by arrows). | |||||||||||||||||||||||||||||||||||||||||||||||||||||||||||||||||||||||||||||||||||||||
| Display | |||||||||||||||||||||||||||||||||||||||||||||||||||||||||||||||||||||||||||||||||||||||
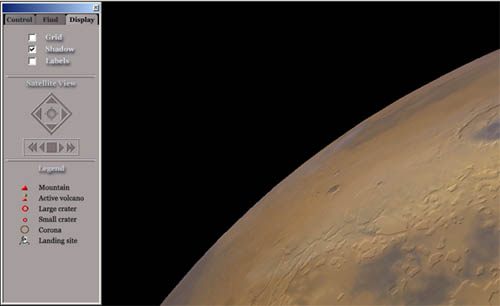
| The appearance of maps can be customized using the options in the Display panel. Click the Display tab to select the Display panel. Use the checkboxes to turn on and off, latitude/longitude grids, labels or the artificial shadow. | |||||||||||||||||||||||||||||||||||||||||||||||||||||||||||||||||||||||||||||||||||||||
 |
|||||||||||||||||||||||||||||||||||||||||||||||||||||||||||||||||||||||||||||||||||||||
|
Satellite View allows you to move the globe left or right, up or down, within the window. Press the gray arrows in the diamond shape. To re-center the map, click the globe icon at the center of the diamond shape. Using the scroll arrows in conjunction with zoom, you can simulate views from a satellite orbiting the object. The VCR-style controls turn automatic rotation on and off. Note: the speed and smoothness of rotation is dependent on the speed of the processor and the amount of memory available. |
|||||||||||||||||||||||||||||||||||||||||||||||||||||||||||||||||||||||||||||||||||||||
 |
|||||||||||||||||||||||||||||||||||||||||||||||||||||||||||||||||||||||||||||||||||||||
| The Display panel also contains a legend for the symbols used on the maps. | |||||||||||||||||||||||||||||||||||||||||||||||||||||||||||||||||||||||||||||||||||||||
| Measure Tool | |||||||||||||||||||||||||||||||||||||||||||||||||||||||||||||||||||||||||||||||||||||||
| The measure tool allows you to measure the distance between two or more points on the map of a planet or moon. Select Measure Tool from the View menu to activate the measure tool. Click two or more points on a map and the total distance is displayed. Click the Reset button to measure a new distance. Close the Measure Tool to return to normal navigation mode. | |||||||||||||||||||||||||||||||||||||||||||||||||||||||||||||||||||||||||||||||||||||||
| Bookmarking | |||||||||||||||||||||||||||||||||||||||||||||||||||||||||||||||||||||||||||||||||||||||
| You can bookmark a location on a map of a planet or moon. First center the map on the location you wish to bookmark, then zoom to the required scale. Select Add Bookmark from the Bookmarks menu. Name the bookmark. You can call up the bookmark at any time by clicking the bookmark name from the Bookmarks menu. To delete bookmarks, click Delete Bookmark in the Bookmarks menu. | |||||||||||||||||||||||||||||||||||||||||||||||||||||||||||||||||||||||||||||||||||||||
| Note: Bookmarks can only be used with maps. They do not work with Encyclopedia text. | |||||||||||||||||||||||||||||||||||||||||||||||||||||||||||||||||||||||||||||||||||||||
| User Labels | |||||||||||||||||||||||||||||||||||||||||||||||||||||||||||||||||||||||||||||||||||||||
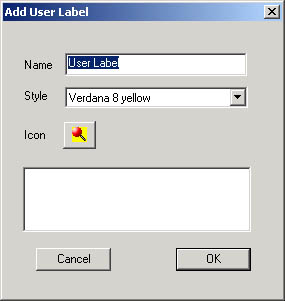
| You can add your own labels to maps of planets and moons. First center the map on the area where you wish to place the label, then zoom to the required scale. Select Add from the User Labels menu. The cursor changes to a cross. Click on the location where you want to place the label. The Add User Labels dialog is displayed. Enter the name for your label and select a color of map pin. If you wish, you can add some notes in the area below the map pin icon. | |||||||||||||||||||||||||||||||||||||||||||||||||||||||||||||||||||||||||||||||||||||||
 |
|||||||||||||||||||||||||||||||||||||||||||||||||||||||||||||||||||||||||||||||||||||||
|
You can find a user label by choosing View from the User Labels menu. The Custom Labels list is displayed. Double click the name of the user label and the map will center on it. You can also delete the user label or edit your notes. Note: you must first select the map which you created the user label
on. Unlike bookmarks, User Labels are not available while viewing a
different map. |
|||||||||||||||||||||||||||||||||||||||||||||||||||||||||||||||||||||||||||||||||||||||
| Click the user label to display its co-ordinates and your notes. | |||||||||||||||||||||||||||||||||||||||||||||||||||||||||||||||||||||||||||||||||||||||
| Note: User labels are only visible when the map is zoomed in. | |||||||||||||||||||||||||||||||||||||||||||||||||||||||||||||||||||||||||||||||||||||||
| Printing | |||||||||||||||||||||||||||||||||||||||||||||||||||||||||||||||||||||||||||||||||||||||
|
To print a map or an encyclopedia entry, select Print from the File menu. Note: printing a map will print the map exactly as it appears in the map window (without the control panel). |
|||||||||||||||||||||||||||||||||||||||||||||||||||||||||||||||||||||||||||||||||||||||
| Copy/Paste | |||||||||||||||||||||||||||||||||||||||||||||||||||||||||||||||||||||||||||||||||||||||
| To copy a map image to another program (such as a painting package), select Copy from the Edit menu. Open a painting program and paste the contents of the clipboard. | |||||||||||||||||||||||||||||||||||||||||||||||||||||||||||||||||||||||||||||||||||||||
| To copy the text of an encyclopedia entry, choose Select All from the Edit menu, then select Copy. Open a word processor or text editor and paste the contents of the clipboard. The text of the encyclopedia entry will be pasted into the document, but not the images. | |||||||||||||||||||||||||||||||||||||||||||||||||||||||||||||||||||||||||||||||||||||||
| Planetarium | |||||||||||||||||||||||||||||||||||||||||||||||||||||||||||||||||||||||||||||||||||||||
| Click the Planetarium button to start the Solar System simulator. Instructions for operating the Solar System simulator are displayed in the simulator window. The simulator allows you to view the motion of the planets and large moons at various speed factors and distances. There are also close-up views of Earth, Jupiter, Saturn and Uranus. Use the mouse to click the options at the bottom of the simulator window. Use the keyboard arrow keys to move the camera. | |||||||||||||||||||||||||||||||||||||||||||||||||||||||||||||||||||||||||||||||||||||||
| To exit the Solar System simulator and return to the main window, press the Esc key. | |||||||||||||||||||||||||||||||||||||||||||||||||||||||||||||||||||||||||||||||||||||||
| Virtual Tours | |||||||||||||||||||||||||||||||||||||||||||||||||||||||||||||||||||||||||||||||||||||||
| Click the Virtual Tours button in the Control panel to display the virtual tours selection page. There are four virtual tours. Instructions for operating the virtual tours are displayed on the tour title screens. In general the tours are controlled using the keyboard, rather than the mouse. The mars and moon rovers are controlled using the keyboard arrow keys. The Mars and Venus "flights" are controlled using the 'A' and 'Z' keys to move forward, plus the arrow keys to navigate. Although the tours are based on real topographic data, some aspects have been exaggerated to create what we hope is an enjoyable experience. | |||||||||||||||||||||||||||||||||||||||||||||||||||||||||||||||||||||||||||||||||||||||
| To exit a Virtual Tour and return to the main window, press the Esc key. | |||||||||||||||||||||||||||||||||||||||||||||||||||||||||||||||||||||||||||||||||||||||
|
|
|||||||||||||||||||||||||||||||||||||||||||||||||||||||||||||||||||||||||||||||||||||||
| Credits and Acknowledgments | |||||||||||||||||||||||||||||||||||||||||||||||||||||||||||||||||||||||||||||||||||||||
| Copyright © 1999-2003, Xamba Software Ltd and United Soft Media Verlag. All rights reserved. | |||||||||||||||||||||||||||||||||||||||||||||||||||||||||||||||||||||||||||||||||||||||
| Maps, images and text Copyright © 1999-2003, Planetary Visions Ltd. All rights reserved. See credits and acknowledgments below for additional copyright information. | |||||||||||||||||||||||||||||||||||||||||||||||||||||||||||||||||||||||||||||||||||||||
| 3D globe software Copyright © 1999-2003 RBAG software | |||||||||||||||||||||||||||||||||||||||||||||||||||||||||||||||||||||||||||||||||||||||
| Credits | |||||||||||||||||||||||||||||||||||||||||||||||||||||||||||||||||||||||||||||||||||||||
| Producers: Philip Smith and Patrick Gibbins, Xamba Software
LTD Software development: Rinat Bagoutdinov, Roman Katargin Editor-in-chief: Kevin Tildsley, Planetary Visions LTD Writers: Simon Tapper, Kevin Tildsley, Philip Eales Editorial Assistance: Hannah Powell-Smith, James Philips, Katharine Tildsley Image processing/graphics: Kevin Tildsley and Philip Eales Additional graphics and animation: Andrew Wayne Data processing (planetary and moons maps): Tim Wilkinson |
|||||||||||||||||||||||||||||||||||||||||||||||||||||||||||||||||||||||||||||||||||||||
| Acknowledgments | |||||||||||||||||||||||||||||||||||||||||||||||||||||||||||||||||||||||||||||||||||||||
| Small moons maps and digital shape data: Philip J. Stooke, University of Western Ontario (special thanks for his help with shape data for Gaspra, Ida, Mathilde, Toutatis and Vesta) Peter C. Thomas and Damon Simonelli, Cornell University Maria Zubar, Dept of Earth, Atmosphere and Planetary Science,MIT |
|||||||||||||||||||||||||||||||||||||||||||||||||||||||||||||||||||||||||||||||||||||||
|
Image sources: |
|||||||||||||||||||||||||||||||||||||||||||||||||||||||||||||||||||||||||||||||||||||||
| Copyright in the images of auroras, solar and lunar eclipses
and comets remains with: Dave Hanon, Jeff MacQuarry, Andy Steere, Hermann Gumpp, Hirokazu Yamamura, Yuuji Kitahara, Martin Mutti, Robert Reeves, Steve Bell, Tim Puckett, Chuck Vaughn |
|||||||||||||||||||||||||||||||||||||||||||||||||||||||||||||||||||||||||||||||||||||||
| Copyright in the Caliban and Sycorax images remains with:
Brett Gladman, Canadian Institute for Theoretical Astrophysics |
|||||||||||||||||||||||||||||||||||||||||||||||||||||||||||||||||||||||||||||||||||||||
| Whilst the publishers have made every effort to acknowledge all copyright ownership, in the event that copyright or acknowledgments have been omitted, please notify the publishers who will rectify the omission as soon as is practicable. | |||||||||||||||||||||||||||||||||||||||||||||||||||||||||||||||||||||||||||||||||||||||
| With thanks to: Oasis Television Ltd. Chris Hornby and Rachelle Smith for Photodesk, Spacetech Ltd. Ray Pinchard |
|||||||||||||||||||||||||||||||||||||||||||||||||||||||||||||||||||||||||||||||||||||||
|
|
|||||||||||||||||||||||||||||||||||||||||||||||||||||||||||||||||||||||||||||||||||||||
| Map scales | |||||||||||||||||||||||||||||||||||||||||||||||||||||||||||||||||||||||||||||||||||||||
|
|||||||||||||||||||||||||||||||||||||||||||||||||||||||||||||||||||||||||||||||||||||||
|
|
|||||||||||||||||||||||||||||||||||||||||||||||||||||||||||||||||||||||||||||||||||||||