8 Animation


You animate the elements of your scene by setting their location, color and size etc. for a few key frames. The computer supplies the remaining values between these keys. You can take more control of how things animate by adding more keys. Besides their basic value some keys have additional properties that you can edit for further control.
A segment is the values for the range of frames between two successive keys. You can change how fast things move between key values by editing the properties of segments.

Animation with Key Frames

You can animate your elements by simply moving them on the screen. First enable animation by clicking on the animate  button. Its background turns green  indicating that you are now animating. Change to a new frame by clicking on the frame in the time track. Then select an element and move it to a new location. Anim8or will add key frames for your element's location for these two frames and will smoothly fill in the locations for all of the frames between the keys. When you press the play button  your element will now move!
You will also notice that a spline path has been added to the scene. This is the element's path through space. You can add more points at different frames to build complex motion. You can also edit the shape of the splines by clicking on the edit spline  button on the toolbar.
Editing objects positions is described in more detail in the chapter on Animation. But there are a few things to note:
  • When the animate button is off  any change that you make will apply to the entire scene. If you move the camera, for example, it will be moved the same amount it each frame. When the animate button is on  changes that you make will only add or change keys for the current frame. Nearby frames will be smoothly changed to reflect these changes.
  • When you move or rotate an element that is a child of another element, then the change will be relative to its parent. The same is true when you rotate an element that is facing its path of movement. The change is relative.
You can edit individual key's values by double clicking on the key in the time track. See the next chapter on animation for more details.

Animating Figures with Sequences

You can also animate a figure by adding an entire sequence of key positions from a sequence. If you make a sequence that is one cycle of a walk you can then add to a scene several times in succession to make a longer walk. Sequences appear are shown in the track bar by <---->. In the track below there is a 31-frame sequence shown for three joints.

Sequences in a scene are linked to the sequence editor. Any changes that you make to a sequence will automatically appear in your scenes. For this reason you cannot modify keys that are part of a sequence in the scene editor. If you try Anim8or will ask if you want to convert that particular reference to the sequence into individual keys and continue. Converting a sequence here will not alter the original sequence, but the link between the sequence and the scene will be lost so that further editing of the sequence will not change these keys in your scene.

Controllers

Controllers manage key values for animation in the scene editor. When you move, rotate, or animate any aspect of an object that uses a key, a controller is created that holds that key. Each one manages only one aspect of the scene. For example one might control the location of an object, and another the color of a light. They contain all the keys regarding that value and any related data.
If an aspect of an object is constant for the scene and not animated then it will not have a controller. The one exception is for bones. They always have a controller for each axis in each joint that can bend. This makes it easier for you to find which bones can move when you are posing a figure.

Kinds of Controllers

There are several kinds of controllers. Each uses a different kind of data, or computes in-between values in a different manner, depending on the needs of the property that is animating.
Float
This is a ordinary number like 10.5 or -150. Like most controllers, in-between values are smoothly interpreted.
Point3
Point3s return 3 numbers per frame. Each value is smoothly interpreted without regards to the others. You use these for positions and RGB colors.
Orientation
An orientation controller returns a rotation per frame. They can set the orientation of an object or can be used for a rotational direction. When you edit these values in a dialog you see the PYR (pitch, yaw, roll) equivalent to the orientation.

Orientation is more complex that it may seem. Interpreting angles smoothly will not result in smooth rotation of your models. The order in which pitch, yaw and roll are applied is also important. Anim8or uses PYR because by applying roll last you can set it to 0 and you elements will stay "upright".

It's often easier for you to just ignore the numeric values for orientation. Simply orient things on the screen and leave the rest to the computer.
Boolean
Boolean controllers return a "yes" or "no" value. You would use one for and object's visibility if you wanted it to suddenly disappear. There is no "maybe" value for a Boolean.

Editing Keys

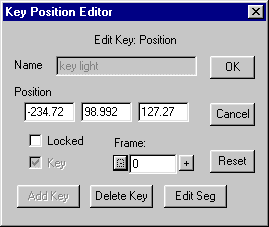
You edit a key by double clicking on its key indicator  in the track, or by clicking on the  button for its controller in an element's properties dialog.
You can edit a location key's x, y and z values in a key location dialog, and add or delete keys. Entering a frame number lets you move to any frame in your scene, and clicking on the + and - buttons move to the next and previous frames. You can see but not change non-key frame values. The computer supplies them.

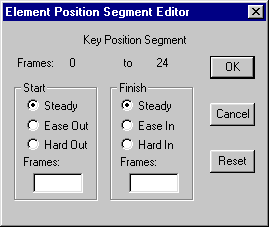
The Edit Seg button allows you to edit the segment next to the current frame.


Editing Segments

Oops! Segment properties didn't quite make it into this release. These values won't do anything for you ... yet. If I get them working soon I'll make a new release but in the mean time you'll just have to be patient. Sorry!
By default values vary at a consistent rate between keys. But this is not always what you want. How quickly a character reaches full speed when starting to move, or how long it takes to slow down when stopping, are important elements in animation. We normally think of small, lightweight objects as accelerating rapidly to full speed, but large or heavy ones as taking a long time to build up steam. In animation terms something is said to ease out and ease in if it is slow to start and stop.

By editing the segment's properties you can change the speed a value changes in several ways. You can set the number of frames that it takes an object to change speeds, size, color, etc. at the start or end of a segment with the ease in and ease out settings. You can also select the opposite: hard out and hard in where you might want an object to accelerate at the end just before it splats into a wall to increase the visual effect.

This page was last updated on March 15, 2003
Copyright 2003 R. Steven Glanville