6 Sequence Editor


The Sequence Editor is where you create most of the movement that gives personality and style to your characters. A sequence is a short block of key frame poses, such as one cycle of a walk. The easiest way you can animate a figure is by placing it in a scene and adding one or more sequences.
Longer animations can be built from several short sequences, such a building a long walk out of multiple applications of a walk cycle. Anim8or automatically joins the adjacent sequences into a single, smooth movement, using the key frame positions as guides. Here is a screen shot of the Sequence Editor in action:


Time Track

The time track at the base of the Sequence Editor indicates the current frame shown in the viewports. The frames that have one or more joints set in key positions are marked with small black squares  in them. The numbers :01 show the time in seconds since the start of the Sequence of a position on the track. The current frame is highlighted with a dark gray background.

You can expand the track to see a tree view showing details of individual joint's keys by clicking on the plus symbol  next to the title.

Key positions are shown for each joint/angle with a small black square in the frame. You can also select a joint by clicking on it in the expanded track. Resize the expanded track view by clicking and dragging the vertical resize bar  at the bottom of the toolbar up or down.
The track will automatically scroll to keep the current frame visible when a sequence is too long to show all at once. If you want to see a frame that is off the window, you can either use the Settings->Sequence command to set the frame numerically, or you can use the Left or Right Arrow keys to play the sequence forwards or backwards until you reach your frame.

You can move to a particular frame in a sequence by clicking on that frame in the track. If you click and drag the mouse it will select a range of frames. Clicking on the name of a bone selects that bone and highlights it in the track window. Clicking on the title of the sequence selects all bones. Mouse buttons have their usual meaning on the bone names: the right button adds to the selection, and the middle button subtracts. Use Shift-Click to select a new frame range while still keeping the same current frame.

Sequence Basics

You can't animate a character before you have one! So it isn't surprising that you must first design a character in the Figure Editor before you can give it any movement. Once you have one, you switch into the Sequence Editor and a new, blank sequence is created. Select the Settings->Sequence menu item to show the Sequence's settings dialog:

Click on the  button and select your figure from the list. You can also set the number of frames in the sequence in this dialog. Now your figure will appear in the viewports and you can begin to animate it. You can also set the Sequence's length and set the current view to a particular frame with this dialog.
The sequence editor has two modes: edit and viewpoint. You click on one of the icons to switch between these two modes.

Sequence/Edit mode is the initial mode that the sequence editor starts in. You use it to set all of your poses and to view the motion of you've created.

Sequence/Viewpoint mode allows you to do the usual pan, scale, rotate, and size-to-fit any or all of your views of your workspace.

Edit Operations


You use this button to select bones in your characters. The right mouse button allows you to select multiple bones.

This mode allows you to adjust the angle of your character's joints to new positions and for new key frames.

(This is the button for Inverse Kinematics, a neat way to pose and animate your characters. Unfortunately it's grayed out and disabled because it isn't quite ready for prime time.  Sorry! It should be in a later release...)

Visibility Options

  These controls allow you to show different aspects of your character on the screen when you are working.

This button toggles the visibility of the axis and the range of motion of any selected joints.


These buttons control the visibility of the bones and body parts of your character, like in the Figure Editor.

Use this ghost view button to show multiple frames of a sequence simultaneously. You can compare previous key poses and in-betweens that Anim8or creates with another frame's to help see how they fit.

Animate Button


This is the animate button. It is your magic wand for making things move. You use it to add and change key positions. When you change the angle of a bone you sometimes want to do it for all frames in a sequence, and sometimes just in the current frame. The key button gives you this choice. If it is not pressed changes apply to the entire sequence. If it is pressed only the current frame is changed. The next sections explain this in more detail.

What is a Key?

If you had to set the position of each joint of your figures in each frame of an animation, that's about all you'd ever do! Fortunately there is an easier way to animate called key frames. With it you pose your character in a few frames that represent what it should be doing in that particular frame, and the computer smoothly fills in the in-between frames. You get the best results, naturally, if the frames you choose represent the significant points in your character's movement. That's why they're called "key".
There is no reason that all the joints have to be key in the same frame. If your character is walking forward an slowly turning his head you may want dozens of key positions in the legs but only a couple in the head turn.

Making a Key Pose

When you first create a Sequence, your character is shown in its default position. You can change its position by bending its joints. But you can only bend the ones that you made flexible in the Figure Editor, and only in the ways that you said they could bend.
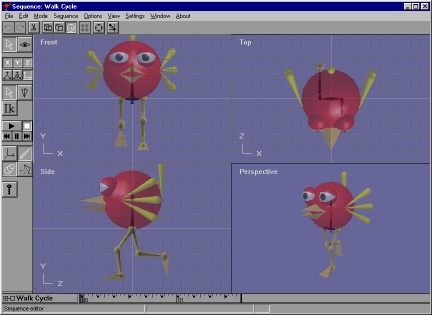
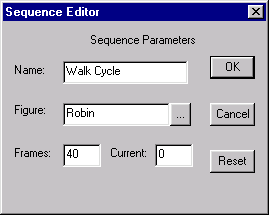
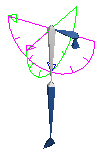
To make a key pose you must first select the joint or joints that you want to bend. Showing the axis and even hiding the body parts can be helpful. Enter rotate Angle mode , then enable Animation . Click on the tip  of the joint and drag the mouse to rotate it. You have to pick a joint that can be rotated, and you have to use the correct mouse button for the axis that you want to rotate.

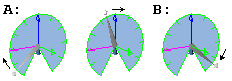
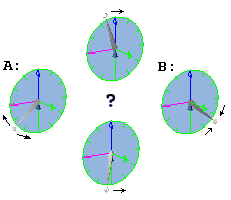
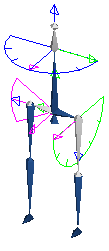
To rotate around the X-axis, which is shown in green, use the left mouse button. The joint will try to follow the mouse.

To rotate around the Y axis shown in blue use the right button. Since the Y-axis rolls the joint around the bone's length, and doesn't change the direction it's pointing, you have to move the mouse to the left or right to move the joint.

To rotate around the Z-axis shown in violet, you have two choices. You can use the middle mouse button if you have a 3-button mouse, or you can use the left button. If the joint can rotate around both 
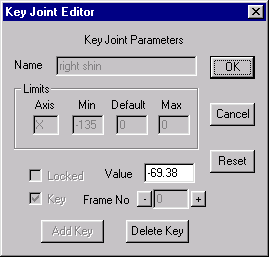
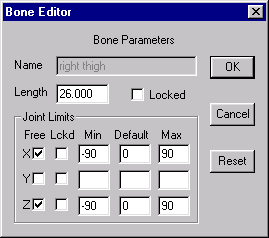
the X and Z-axis, then you have to disable the X-axis first. Double click on the bone and Lock the X-axis by checking the "Lckd" box in the X row, as shown below:


That's all there is to it! You've created a key position for a joint. To make your character move, go to another frame (click on it in the track window) and make a second key position. Click on the play button  to see it move.
Continue setting the positions of any joints that need changing until you are satisfied with your pose.

Editing Key Frames

You can edit key frame values for individual joints. Double click on the joint's track in the expanded view of the track and the key frame editor dialog will appear:

The current value of this joint angle is shown next the value, and the current frame next to Frame No. If this is a key frame for this joint you will be able to enter a new value for the key, and you can delete the key with the Delete Key button. If it isn't, you can make it a key with the Add Key button. The plus + and minus - buttons advance the current frame by one in either direction.

A Circle Has 720 Degrees

Sometimes rotation is not quite a simple as giving the first and last positions and letting the computer figure out what to do in between. For constrained joints (those with limits on how they can be rotated) like the one at the right, things are simple. Moving from position A to position B simply rotates to the right.

However for a free or unconstrained rotation this doesn't quite work. There are two directions that the joint can move: clockwise or counter clockwise.

Anim8or resolves this dilemma by expanding the range of angles that you can use to be from -360 degrees to +360 degrees. There are then two values that represent the same position. One-quarter turn to the right is either +90 or -270. If the difference between the angles of less than 360 degrees, the joint simply moves between the two. If it's greater than 360 degrees then the joint moves the opposite way. It's not really as confusing as it seems once you've tried it out a time or two.


Making a Sequence

A Sequence can be thought of as a bunch of Key Poses played back in order. Each joint's position from one key frame is linked to the prior and following positions. Anim8or fills in joint positions for frames in-between key poses. When viewed this way, your character appears to the eye as if it is making one continuous motion. The smoothness and speed of the motion depends on how fast and in what ways the poses change. A large part of the work in animation concerns getting the motion just right.
After you finish the first key pose, set the sequence to a later frame by clicking on the appropriate spot in the track, or by using the left and right arrow keys. Then make a second key pose. You don't have to set the positions of all the joints, just the ones that need it. If one part of your character is moving at a slow pace, or needs less detailed control, save yourself some work. You can always go back and add more keys if you find you need them.

If you enable Ghost Views  you can see the relative positions of other frames. Then it's easier to adjust things relative to one another. This view can sometimes get rather confusing. It can help to hide body parts and just animate the skeleton.

You can change which frames are ghosted with the Options->GhostSettings command. They can be limited to just key frames, or to those a fixed number of frames apart. You can also adjust the number of ghosts shown.


This page was last updated on March 15, 2003
Copyright 2003 R. Steven Glanville